What is JWT? How do Secret, Public, Private Keys actually work?
This guide covers two JWT authentication approaches for the English-Uzbek Translator API:
- Secret Key + JWT (Symmetric – Traditional approach)
- Public + Private Key (Asymmetric – Current implementation)
📋 Table of Contents
- Overview
- Approach 1: Secret Key + JWT
- Approach 2: Public + Private Key
- Comparison
- Best Practices
- Troubleshooting
Overview
What is JWT?
JSON Web Tokens (JWT) are a secure way to transmit information between parties. A JWT consists of three parts:
- Header: Algorithm and token type
- Payload: Claims (user data)
- Signature: Verification signature
Authentication Flow

Both approaches follow the same basic flow:
- Client obtains a JWT token
- Client includes token in API requests
- Server verifies token and processes request
Approach 1: Secret Key + JWT
🔍 When to Use
- Single application environment
- Centralized token generation (same server creates and verifies)
- Simple deployment scenarios
- Internal APIs within same organization
🛠️ Setup
Step 1: Generate Secret Key
# Generate a secure secret key
node -e "console.log(require('crypto').randomBytes(64).toString('hex'))"
Step 2: Configure Environment
# .env file
JWT_SECRET=your_64_character_secret_key_here
JWT_EXPIRES_IN=24h
JWT_ALGORITHM=HS256
Step 3: Server Configuration
// authService.js (Secret Key approach)
import jwt from 'jsonwebtoken';

const JWT_SECRET = process.env.JWT_SECRET;
const JWT_ALGORITHM = 'HS256';

class AuthService {
  // Generate token
  generateToken(user) {
    return jwt.sign(
      {
        sub: user.id,
        username: user.username,
        iat: Math.floor(Date.now() / 1000)
      },
      JWT_SECRET,
      {
        expiresIn: process.env.JWT_EXPIRES_IN || '24h',
        algorithm: JWT_ALGORITHM
      }
    );
  }

  // Verify token
  verifyToken(token) {
    return jwt.verify(token, JWT_SECRET, { algorithms: [JWT_ALGORITHM] });
  }
}
🔐 Token Generation Example
// Example: Creating a JWT token (server-side)
const authService = new AuthService();

const user = {
  id: "user123",
  username: "john_doe"
};

const token = authService.generateToken(user);
console.log("Generated Token:", token);

// Output: eyJhbGciOiJIUzI1NiIsInR5cCI6IkpXVCJ9.eyJzdWIiOiJ1c2VyMTIzIiwidXNlcm5hbWUiOiJqb2huX2RvZSIsImlhdCI6MTY0MjAwMDAwMCwiZXhwIjoxNjQyMDg2NDAwfQ.signature
📡 Making API Requests
# Using curl
curl -X POST http://localhost:8000/translate
  -H "Authorization: Bearer eyJhbGciOiJIUzI1NiIsInR5cCI6IkpXVCJ9..."
  -H "Content-Type: application/json"
  -d '{"text": "Hello world"}'
// Using JavaScript/Node.js
const response = await fetch('http://localhost:8000/translate', {
  method: 'POST',
  headers: {
    'Authorization': `Bearer ${token}`,
    'Content-Type': 'application/json'
  },
  body: JSON.stringify({ text: 'Hello world' })
});
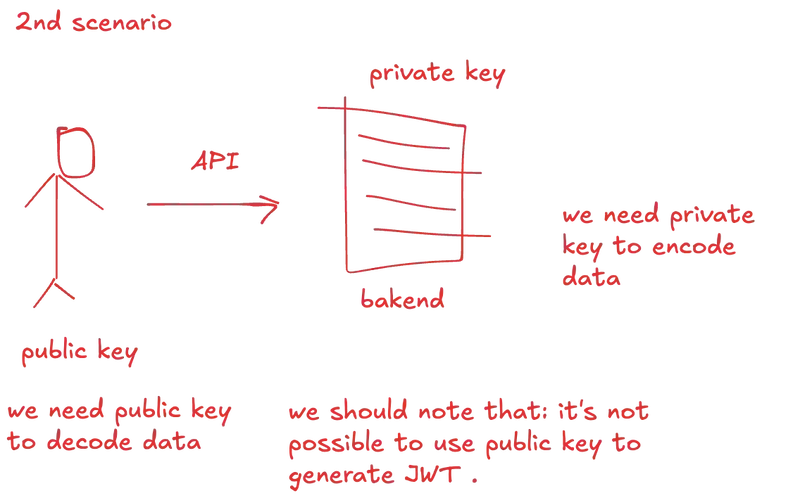
Approach 2: Public + Private Key
🔍 When to Use (Current Implementation)
- Distributed systems (microservices)
- Third-party integration
- Enhanced security requirements
- Token generation separation from verification
- Multiple token issuers
🛠️ Setup
Step 1: Generate RSA Key Pair
# Using the provided generator
npm run generate-keys

# Or manually with OpenSSL
openssl genrsa -out jwt-private.key 2048
openssl rsa -in jwt-private.key -pubout -out jwt-public.key
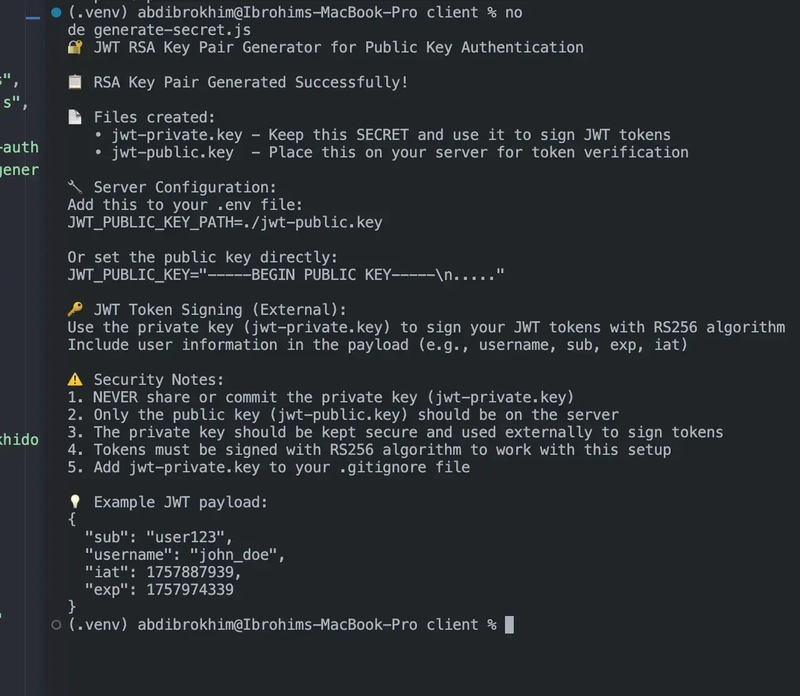
Step 2: Configure Environment
# .env file
JWT_PUBLIC_KEY="-----BEGIN PUBLIC KEY-----
MIIBIjANBgkqhkiG9w0BAQEFAAOCAQ8AMIIBCgKCAQEA...
-----END PUBLIC KEY-----"
JWT_ALGORITHM=RS256
Step 3: Server Configuration (Current)
// authService.js (Public Key approach - current implementation)
import jwt from 'jsonwebtoken';

const JWT_PUBLIC_KEY = process.env.JWT_PUBLIC_KEY;
const JWT_ALGORITHM = process.env.JWT_ALGORITHM || 'RS256';

class AuthService {
  constructor() {
    this.jwtPublicKey = this.loadPublicKey();
  }

  loadPublicKey() {
    if (process.env.JWT_PUBLIC_KEY) {
      return process.env.JWT_PUBLIC_KEY.replace(/\n/g, 'n');
    }
    console.warn('⚠️  WARNING: No JWT public key found!');
    return null;
  }

  // Only verify tokens (no generation on server)
  verifyToken(token) {
    return new Promise((resolve, reject) => {
      jwt.verify(token, this.jwtPublicKey, { algorithms: [this.jwtAlgorithm] }, (err, decoded) => {
        if (err) reject(err);
        else resolve(decoded);
      });
    });
  }
}
🔐 Token Generation (External)
Important: With public/private key approach, tokens are generated externally using the private key.
Using Node.js
// external-token-generator.js
import jwt from 'jsonwebtoken';
import fs from 'fs';

const privateKey = fs.readFileSync('./jwt-private.key', 'utf8');

function generateToken(user) {
  const payload = {
    sub: user.id,
    username: user.username,
    iat: Math.floor(Date.now() / 1000),
    exp: Math.floor(Date.now() / 1000) + (24 * 60 * 60) // 24 hours
  };

  return jwt.sign(payload, privateKey, { algorithm: 'RS256' });
}

// Example usage
const user = { id: "user123", username: "john_doe" };
const token = generateToken(user);
console.log("Generated Token:", token);
Using Python
# external_token_generator.py
import jwt
import time
from cryptography.hazmat.primitives import serialization

# Load private key
with open('./jwt-private.key', 'rb') as f:
    private_key = serialization.load_pem_private_key(
        f.read(),
        password=None
    )

def generate_token(user_id, username):
    payload = {
        'sub': user_id,
        'username': username,
        'iat': int(time.time()),
        'exp': int(time.time()) + (24 * 60 * 60)  # 24 hours
    }

    return jwt.encode(payload, private_key, algorithm='RS256')

# Example usage
token = generate_token("user123", "john_doe")
print(f"Generated Token: {token}")
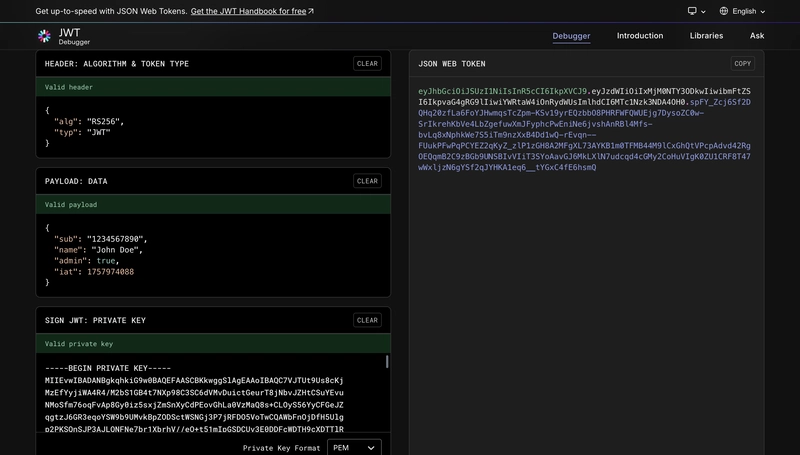
Using JWT.io (Manual)
- Go to jwt.io
- Select RS256 algorithm
- Enter your payload:
{
  "sub": "user123",
  "username": "john_doe",
  "iat": 1642000000,
  "exp": 1642086400
}
- Paste your private key in the “Private Key” field
- Copy the generated token
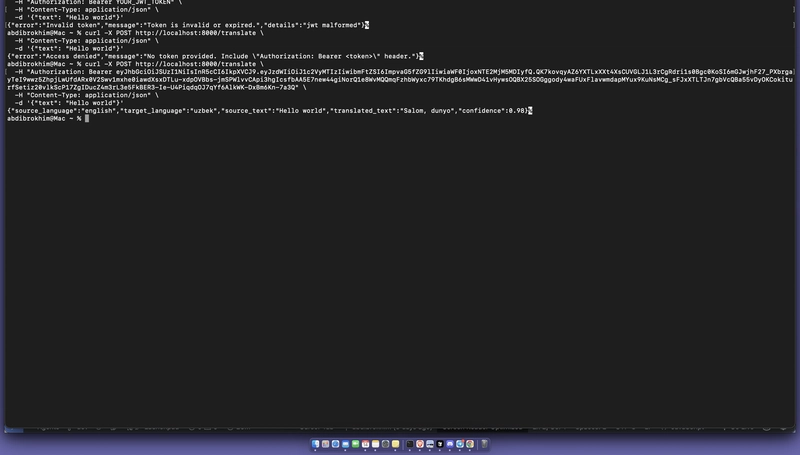
📡 Making API Requests
# Check auth status
curl http://localhost:8000/auth/status

# Verify your token
curl -X GET http://localhost:8000/auth/verify
  -H "Authorization: Bearer eyJhbGciOiJSUzI1NiIsInR5cCI6IkpXVCJ9..."

# Make translation request
curl -X POST http://localhost:8000/translate
  -H "Authorization: Bearer eyJhbGciOiJSUzI1NiIsInR5cCI6IkpXVCJ9..."
  -H "Content-Type: application/json"
  -d '{"text": "Hello world"}'
🧪 Testing
# Run the test suite with your token
JWT_TOKEN="your_generated_token_here" npm run test-auth

# Test the client
JWT_TOKEN="your_generated_token_here" node jwt-client.js
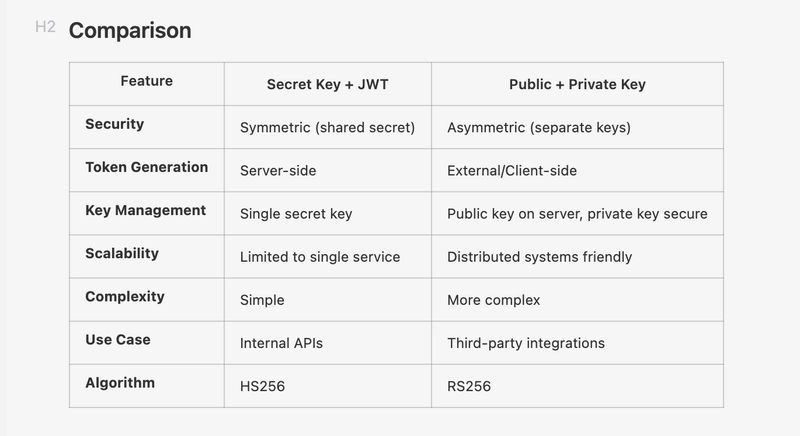
Comparison
| Feature | Secret Key + JWT | Public + Private Key |
|---|---|---|
| Security | Symmetric (shared secret) | Asymmetric (separate keys) |
| Token Generation | Server-side | External/Client-side |
| Key Management | Single secret key | Public key on server, private key secure |
| Scalability | Limited to single service | Distributed systems friendly |
| Complexity | Simple | More complex |
| Use Case | Internal APIs | Third-party integrations |
| Algorithm | HS256 | RS256 |
Security Considerations
Secret Key Approach
- ✅ Simple implementation
- ✅ Fast verification
- ❌ Shared secret vulnerability
- ❌ Key rotation complexity
Public/Private Key Approach
- ✅ No shared secrets
- ✅ Easy key rotation
- ✅ Distributed token generation
- ❌ Slightly slower verification
- ❌ More complex setup
Best Practices
🔐 Security
- Never commit private keys to version control
- Use environment variables for sensitive data
- Implement token expiration (reasonable timeframes)
- Validate all JWT claims (exp, iat, sub, etc.)
- Use HTTPS in production
- Implement rate limiting for authentication endpoints
🗂️ Key Management
# Add to .gitignore
echo "jwt-private.key" >> .gitignore
echo ".env" >> .gitignore

# Set proper file permissions
chmod 600 jwt-private.key  # Private key - owner read/write only
chmod 644 jwt-public.key   # Public key - readable by others
🏗️ Token Structure
Recommended JWT payload structure:
{
  "sub": "user_unique_identifier",
  "username": "human_readable_name",
  "iat": 1642000000,
  "exp": 1642086400,
  "roles": ["user", "translator"],
  "permissions": ["read", "translate"]
}
🔄 Token Refresh
// Check token expiration before requests
function isTokenExpired(token) {
  try {
    const decoded = jwt.decode(token);
    return decoded.exp < Date.now() / 1000;
  } catch (error) {
    return true;
  }
}

// Auto-refresh logic
if (isTokenExpired(currentToken)) {
  currentToken = await generateNewToken();
}
Troubleshooting
Common Issues
1. “JWT public key not configured”
# Solution: Set the public key in environment
export JWT_PUBLIC_KEY="-----BEGIN PUBLIC KEY-----..."
2. “Token verification failed”
# Check algorithm mismatch
# Ensure your token is signed with RS256 for public/private key approach
# Ensure your token is signed with HS256 for secret key approach
3. “Token expired”
// Check token expiration
const decoded = jwt.decode(token);
console.log('Token expires at:', new Date(decoded.exp * 1000));
4. “Invalid signature”
# Ensure you're using the correct private key for signing
# Verify the public key matches the private key used for signing
openssl rsa -in jwt-private.key -pubout | diff - jwt-public.key
Debug Mode
# Enable debug logging
DEBUG=jwt* npm start

# Check token details without verification
node -e "console.log(JSON.stringify(require('jsonwebtoken').decode('your_token_here'), null, 2))"
Testing Endpoints
# Health check (no auth required)
curl http://localhost:8000/health

# Auth status
curl http://localhost:8000/auth/status

# Token verification
curl -H "Authorization: Bearer YOUR_TOKEN" http://localhost:8000/auth/verify
🎯 Next Steps
- Choose your approach based on your requirements
- Generate appropriate keys (secret or RSA pair)
- Configure environment variables
- Test token generation and verification
- Implement in your application
- Set up monitoring and logging
Production Checklist
- [ ] Keys stored securely (env vars, key management service)
- [ ] Private keys never on server (public/private approach)
- [ ] HTTPS enabled
- [ ] Token expiration configured
- [ ] Rate limiting implemented
- [ ] Logging and monitoring set up
- [ ] Error handling implemented
- [ ] Documentation updated
This tutorial covers both JWT authentication approaches. Choose the one that best fits your architecture and security requirements.

