What Are Webhooks, and How Do You Implement Them?
Imagine a customer just completed a payment at your online store. Now your server needs to know if the transaction went through, so it checks every few seconds, repeatedly asking: ‘Is the payment done yet?’ This approach is called polling, and it’s wasteful. Your server keeps asking for updates that aren’t there yet, burning through resources while missing real-time events.
Webhooks flip this around. Instead of your server constantly asking “Is the payment done yet?”, your payment provider notifies your server the instant the payment goes through.
In this guide, you’ll learn what webhooks are, how they work, and most importantly, how to implement them with Flutterwave to build better payment experiences for your users.
What Are Webhooks?
Webhooks are automated messages sent from one application to another when a certain event occurs. In the context of Flutterwave, webhooks are HTTP POST requests that notify your application about payment events in real time.
Here’s a simple way to think about it: Webhooks are like push notifications for your server. If you’re waiting to receive a text message, you don’t have to keep opening the messaging app to check for new messages; your phone alerts you immediately. Webhooks work the same way for your application.
Instead of your server constantly polling Flutterwave for updates about a transaction, which is slow and inefficient, Flutterwave automatically sends you a notification the moment a new event happens.
In the intro to this guide, we mentioned polling, which is referred to as the Pull Model. Let’s understand the push and pull paradigm.
The Push vs. Pull Paradigm
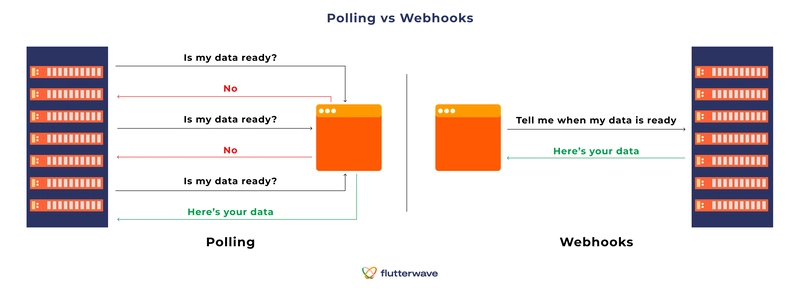
Webhooks use the “push” model: the server sends data to your application when events occur, while traditional polling uses the “pull” model: your application repeatedly asks the server for updates. Here’s how they compare:
| Feature | Webhooks (Push Model) | API Polling (Pull Model) |
|---|---|---|
| Data Flow | Server pushes data to client when an event occurs. | The client repeatedly makes requests to retrieve data from the server. |
| Efficiency | High. Communication only happens when there’s new data. | Low. Wastes resources on requests that yield no new data. |
| Latency | Near real-time. Data is sent instantly. | Delayed. Depends on the polling interval. |
| Server Load | Low. Load is proportional to event frequency. | High. Constant load from all clients. |
| Setup Complexity | More complex initially (requires a public endpoint). | Simpler to implement initially. |
Now you know the difference between webhooks and API polling, let’s look at how webhooks work and how to implement them with Flutterwave in the next sections.
How Do Webhooks Work?
Understanding how webhooks work helps you implement them correctly. Here’s the complete flow of a webhook in action:
- The Trigger: The process begins when a specific event occurs in the webhook provider’s system. This could be a customer successfully authorizing a payment, a bank transfer failing, or a subscription being renewed.
- Payload Generation: Upon triggering, the provider’s system generates a JSON object, known as the payload. This payload contains detailed information about the event that just occurred.
- The HTTP POST Request: The provider then sends this JSON payload in the body of an HTTP POST request to the webhook URL you have configured. This URL must be a publicly accessible endpoint on your server capable of receiving POST requests.
- Receipt and Processing: Your application’s server, often called a “webhook listener,” receives this incoming HTTP request. The first and most important step for your listener is to verify the authenticity of the request to ensure it genuinely came from the legitimate provider. (With Flutterwave, this verification is done using the verif-hash header.)
-
The Acknowledgment Handshake: To confirm that it has successfully received the webhook, your listener must respond with a
200 OKHTTP status code. This response signals to the provider that the delivery was successful, and no further action is needed for that event. -
Retry Mechanism: If your endpoint fails to return a
200 OKstatus code, for example, if it returns a4xxor5xxerror, or if the request times out, most providers will consider the delivery to have failed and attempt to resend the webhook. (Flutterwave, for instance, will retry three times with 30-minute intervals between each attempt if you have retries enabled in your dashboard.)
How To Implement Webhooks with Flutterwave
Now let’s get into the practical part: implementing webhooks in your application. In this guide, we’ll use Express.js and the Flutterwave v3 API.
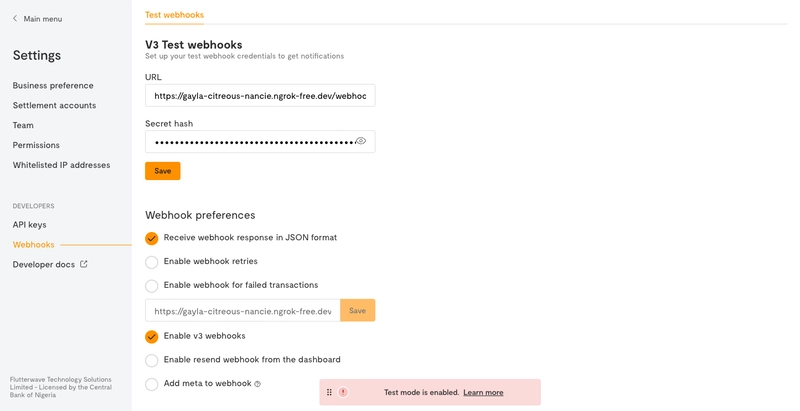
Step 1: Configure Your Flutterwave Dashboard
Before you can receive webhooks, you must specify the webhook endpoint you want Flutterwave to send an update to. This is done through your dashboard.
- Log in to your Flutterwave dashboard.
- Navigate to Settings → Webhooks.
- Enter your webhook URL in the Webhook URL field (e.g.,
https://yourdomain.com/webhooks/flutterwave). For local development, we will use a temporary URL from a tool called ngrok, which we’ll cover in step 5. - In the Secret Hash field, enter a long, random, and unpredictable string. Never store this in your code or configuration files; always use environment variables.
- Check the boxes for the webhook options:
- Receive webhook response in JSON format
- Enable webhook retries
- Enable webhook for failed transactions
- Enable V3 webhooks
- Click Save.
By the time you’re done, your webhooks settings should look like this:
Step 2: Set Up Your Webhook Endpoint
Here, we will build our webhook endpoint using Node.js and Express.js. This endpoint allows one app (Flutterwave) to communicate with your web app in real time. First, we need to set up our project and install the necessary dependencies:
-
expressfor the web server -
body-parserto handle incoming request bodies -
cryptofor signature verification -
dotenvto manage environment variables
    mkdir flutterwave-webhook-handler
    cd flutterwave-webhook-handler
    npm init -y
    npm install express body-parser crypto dotenv
Create a .env file in your project’s root directory to store your secret hash:
FLW_SECRET_HASH=your_super_secret_hash_from_the_dashboard
Next, create an endpoint in your Express application to receive webhooks from Flutterwave. This endpoint needs to capture the raw request body because you’ll need it to verify the webhook signature.
    // in app.js
    const express = require('express');
    const crypto = require('crypto');
    const app = express();

    // Middleware to capture raw body for signature verification
    app.use(express.json({
      verify: (req, res, buf) => {
        req.rawBody = buf.toString();
      }
    }));

    // Webhook endpoint
    app.post('/webhooks/flutterwave', async (req, res) => {
      try {
        // We'll add verification and processing logic here
        console.log('Webhook received:', req.body);

        // Always respond with 200 quickly
        res.status(200).send('Webhook received');
      } catch (error) {
        console.error('Webhook error:', error);
        res.status(500).send('Error processing webhook');
      }
    });

    const PORT = process.env.PORT || 3000;
    app.listen(PORT, () => {
      console.log(`Server running on port ${PORT}`);
    });
In the code above, a few things are happening that you should take note of:
- We use
express.raw({ type: 'application/json' })for our webhook route. This is important because we need the raw, un-parsed request body as a buffer to compute the HMAC hash correctly. Standard JSON middleware likeexpress.json()would parse the body, altering it and causing the signature verification to fail. - If verification fails, it immediately responds with a
500and stops processing. - After successful verification, it sends a
200 OKresponse.
Note: Any time-consuming business logic should be handed off to a background process or queue after this response is sent to avoid timeouts.
Step 3: Verify Webhook Signatures
Anyone can send a POST request to your webhook URL, so you need to verify that incoming webhooks are actually from Flutterwave.
Flutterwave signs every webhook with your secret hash and includes the signature in the verif-hash header. Here’s how to verify it:
    function verifyWebhookSignature(payload, signature, secretHash) {
      // Create a hash of the payload using your secret hash
      const hash = crypto
        .createHmac('sha256', secretHash)
        .update(payload)
        .digest('hex');

      // Compare with the signature from Flutterwave
      return hash === signature;
    }

    app.post('/webhooks/flutterwave', async (req, res) => {
      try {
        const signature = req.headers['verif-hash'];
        const secretHash = process.env.FLW_SECRET_HASH;

        // Verify the webhook is from Flutterwave
        if (!signature || !verifyWebhookSignature(req.rawBody, signature, secretHash)) {
          console.error('Invalid webhook signature');
          return res.status(401).send('Unauthorized');
        }

        // Webhook is verified, safe to process
        const webhookData = req.body;

        // Process the webhook data
        await processWebhook(webhookData);

        res.status(200).send('Webhook processed');
      } catch (error) {
        console.error('Webhook error:', error);
        res.status(500).send('Error processing webhook');
      }
    });
Step 4: Process Webhook Events
Once verified, you can process the webhook based on the event type. Each specific event triggers different actions in your application. A successful payment might send a confirmation email, while a failed transfer might notify your support team. Flutterwave sends different events for different actions. Here’s how to handle the most common ones:
    async function processWebhook(webhookData) {
      const { type, data } = webhookData;

      switch (type) {
        case 'charge.completed':
          await handleSuccessfulCharge(data);
          break;

        case 'transfer.completed':
          await handleTransferCompleted(data);
          break;

        default:
          console.log(`Unhandled webhook type: ${type}`);
      }
    }

    async function handleSuccessfulCharge(data) {
      const { id, tx_ref, amount, status, customer } = data;

      // Only process successful transactions
      if (status !== 'successful') {
        console.log(`Payment ${id} not successful: ${status}`);
        return;
      }

      // Check if you've already processed this webhook (idempotency)
      const alreadyProcessed = await checkIfProcessed(id);
      if (alreadyProcessed) {
        console.log(`Webhook ${id} already processed`);
        return;
      }

      // Update your database
      await updatePaymentStatus(tx_ref, 'completed');

      // Send confirmation email to customer
      await sendConfirmationEmail(customer.email, amount);

      // Mark webhook as processed
      await markWebhookProcessed(id);

      console.log(`Payment ${id} processed successfully`);
    }

    async function handleTransferCompleted(data) {
      const { id, reference, status, amount } = data;

      if (status === 'SUCCESSFUL') {
        await updateTransferStatus(reference, 'completed');
        console.log(`Transfer ${id} completed: ${amount}`);
      } else {
        await updateTransferStatus(reference, 'failed');
        console.log(`Transfer ${id} failed`);
      }
    }
Step 5: Test Your Webhooks
Since your development machine is not on the public internet, external web services like Flutterwave cannot reach it directly. ngrok is a tool that solves this by creating a secure public URL that tunnels traffic directly to a port on your local machine.
-
Install Ngrok: Download and install
ngrokfrom the official website. - Authenticate: Connect your ngrok agent to your account by running the command provided in your ngrok dashboard (this is usually a one-time setup):
ngrok config add-authtoken <YOUR_NGROK_AUTHTOKEN>
3. Start Your Local Server: Run your Node.js application:
node app.js
Your server is now listening on port 3000.
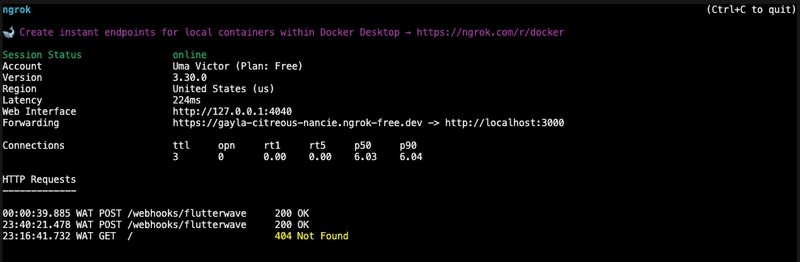
4. Start the ngrok Tunnel: In a new terminal window, tell ngrok to forward public traffic to your local port 3000:
ngrok http 3000
5. Get Your Public URL: ngrok will display a screen with a public “Forwarding” URL that looks something like https://random-string.ngrok-free.app. This is your temporary public webhook URL.
6. Update Flutterwave Dashboard: Copy the HTTPS version of the ngrok URL and append your webhook route (e.g., https://random-string.ngrok-free.app/webhooks/flutterwave). Paste this full URL into the Webhook URL field in your Flutterwave dashboard’s Test Mode settings.
You can perform a test transaction with the Flutterwave bank transfer endpoint. Just make sure to use your test mode secret key as the authorization header. You can get your secret key at Settings → API key in your dashboard.
After your test transaction, look at your terminal, and you can see the post request made by Flutterwave to the webhook handler you created.
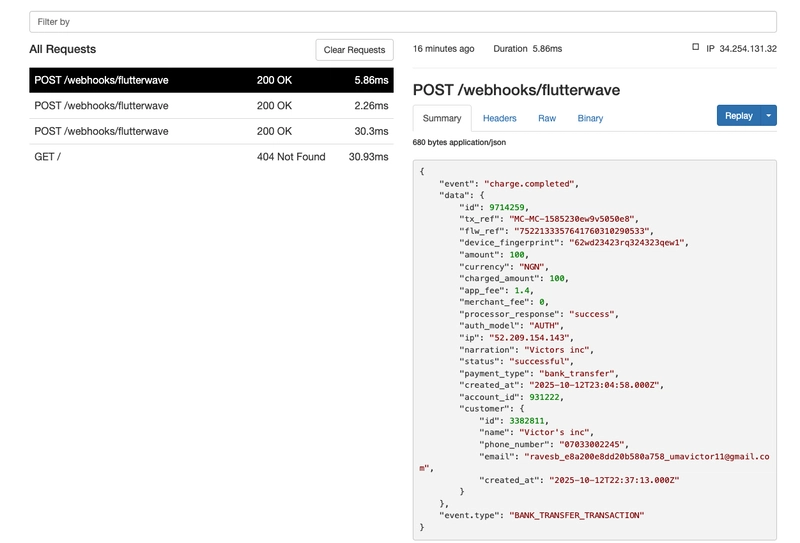
You can also open ngrok’s web interface (at http://localhost:4040) to inspect the full details of every request and response, including headers and body. You can even replay requests with a single click, which is invaluable for debugging your handler logic without having to perform a new transaction every time.
You have now learned how to create a webhook handler and test a webhook from Flutterwave, but you still need to follow some best practices to make sure your webhook is secure. Let’s look at some best practices next.
Best Practices for Webhook Implementation
Following these best practices will help you build a reliable, secure webhook implementation:
1. Always Use HTTPS
Never use HTTP for webhook endpoints. Flutterwave requires HTTPS, and for good reason. It encrypts the data in transit, protecting sensitive payment information from being intercepted. If you’re testing locally, tools like ngrok automatically provide HTTPS URLs.
2. Verify Every Webhook Signature
Never trust a webhook just because it arrived at your endpoint. Always verify the verif-hash header using your secret hash. This protects you from:
- Attackers sending fake payment confirmations
- Replay attacks where someone tries to resend captured webhooks
- Unauthorized access to your webhook endpoint
Without verification, anyone could send fake “payment successful” webhooks to your server. You can read more on securing webhooks in our guide on webhook security.
3. Respond Quickly (Within 60 Seconds)
Flutterwave times out webhook requests after 60 seconds. If your server takes longer to respond, Flutterwave considers it a failure and retries the webhook.
Respond immediately with a 200 status, then process any heavy logic asynchronously:
    app.post('/webhooks/flutterwave', async (req, res) => {
      // Verify signature
      if (!verifyWebhookSignature(req.rawBody, req.headers['verif-hash'], process.env.FLW_SECRET_HASH)) {
        return res.status(401).send('Unauthorized');
      }

      // Acknowledge receipt immediately
      res.status(200).send('Received');

      // Process webhook asynchronously (don't await here)
      processWebhookAsync(req.body).catch(error => {
        console.error('Background processing error:', error);
      });
    });
4. Make Your Endpoint Idempotent
Webhooks can arrive multiple times for the same event due to network issues or retries. Your endpoint should handle duplicate webhooks gracefully without creating duplicate orders or charging customers twice.
The best way to handle this is by tracking which webhooks you’ve already processed:
    // Simple in-memory store (use a database in production)
    const processedWebhooks = new Set();

    async function checkIfProcessed(webhookId) {
      return processedWebhooks.has(webhookId);
    }

    async function markWebhookProcessed(webhookId) {
      processedWebooks.add(webhookId);
      // Also save to your database for persistence
      await saveProcessedWebhookToDb(webhookId);
    }
Each webhook from Flutterwave includes a unique id field. Store this ID when you process a webhook, and check it before processing future webhooks.
5. Handle Retries Properly
If your webhook endpoint returns an error status code (anything other than 2xx), Flutterwave will retry sending the webhook up to three times with 30-minute intervals between attempts. This is helpful for temporary failures (your server was restarting, database connection issue, etc.), but you need to make sure your webhook processing is idempotent so these retries don’t cause problems.
Wrapping Up
Webhooks are the backbone of modern payment integrations. Instead of constantly polling your payment provider’s API, webhooks let you receive notifications and real-time data instantly when payment events happen. Webhooks let Flutterwave notify your application almost instantly when payment events happen. No polling, no delays, just real-time updates to your server.
One of the keys to great payment experiences is keeping your customers informed every step of the way. Webhooks make that possible.
Ready to implement webhooks in your application? Check out Flutterwave’s webhook documentation for detailed API references.
