UV Mapping in Mini Micro
Mini Micro version 1.2.5 came out this week, a fairly minor update that fixed a couple of obscure bugs, but also introduced one big feature: the ability to change the texture coordinates of a sprite. This feature is sometimes known as “UV mapping.”
What’s UV Mapping?
Just as positions on a screen are usually described as X (horizontal) and Y (vertical), positions on a texture (any image used to define the colors in a sprite or tile map) are described as U (horizontal) and V (vertical).
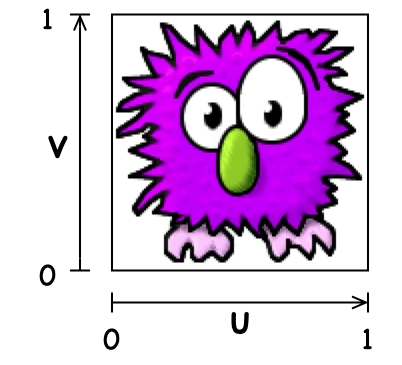
A sprite in Mini Micro has four corners, and each corner of the sprite corresponds to some position in this image. In the standard (default) UV mapping, each corner of the sprite simply maps to the corresponding corner of the texture.
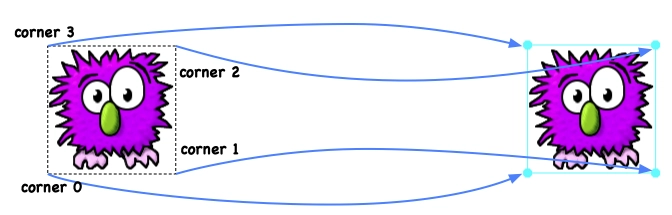
Sprite corners in Mini Micro are always specified in counter-clockwise order, starting with the bottom-left. So if the sprite above were called spr and you checked spr.uvs (one of the new methods introduced in 1.2.5), you would get [[0, 0], [1, 0], [1, 1], [0, 1]]. That’s because the bottom-left corner of the sprite uses texture (UV) coordinate [0,0], the bottom-right one has UV coordinate [1,0], and so on.
But now you can use the setUVs method to change those default coordinates to anything you like! Suppose we change the first two UV coordinates to [0, 0.5] and [1, 0.5] — moving them up from the bottom of the texture to the middle. The resulting sprite would like the this (on the left):
![Sprite with UV coordinates raw `[[0, 0.5], [1, 0.5], [1, 1], [0.1]]` endraw](https://www.asadqi.com/wp-content/uploads/2025/08/78owc80t17h35hr7mmbs.png)
The sprite is just as big as it was before — we haven’t changed its size or position on screen. But we’ve changed what part of the texture it’s using. So now we see only the top half of the texture, stretched to fill the sprite.
You don’t have to keep your UV values in the 0-1 range, either. If you go outside this range, with numbers less than 0 or greater than 1, the texture simply repeats. It can repeat as many times as you like. Here’s an example with UVs set to [[0, 0.5], [2, 0.5], [2, 1], [0, 1]]:
![Sprite with UV coordinates raw `[[0, 0.5], [2, 0.5], [2, 1], [0, 1]]` endraw](https://www.asadqi.com/wp-content/uploads/2025/08/h8w3inngn656mlfjuswi.png)
OK, but why?
Why would you do this? It’s true that this is a “power user” feature that many devs won’t need, especially in the beginning. That’s why Mini Micro never had it before now! But there are a few cases where it is really handy.
Suppose you want a sprite to grow up out of the ground. Before now, you could only do this by using Image.getImage to extract a bunch of partial images, which is inefficient, or by somehow layering the sprite behind the ground, which is not always possible. With setUVs, it’s both easier and more efficient. Code like this can do the job:
clear
spr = new Sprite
spr.image = file.loadImage("/sys/pics/Wumpus.png")
display(4).sprites.push spr

bottom = 200; height = 128
left = 480-64; right = 480+64

for v in range(0, 1, 0.01)
    spr.setUVs [[0,1-v], [1,1-v], [1,1], [0,1]]
    top = bottom + v * height
    spr.setCorners [[left, bottom], [right, bottom],
      [right, top], [left, top]]
    yield
end for

Or, suppose you want to take a simple tiling texture (like any of those in /sys/pics/textures), and make a screen-wide bar out of it, repeating the texture many times. Again, methods to do this before were either inefficient or a pain in the next to write. Now it’s easy:
clear
spr = new Sprite
spr.image = file.loadImage("/sys/pics/textures/ToonWoodB.png")
display(4).sprites.push spr
yield // causes sprite to get fully set up

bottom = 200; top = bottom + 64
left = 0; right = 960
repeats = 960 / 64
spr.setCorners [[left, bottom], [right, bottom],
  [right, top], [left, top]]
spr.setUVs [[0,0], [repeats,0], [repeats,1], [0,1]]

This works at any scale. Take a screen-wide background layer, and make it repeat as many times as needed for your level. It’s still a simple quad sprite to Mini Micro, and so extremely efficient.
UV mapping can also be an efficient way to make use of sprite sheets — large textures that contain smaller images meant for individual sprites (or animation frames). Again, you could use these before by calling getImage to break them up. But just pointing the UV coordinates at the right place may be both easier and more efficient, especially if you’re working with tools (spritesheet editors) already set up to give you UV coordinates.
A Long Time Ago, On A Server Far, Far Away…
Let’s close with something a bit cooler. Suppose we use setCorners on our sprite to stretch it out on bottom, and make it narrow at the top, like the floor of a long hallway. Then we make a texture by drawing a few paragraphs of text into an offscreen PixelDisplay, with plenty of blank space above the actual text. And finally, we use setUVs in a loop to scroll the texture up the sprite.
(If you don’t see an image below, give it a moment to load.)

The result on an actual Mini Micro looks a lot smoother than the above heavily compressed GIF. So try it yourself! Here’s the code:
Twist open to see ANewHope.ms
import "styledText"
import "bmfFonts"
import "mathUtil"; lerp2d = @mathUtil.lerp2d
min = @mathUtil.min; max = @mathUtil.max

title = "A NEW HOPE"
crawl = [
"It is a period of coding chaos.",
"Rebel programmers, striking from",
"hidden basements, have won their",
"first victory against the evil",
"Punctuation Empire.", "",
"Evading the dreaded STATUS QUO, a",
"group of freedom fighters led by",
"Joe Codewalker has established a new",
"secret language on the remote",
"internet site of MiniScript.org.", "",
"Pursued by agents of the Established",
"Order, the brave rebels race to",
"restore clarity to the code,",
"overcome the dark forces of verbose",
"syntax, and bring joy to the",
"programmers of the galaxy..."]

bmfFonts.Font.printJustified = function(s, x, y, width=500)
    words = s.split
    w = 0
    for word in words; w += font.width(word); end for
    ew = width - w // ("extra width")
    ewPerWord = floor(ew/(words.len-1))
    for i in words.indexes
        font.print words[i], x, y
        if i == words.len-2 then ewPerWord = ew
        x += font.width(words[i]) + ewPerWord
        ew -= ewPerWord
    end for
end function

clear
colors = ["#FFFFFF", "#AAAAFF", "#FFFFAA", "#FFCCCC"]
gfx.clear
for i in range(1000)
    gfx.setPixel rnd*960, rnd*640, colors[rnd * colors.len]
end for

font = bmfFonts.Font.load("/sys/fonts/minimicro-pro-20.bmf")
gfx = new PixelDisplay
gfx.clear color.clear, 480, 4096

y = 480
font.printCentered "A NEW HOPE", 476/2, y
y -= 48

for i in crawl.indexes
    if i+1 == crawl.len or crawl[i+1] == "" then
        font.print crawl[i], 0, y
    else
        font.printJustified crawl[i], 0, y, 476
    end if
    y -= 24
end for
texture = gfx.getImage(0, 0, gfx.width, gfx.height)
gfx = display(5)

spr = new Sprite
spr.image = texture
display(4).sprites.push spr
yield

spr.setCorners [[480-400, 0], [480+400, 0], [480+20, 600], [480-20, 600]]

scrollTo = function(yOffset)
    v = yOffset / texture.height
    dv = 1 - 480 / texture.height

    spr.setUVs [[0, v], [1, v], [1, v+dv], [0, v+dv]]
end function


while true
    scrollTo 500 - time * 20
    yield
end while
Conclusion
Now you know what UV mapping is, and how to use it in Mini Micro. Hopefully the examples above have given you some inspiration. How might you use this in your own games? Share your thoughts in the comments below!

