Supercharge Your Java Side Projects: Create CI Pipeline with GitHub Actions
Hello developers, and welcome to my new article!
In today’s article, I’m going to introduce a CI pipeline solution for your side projects. This setup will help you automate various processes, such as enforcing coding style and running tests, making your development workflow much smoother.
Why Bother with a Pipeline for a “Side Project”?
Whenever you have a billion dollar startup idea, you need to create a project on GitHub to develop. It’s rare for developers to think about deployment servers before writing a single line of code, as there’s so much to achieve before reaching the deployment stage.
However, until the deployment phase, crucial aspects like coding style, comprehensive tests, and security vulnerability checks often get overlooked. This is because developers typically prioritize more immediate and seemingly necessary tasks.
If you aspire to be a successful tech entrepreneur, automating these tedious tasks is essential. Therefore, it’s highly beneficial to create a reusable project template that incorporates CI. This will save you significant time and effort across almost all your future projects. CI pipelines should undoubtedly be a core component of this template.
In this article, we’ll walk through building a simple, yet powerful, CI pipeline on GitHub. We’ll set it up to automatically build your Java application and, crucially, enforce code quality with Checkstyle every time you push code.
Simple CI Pipeline: What We’re Building
Our goal is straightforward: every time you push code to your GitHub repository (or open a pull request), we want GitHub Actions to:
- Check out your code.
- Set up a Java Development Kit (JDK).
- Build your Java application using Maven or Gradle.
- Run Checkstyle to ensure your code adheres to quality standards. If Checkstyle finds any violations, the pipeline will fail, notifying you immediately.
Step 1: Set up a Spring Boot Project and Checkstyle Plugin
Working with Spring Boot combined with Gradle is so much easy and faster choice. I always create my projects with the help of Spring Initializr website. Download and export the zip file of your project.
It is time to add Checkstyle plugin and configurations to your
build.gradle file.
plugins {
 id 'java'
 id 'org.springframework.boot' version '3.4.5'
 id 'io.spring.dependency-management' version '1.1.7'
 id 'checkstyle'
}

checkstyle {
 toolVersion = "10.25.0"
 configFile = file("${rootProject.projectDir}/checkstyle/checkstyle.xml")
 ignoreFailures = false
}

// Optional: Configure reports to be generated
tasks.withType(Checkstyle).configureEach {
    reports {
        xml.required = true
        html.required = true
    }
}
As next:
- Create
checkstylefolder in your project’s root directory. - Create
checkstyle.xmlfile incheckstylefolder. - Copy the content of this file.
- Paste copied content into
checkstyle.xmlfile.
Step 2: Create GitHub Actions
Visit project’s GitHub repository. Click Actions tab to create GitHub Actions.

In the newly opened tab, click ‘New Workflow’ button which will open following page.
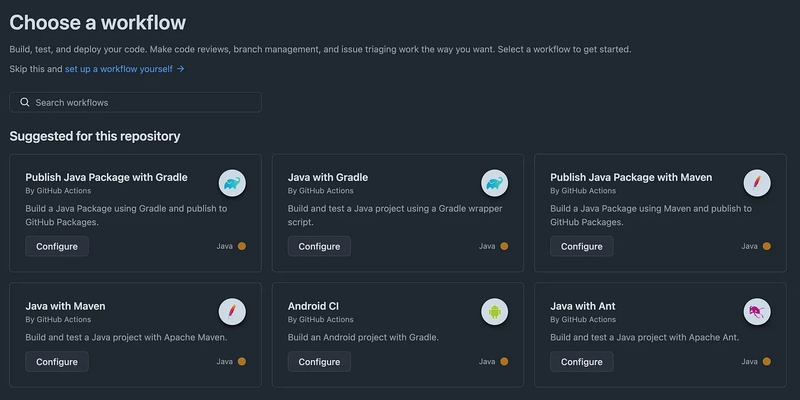
Click ‘Configure’ button of ‘Java with Gradle’ workflow. GitHub will provide you a default GitHub Actions template.
Use following code snippet to create Checkstyle job.
name: Checkstyle

on:
  push:
    branches: [ "master" ]
  pull_request:
    branches: [ "master" ]

jobs:
  checkstyle:
    runs-on: ubuntu-latest
    permissions:
      contents: read

    steps:
      - name: Checkout main repository and submodules
        uses: actions/checkout@v4

      - name: Set up JDK 21
        uses: actions/setup-java@v4
        with:
          java-version: '21'
          distribution: 'temurin'

      - name: Run Checkstyle
        run: ./gradlew checkstyleMain

      - name: Upload Checkstyle Report
        if: failure()
        uses: actions/upload-artifact@v4
        with:
          name: checkstyle-report
          path: build/reports/checkstyle/
By the way, Java version is 21 in my project, therefore, you should update following code block to your project’s Java version, otherwise, pipeline might fail.
- name: Set up JDK 21
  uses: actions/setup-java@v4
  with:
    java-version: '21'
    distribution: 'temurin'
Step 3: Publish Changes To master Branch
Before making changes, make sure you pull remote changes into your local machine. Update the code and publish your changes to master branch. GitHub will automatically aware of your push and start Checkstyle job.
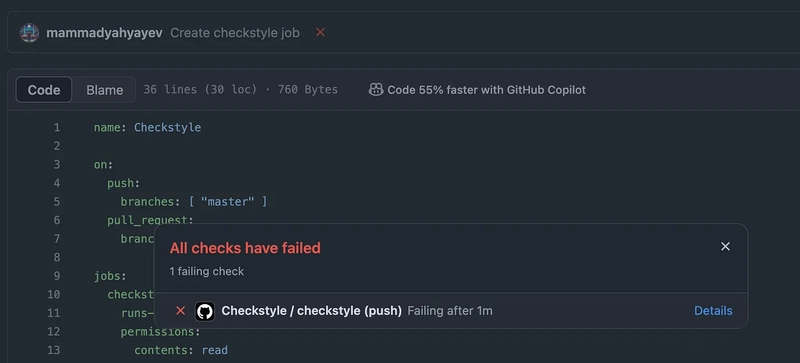
You can monitor the job’s status directly within your commit history on GitHub. You will see either a ❌ (failed) or ✔️ (successful) icon next to your commit. For instance, in the following image, the Checkstyle job failed for a specific reason. You can click the ‘Details’ button to view the logs and understand why it failed.
Step 4: GitHub Action for Projects with Submodules
If your project includes submodules, you’ll need to slightly modify your workflow file to ensure they are also covered by the action.
name: Checkstyle

on:
  push:
    branches: [ "master" ]
  pull_request:
    branches: [ "master" ]

jobs:
  checkstyle:
    runs-on: ubuntu-latest
    permissions:
      contents: read

    steps:
      - name: Checkout main repository and submodules
        uses: actions/checkout@v4
        # new lines
        with:
          submodules: recursive
          fetch-depth: 1

      - name: Set up JDK 21
        uses: actions/setup-java@v4
        with:
          java-version: '21'
          distribution: 'temurin'

      - name: Run Checkstyle
        run: ./gradlew checkstyleMain

      - name: Upload Checkstyle Report
        if: failure()
        uses: actions/upload-artifact@v4
        with:
          name: checkstyle-report
          path: build/reports/checkstyle/
Step 5 (Optional): Add Status of a Job in Readme file
Optionally, pipeline status can also be seen in your project’s README file. GitHub will offer you this feature, therefore, accept it if you want to see cool status badges on your project.
[](https://github.com/<project-name>/actions/workflows/<job-file-name>.yml)
What’s Next? Expanding Your Pipeline
This is just the beginning! A robust CI pipeline can do much more:
-
Run Unit Tests: Add a
mvn testorgradle teststep immediately after your build. This is fundamental for any project. - Code Coverage: Integrate tools like JaCoCo to measure your test coverage and upload reports.
- Static Code Analysis: Explore more advanced tools like SonarQube (which has a free cloud tier for open-source projects) for deeper code quality insights.
- Integration Tests: If you have them, run integration tests after unit tests.
- Notifications: Configure GitHub Actions to send notifications to Slack, Discord, or email on workflow failures.
Conclusion
Building a CI pipeline for your side projects, even a simple one like this, is a game-changer. You’ll write better code, with more confidence, and ultimately enjoy your side projects more.
So, go ahead, implement this pipeline for your next Java side project.
What are your favorite CI/CD tools for side projects? Share your thoughts and experiences in the comments below!
- 👍 If you like the article, please consider clapping 👏 and following.
- ⭐ Star GitHub repository
- ➕ Follow me on LinkedIn | X (Twitter) | GitHub
- 👁 Check out my other stories.
📚 Recommended Reading