Implement security through a pipeline using Azure DevOps. Part1
Introduction
In today’s DevOps-driven software lifecycle, security must be integrated into every phase of the development process—not just at the end. This approach is often referred to as “shift-left security.” One of the most critical places to enforce security is within the CI/CD pipeline, where code is built, tested, and deployed.
Azure DevOps Pipelines offer powerful automation tools for building and deploying applications, but without proper safeguards, they can become a target for unauthorized access, secret leaks, and misconfigurations. Securing your pipelines ensures the integrity of your deployments, protects sensitive resources, and minimizes the risk of supply chain attacks.
Setup Requirements.
-
Azure DevOps Organization and Project
-
Azure Subscription
-
Azure CLI or Azure Portal access
-
Basic knowledge of YAML pipelines
-
Azure Key Vault and Azure Repos enabled
Step 1: Set Up a Secure Project and Repo Structure
This step involves organizing your Azure DevOps project and source code repositories in a way that promotes security, scalability, and isolation. By applying strategies like branching policies, access control, and environment separation, you reduce the risk of unauthorized changes, enforce code quality, and ensure that sensitive resources are protected throughout the development lifecycle.
i. Create Azure DevOps Organization
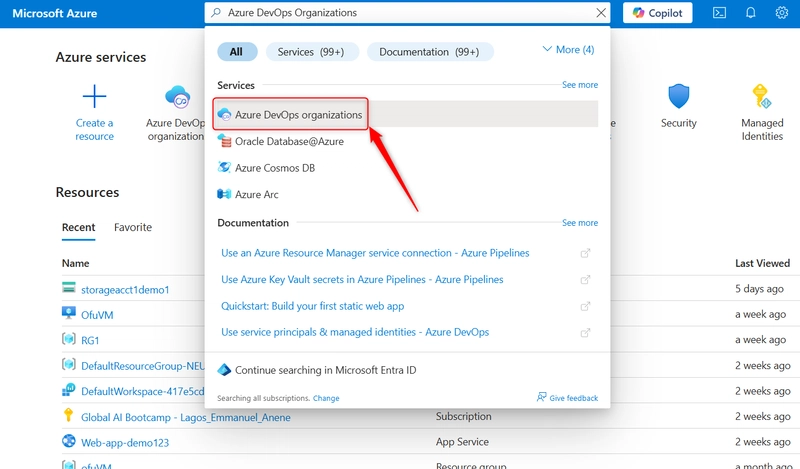
a. On your Microsoft Azure Portal, search for Azure DevOps Organizations
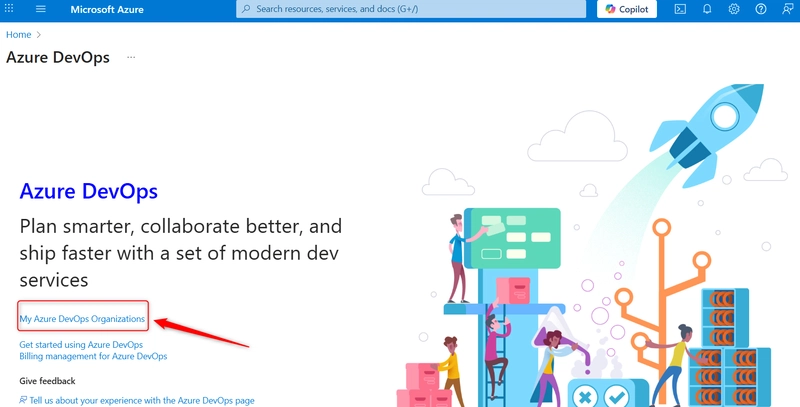
b. On the Azure DevOps Organization page, click on My Azure DevOps Organizations
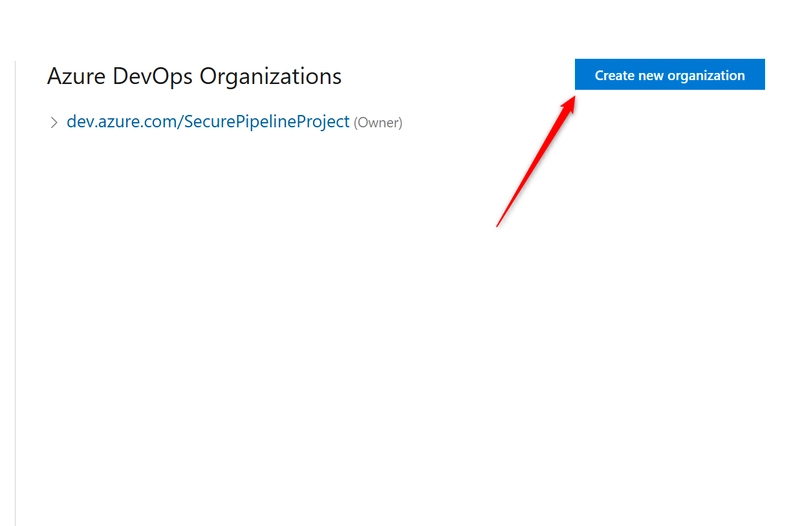
c. Create a New Organization Click on your organization name.
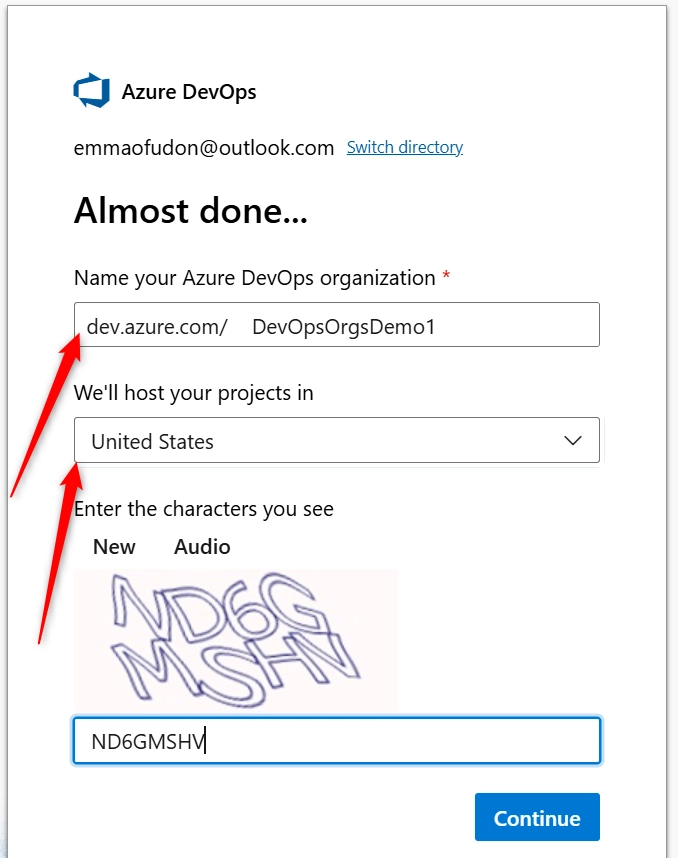
d. Give your Organization a name (DevOpsOrgsDemo1) and set you the location where your organization will be hosted.
ii. Create a New Project. After you have created Azure DevOps Organization, on the next page you can now create your Project, steps to create a project.
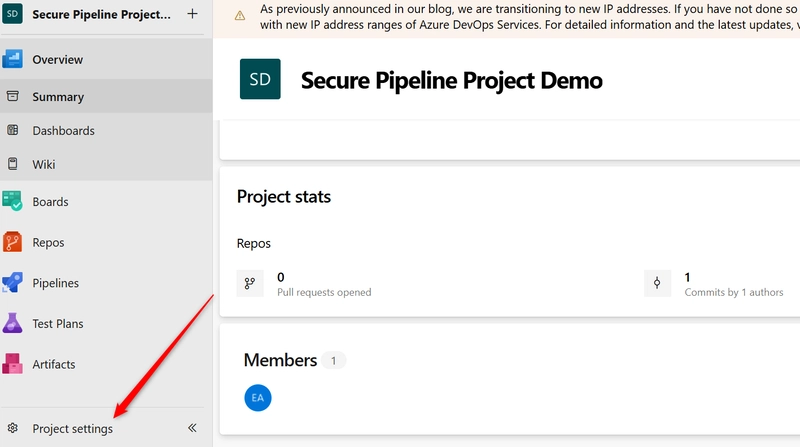
a. Give your project a name (Secure Pipeline Project Demo)
b. Write the Description that suits this project
c. For the Visibility, Private (recommended for internal or secure projects)
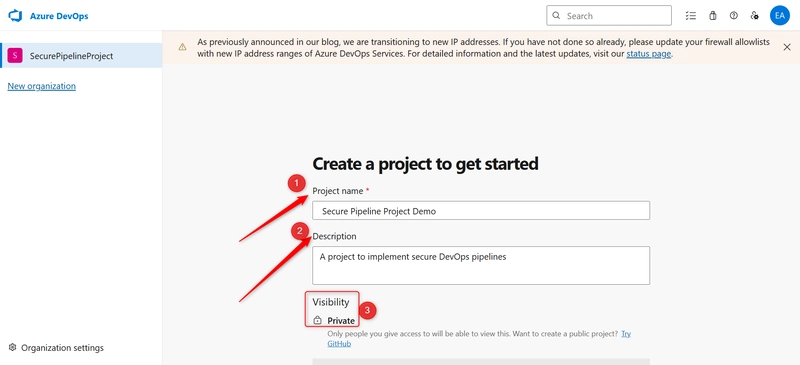
Click on the Advanced tab
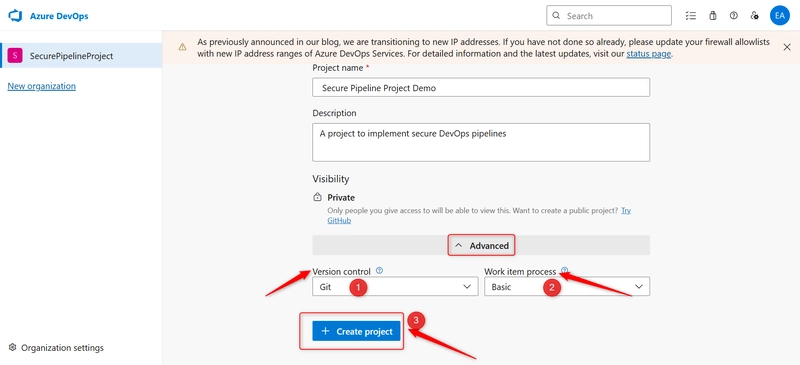
d. For the Version Control select GIT as recommended,Git is distributed, widely adopted, supports branching/merging, and integrates easily with modern DevOps tools and CI/CD pipelines.
e. For the Work item process select Basic. Basic is simple, lightweight, and ideal for small teams or new projects focused on code and deployment without complex tracking needs.
f. Then click on Create.
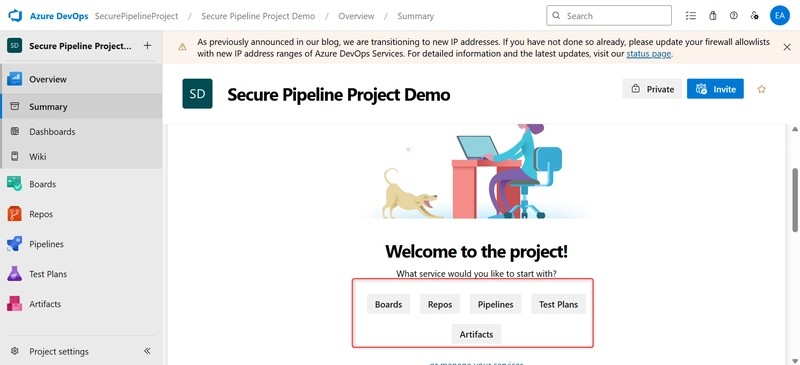
g. After your Project is created successfully, You should now see tabs like: Repos, Pipelines, Boards, Test, Plans and Artifacts
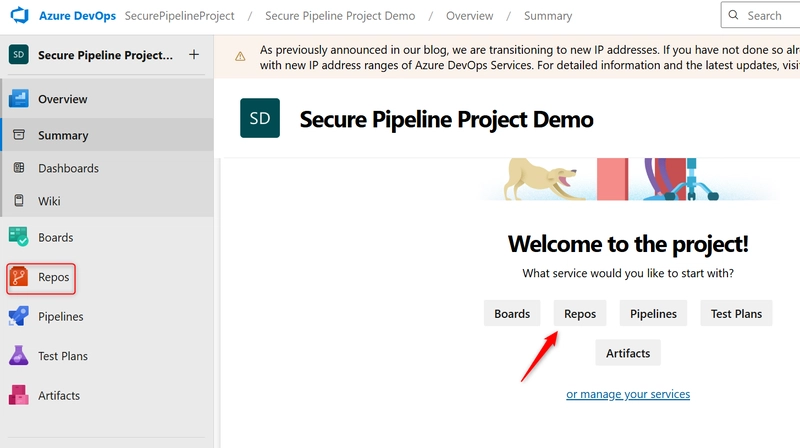
ii. Create a new Git repository and define branching strategy (e.g., main, dev).
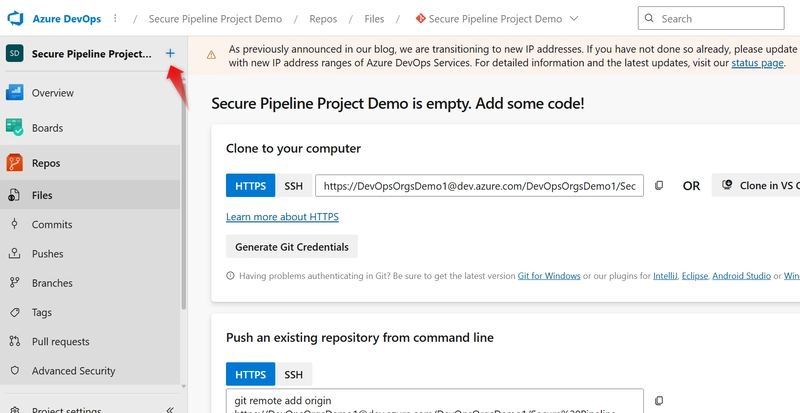
a. On the created tab, click on Repos
b. At the top-right corner, click the dropdown arrow beside the current repo name, Click + New repository what the list of items shows.
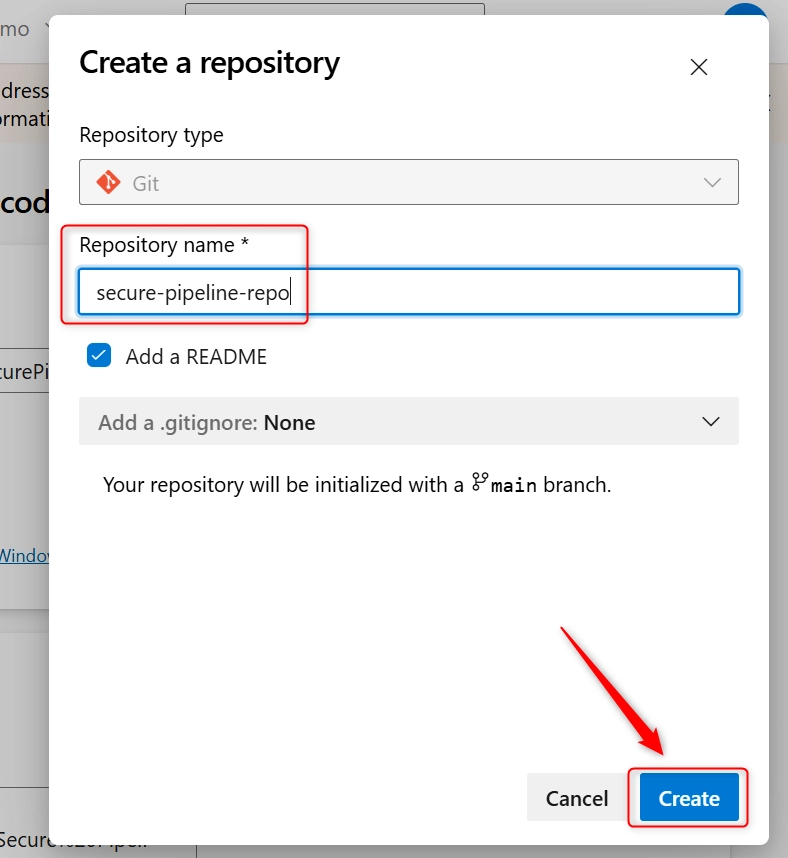
c. On the Create a repository tab, give your Repo a name (secure-pipeline-repo). Leave default settings unless needed and the click on Create
iv. Create the main and dev Branches. They are two ways you can do this, through the Azure DevOps web Ui or Git CLI. but in this case we will be working with the Azure DevOps web UI
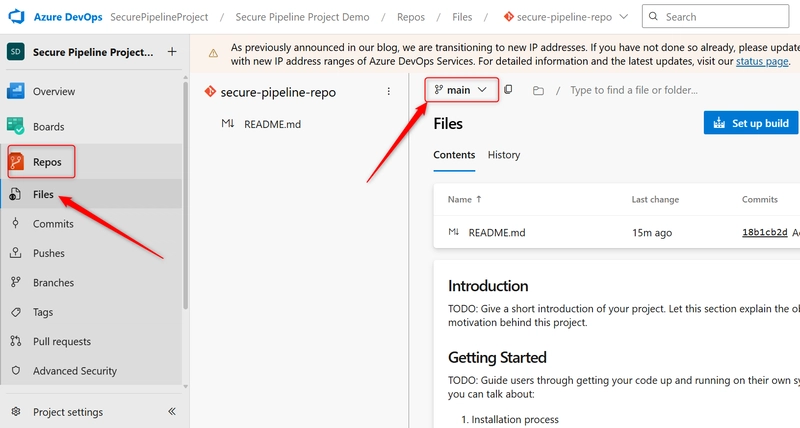
a. Go to Repos > Files, Click the dropdown that shows the current branch (main). Click + New Branch.
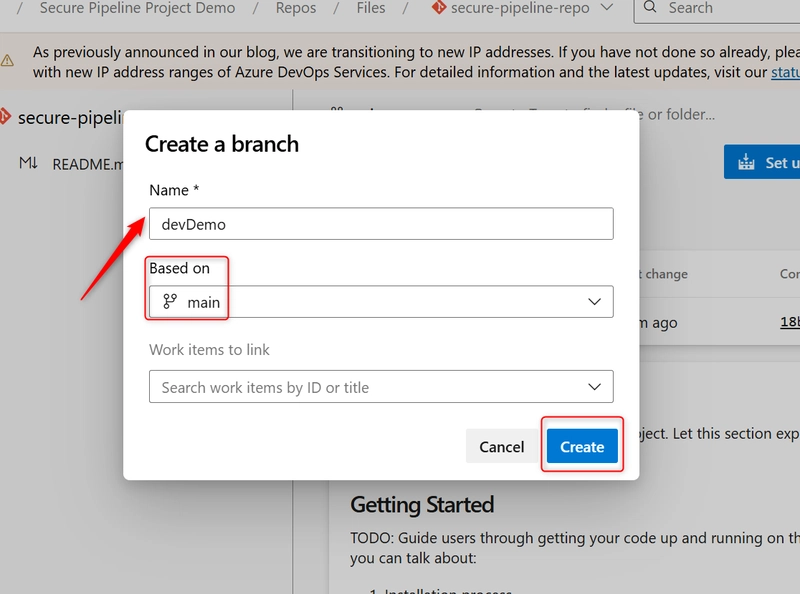
b. On the Create a branch tab: Enter branch name dev, Choose main as the source branch. And the click on Create.
Repeat this for any additional branches you want (e.g., feature/login, release, etc.).
v. Enable branch protection on main:
a. Go to your Azure DevOps project (Secure Pipeline Project Demo), In the left-hand menu, select Repos > Branches.
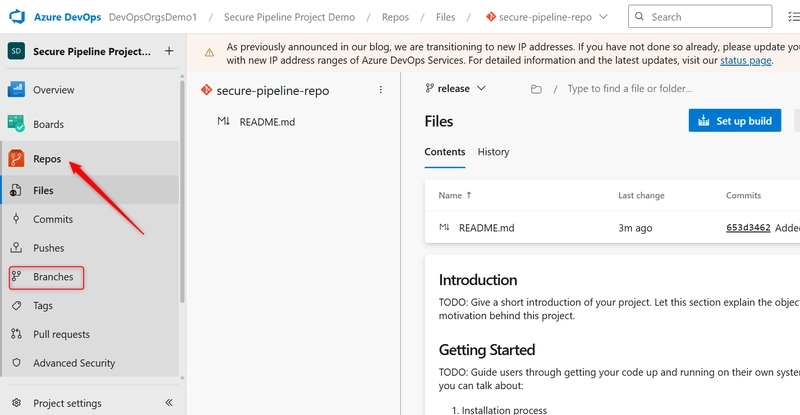
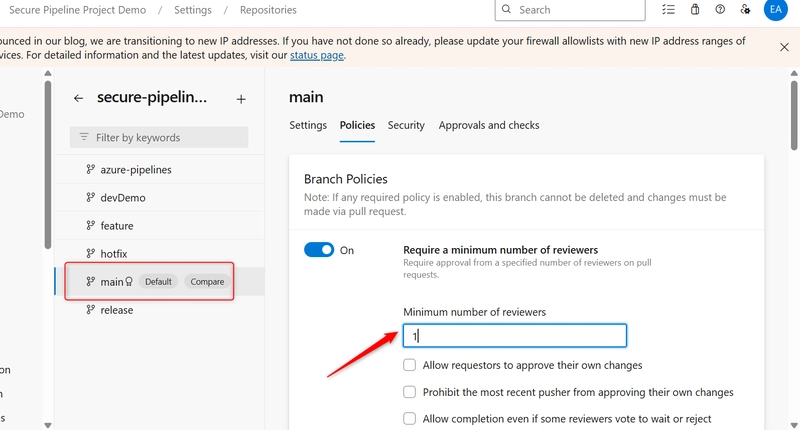
b. Find the main branch, click on the 3 dots (⋯) next to the main branch → choose Branch Policies
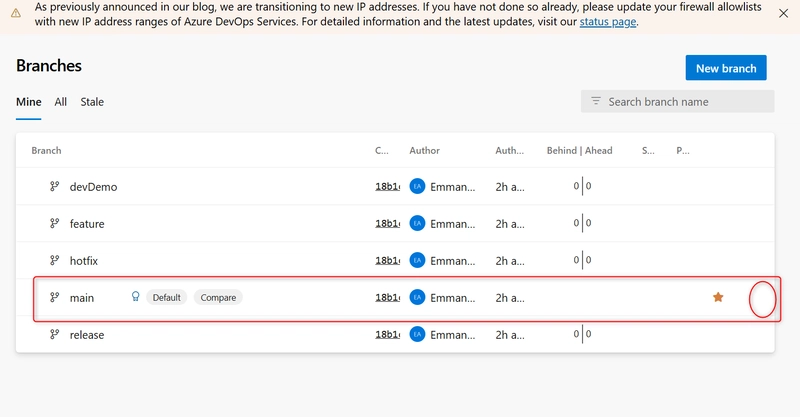
c. Toggle on the Require a minimum number of reviewers and Set Minimum number of reviewers to 1 (or more, depending on your team).
d. Enable Build Validation. Scroll down to Build Validation section. Click + Add build policy.
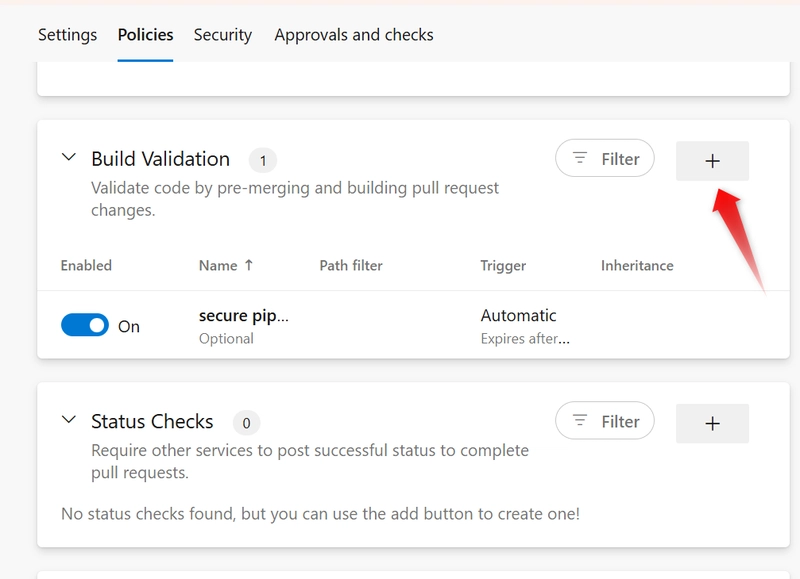
c. Select the pipeline that should be triggered when a pull request is created or updated.
-
Choose the pipeline from the list (secure-pipeline-repo).
-
Set Trigger to: Automatic (recommended)
-
Enable Optionally:Path filter (if you want to restrict the build to specific folders/files)
-
Click on Save

Step 2: Manage Identities and Permissions
This step involves assigning the right access levels to users, service accounts, and agents in Azure DevOps by applying the principle of least privilege. It ensures that only authorized entities can access or modify pipelines, environments, and resources.
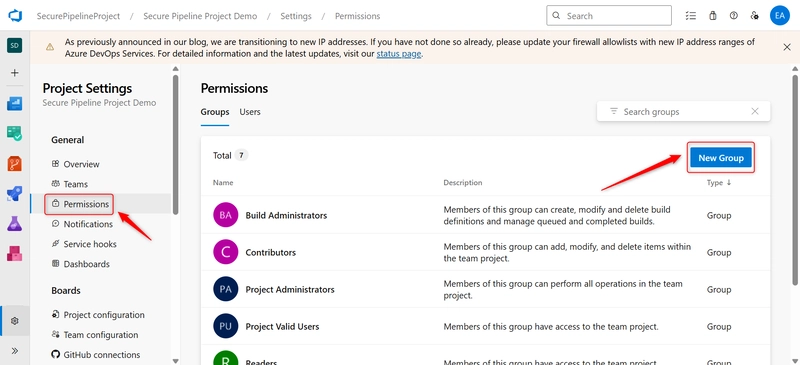
i. Navigate to Project Settings > Permissions.
ii.On the Project Settings Permissions page. Create a custom security group: Click New group at the top.
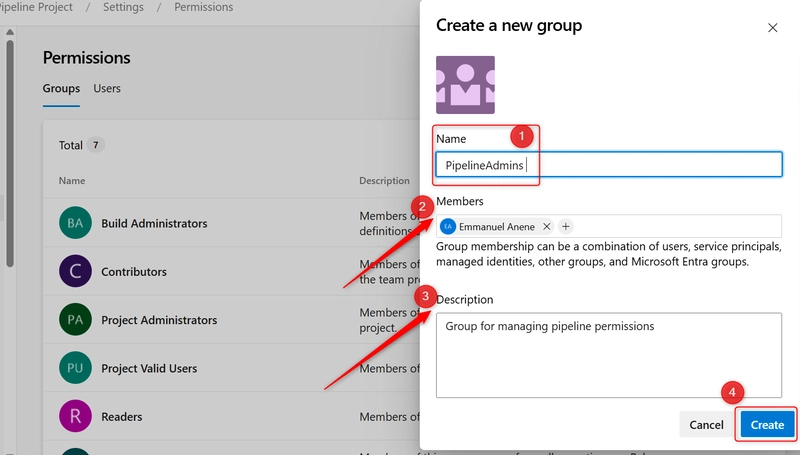
iii. Fill in the form:
-
Group name: PipelineAdmins (or any name).
-
Under Members, add users or groups from Azure AD or your DevOps organization
-
Description: e.g., “Group for managing pipeline permissions“
-
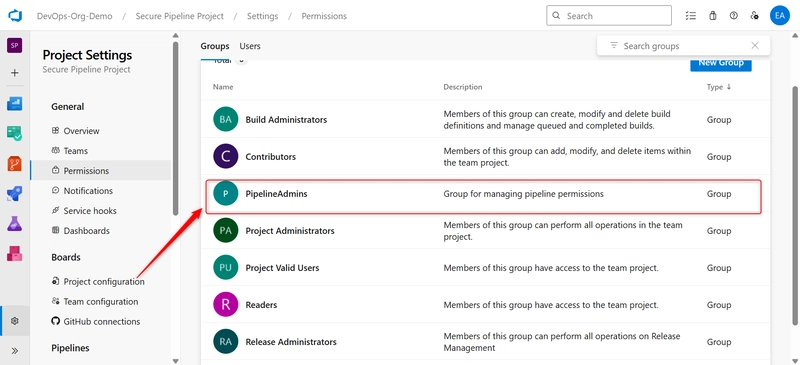
Click Create.
iv. Assign Permissions to the Group:
- After creating the group, select it from the list.
- Review and set permissions such as:
View project-level information: Allow
Edit project-level information: Deny
Create repositories: Deny
Manage build pipelines: Allow (if needed)
Queue builds: Allow
v. Assign Pipeline Permissions: Go to Pipelines > Pipelines. Click on the three dot (…) next to a pipeline → choose Manage Security.
- Find the PipelineAdmins group and click on it.
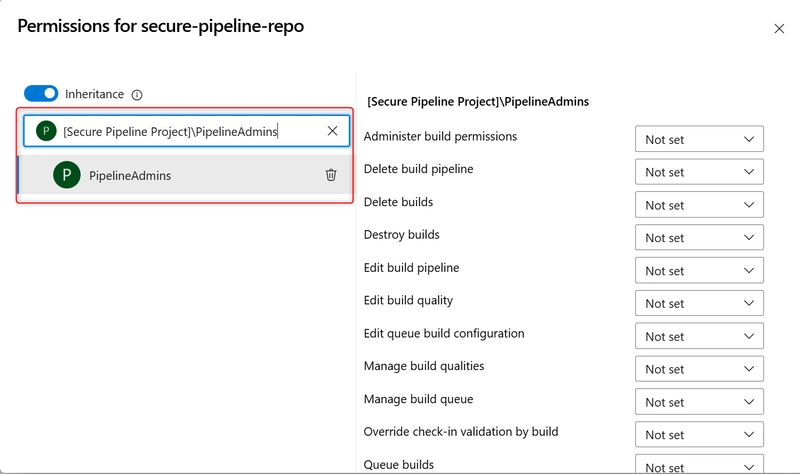
-
Assign pipeline-specific permissions:
Edit build pipeline: Allow
Queue builds: Allow
Delete builds: Deny or Allow (based on need)
View builds: Allow
Manage builds: Deny (optional)
Step 3: Secure Pipeline Resources and Environments
In this step, you will control who can access or deploy to environments and secure the resources your pipeline uses. By adding approval checks, limiting service connection permissions, and organizing environments with access controls, you ensure that deployments are safe and only authorized actions are performed.
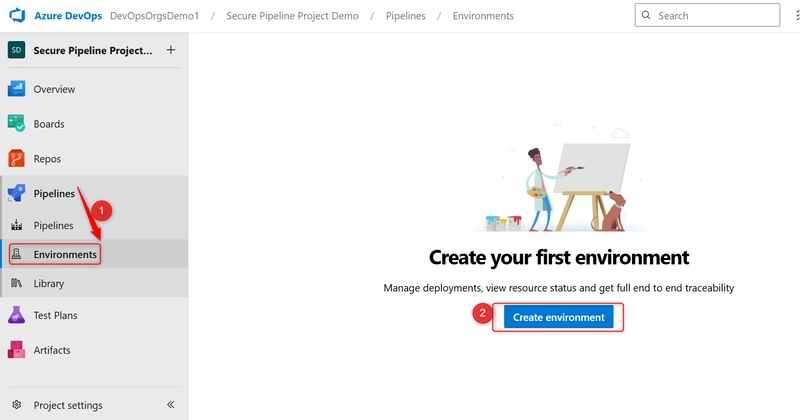
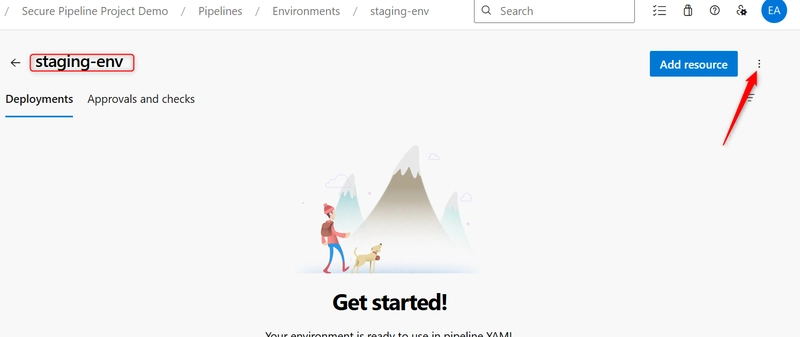
i. Create an environment in Azure DevOps (e.g., staging-env) and assign reviewers.
- From the left-hand menu, select Pipelines > Environments.
- Click the New environment button.
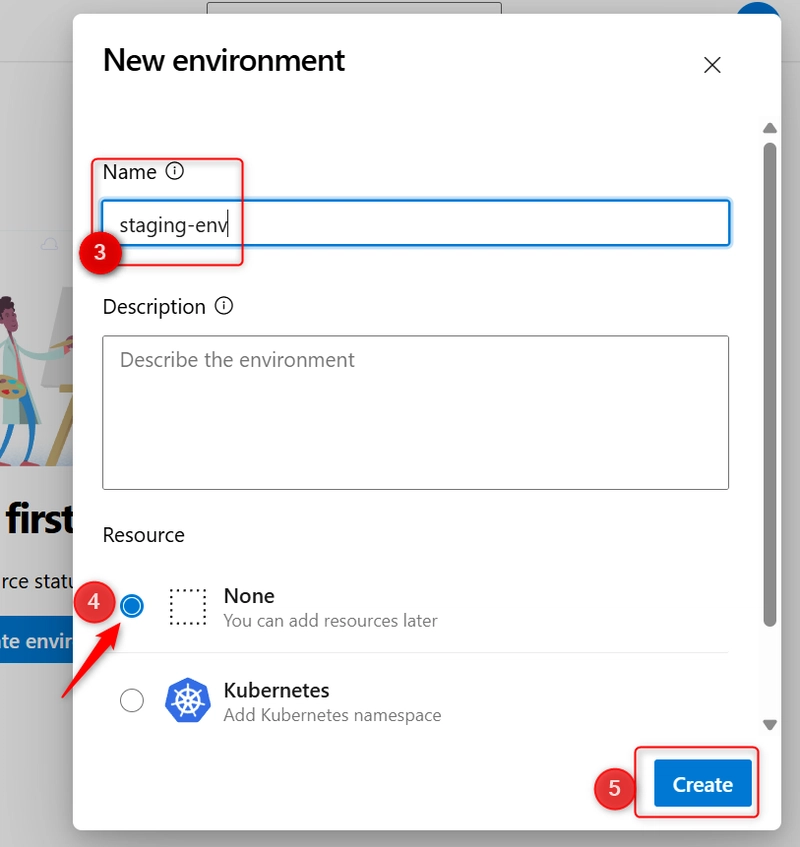
-
Enter the Name (e.g.,
staging-env) -
Select the Resource Type:
Choose based on your scenario (e.g., Virtual machines, Kubernetes, etc.). If none is needed, select None to just use the environment for approvals and audit. -
And click on Create.
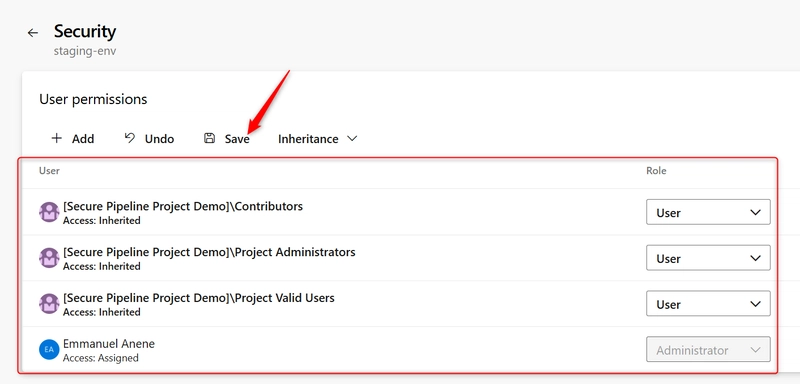
ii. Assign Security and Reviewers:
- Once the environment is created, click on the “three dots (⋮)” next to the environment. Select Security.
- Here, configure who has access:
Add users or groups (e.g., your DevOps team).
Assign roles such as Reader, User, or Administrator.
Important: Only trusted users should have Admin rights.
- Click on Save.
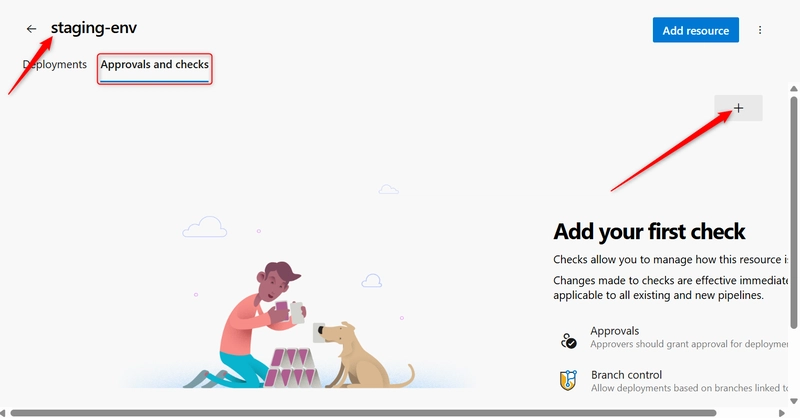
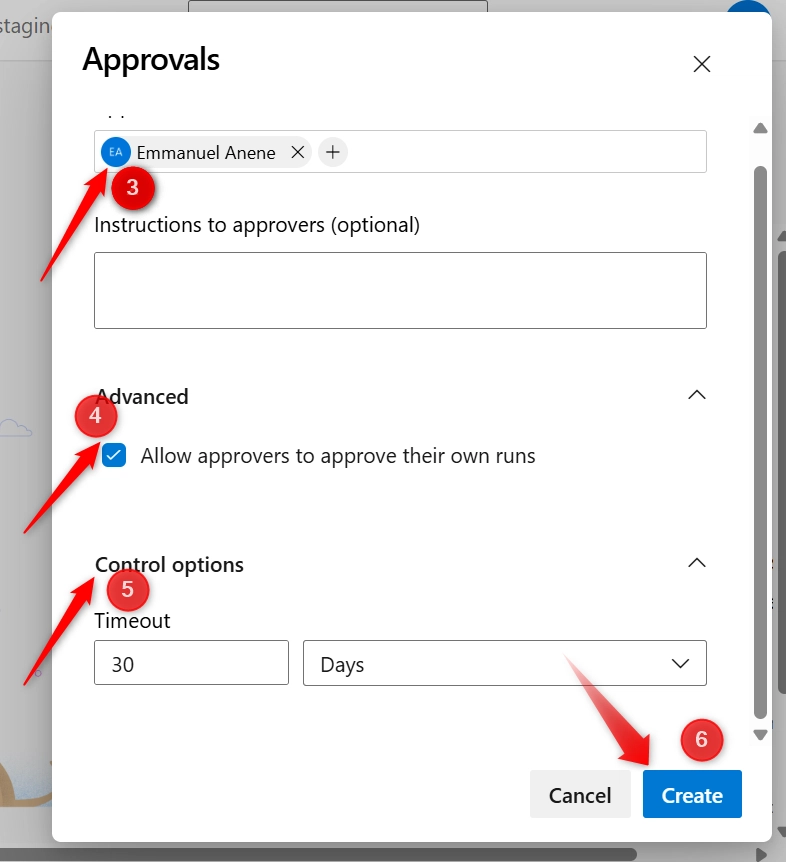
iii. Add Approvals and Checks
- Environment name (
staging-env)>> Click Approvals and checks tab.>> Click on the plus icon(+)
- Select Approvals and click on Next
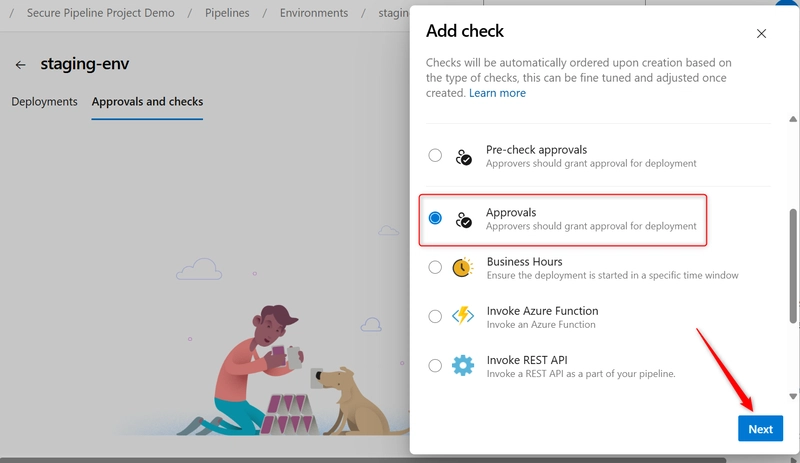
- Add reviewers (users or groups) who must manually approve deployments to this environment
- Allow approvers to approve their own runs
- Timeout (how long to wait for approval)
- Click on Create.
Use the Environment in a YAML Pipeline
Ensure your pipeline references the environment with the approval check:
`jobs:
- deployment: DeployToStaging
displayName: ‘Deploy to Staging’
environment:
name: ‘staging-env’
resourceName: ‘staging-env’
strategy:
runOnce:
deploy:
steps:
– script: echo Deploying to staging…`
iv. Setting up an Azure Service Connection with RBAC Permissions Scoped to a Resource Group
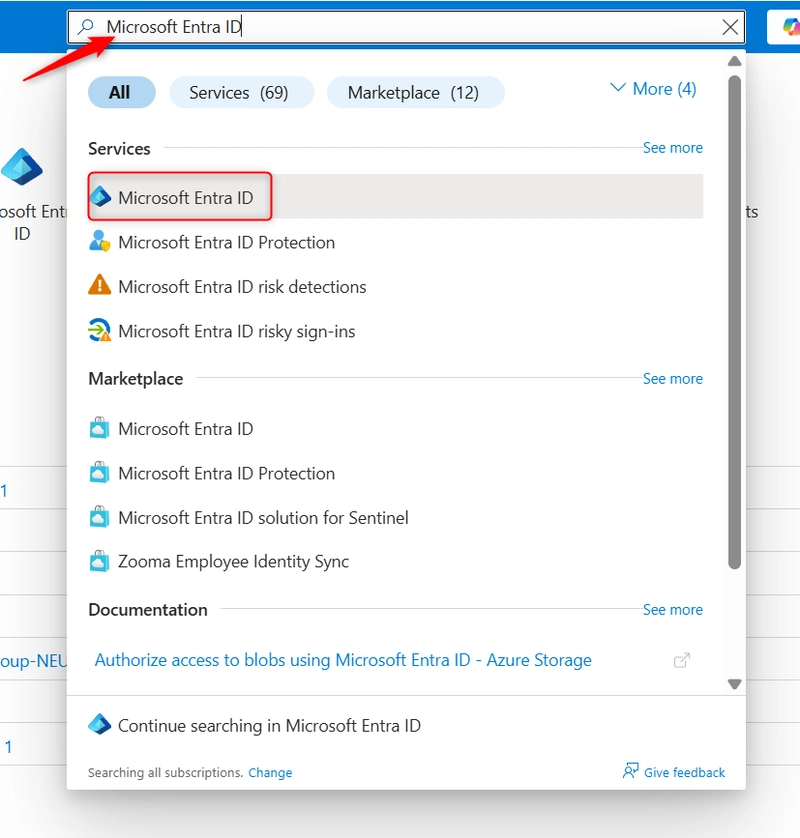
- Create an Azure AD App Registration (Service Principal). Navigate to your Azure Portal and search Microsoft Entra ID
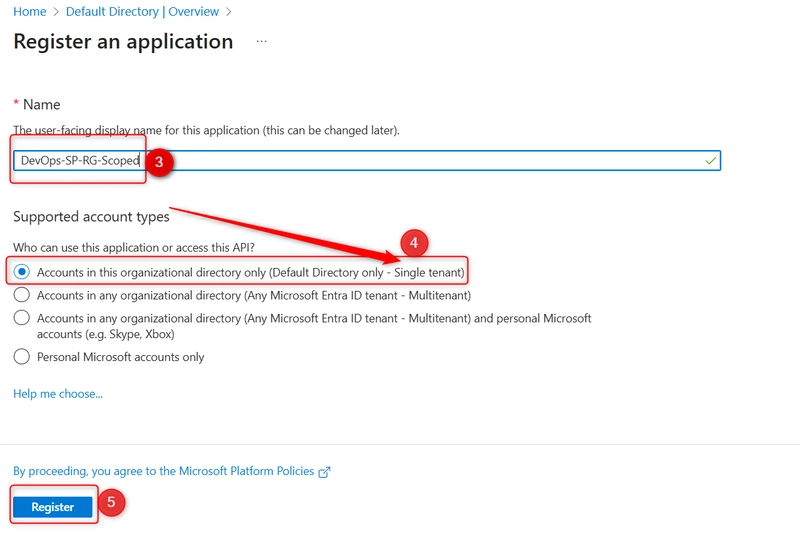
- Click on + Add and select App registrations
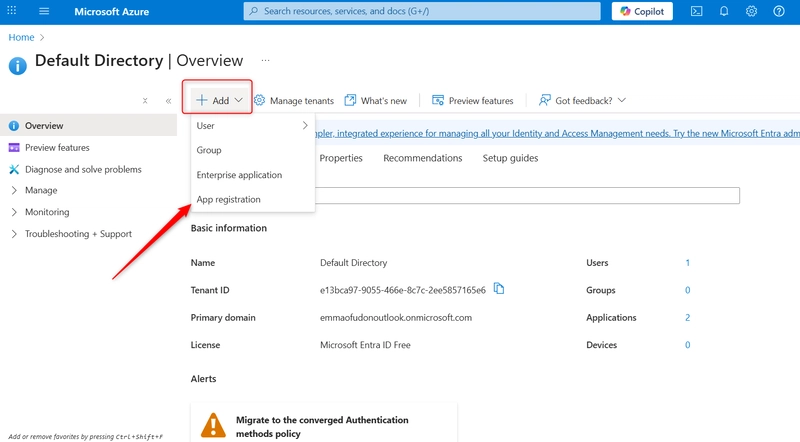
- Give your App registrations (DevOps-SP-RG-Scoped)
- Supported account types: Single tenant.
- Click on Register.
v. Generate a Client Secret
- In your newly created App Registration, click on Manage and select Certificates & secrets.
- Click on + New client Secret
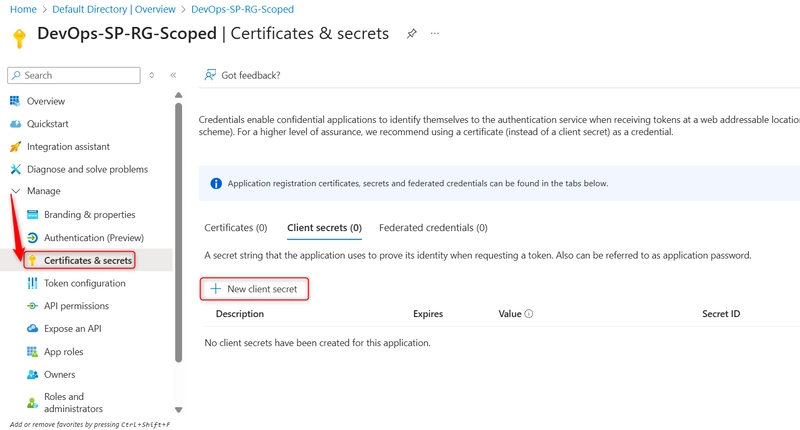
- Add a description (DevOpsPipelineSecret)
- Choose expiration (6 months, 12 months, etc.)
- Click on Add
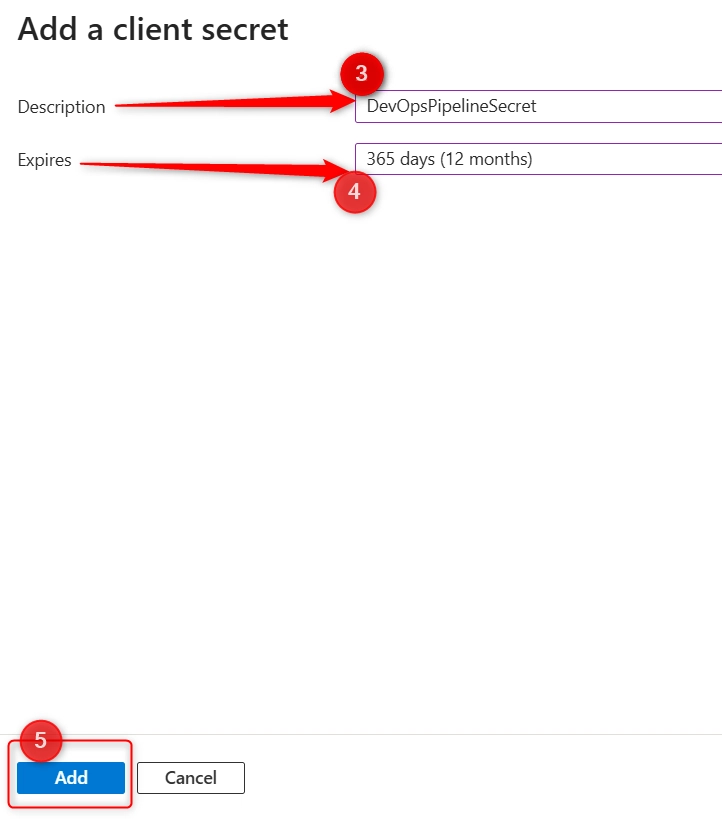
Note Copy and securely store the value of the secret (you won’t see it again). You will need the App ID and Client Secret for Azure DevOps.
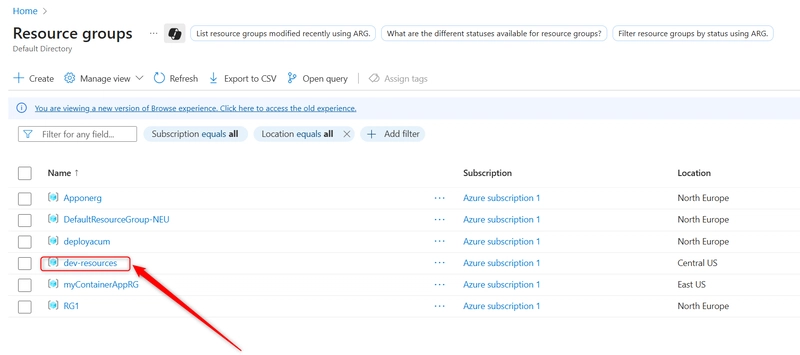
vi. Assign RBAC to the Resource Group
- In the Azure Portal, go to Resource Groups and select the specific RG (dev-resources).
- In your resource group, select Access control (IAM). and click on + Add > Add role assignment.
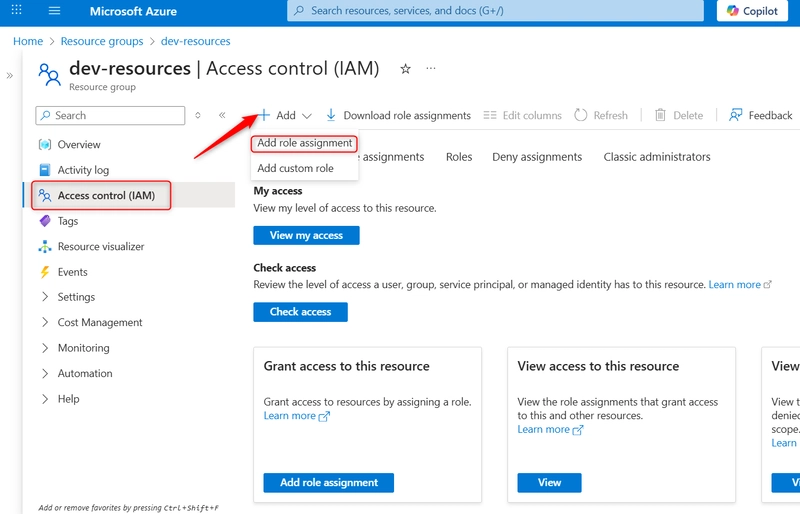
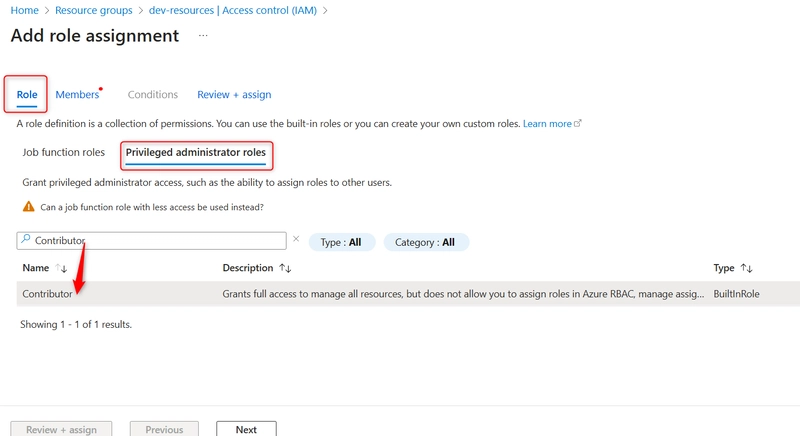
- Under Privileged administrator roles, Search for Contributor and select it.
- Under the Members tab, select User, group, or service principal and click + Select Members
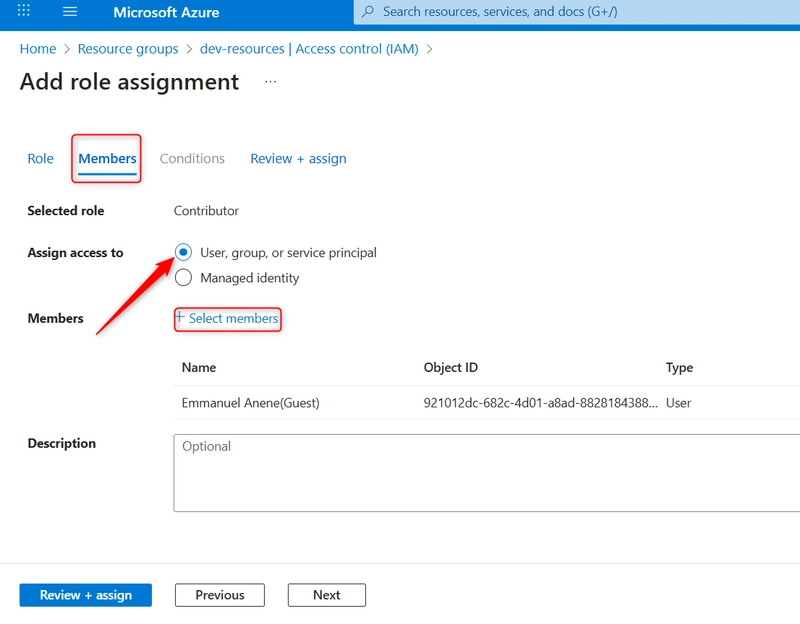
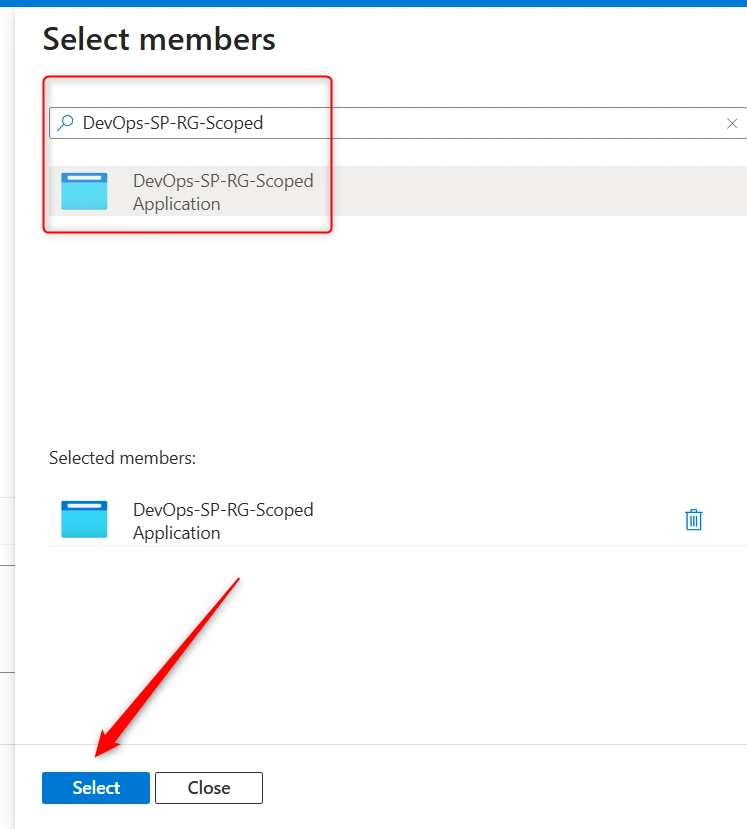
- On side pane, In the search box at the top of that pane, type the name of the App Registration (DevOps-SP-RG-Scoped). Wait for it to load and select it. Click on Select
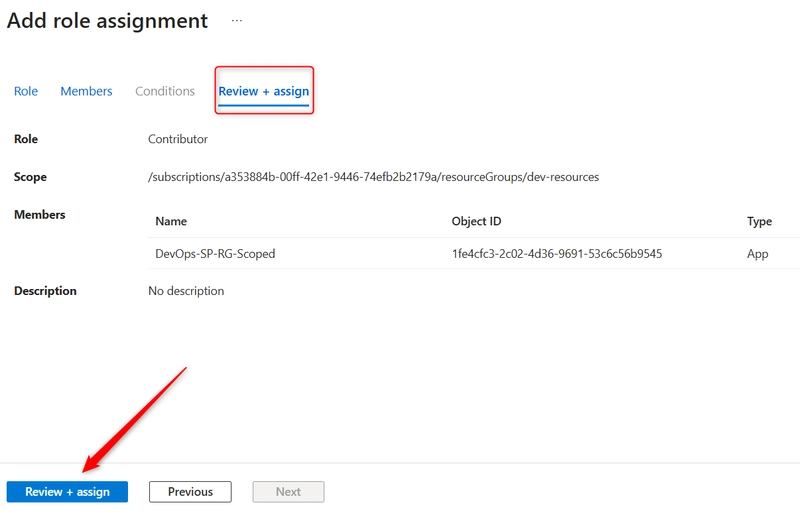
- Click on Review + Assign tab and again click Review + Assign to assign your App Registration to Assign RBAC to the Resource Group.
vii. Create the Azure Service Connection in Azure DevOps
- Navigate to Project Settings > Service connections. In the service connection page click on New service Connection
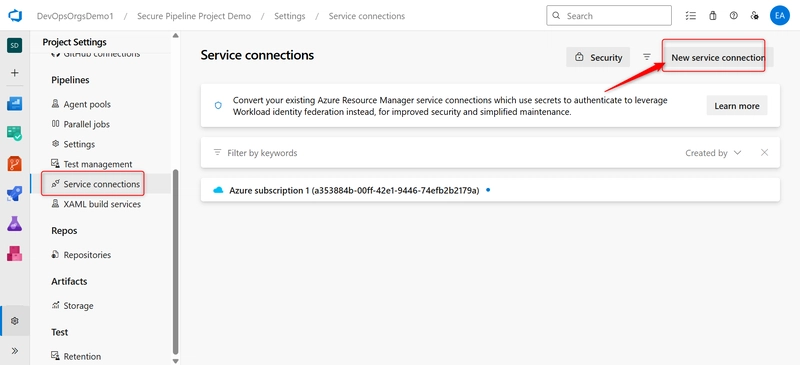
- Select Azure Resource Manager and click on Next
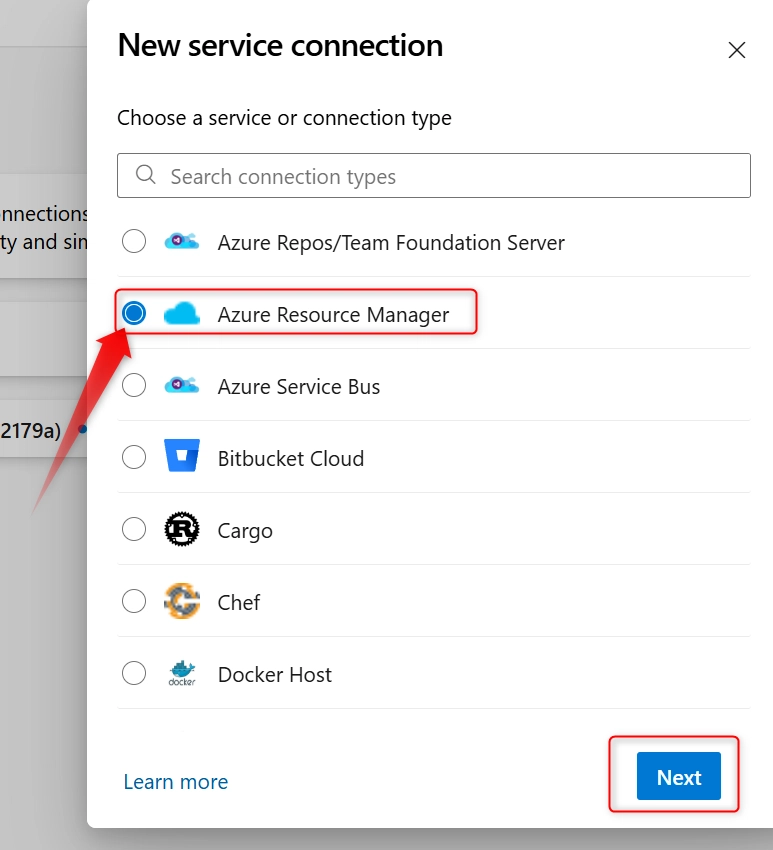
- Choose Identity type (manual) and Fill in the following:
-
Subscription ID and name (from Azure)
-
Tenant ID (from Azure AD)
-
Service principal ID = App ID (Step 1)
-
Service principal key = Client Secret (Step 2)
-
Scope level = Resource Group
-
Resource Group name = dev-resources
After filling the above details, check the box: Grant access permission to all pipelines (or leave unchecked for stricter control)
Click Verify and Save.
vii. Configure Secure Pipeline Folders and Lock Access to YAML Files.
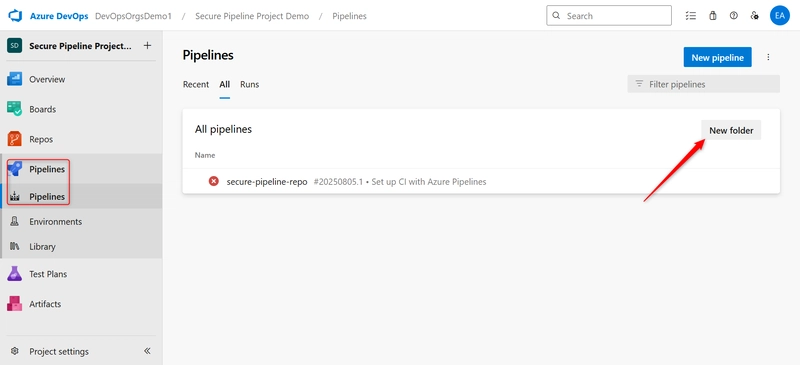
- Organize Pipelines Using Folders. Go to your Azure DevOps project, navigate to Pipelines > Pipelines. Click on the New folder button (icon next to the pipeline list)
- Create folders to categorize pipelines:
-
DevPipelines
-
ProdPipelines
-
SharedTemplates
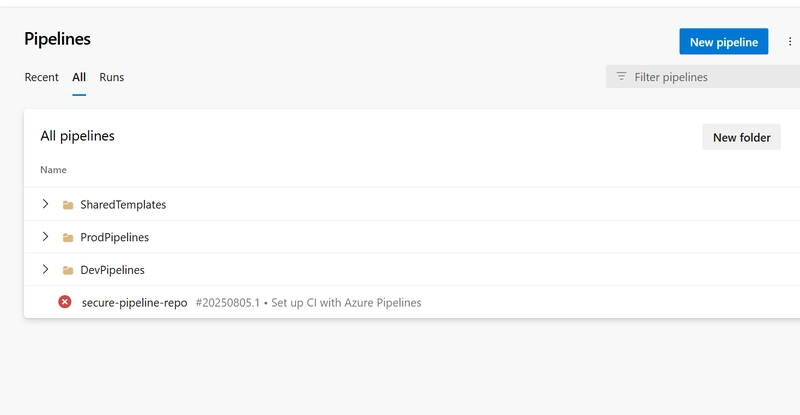
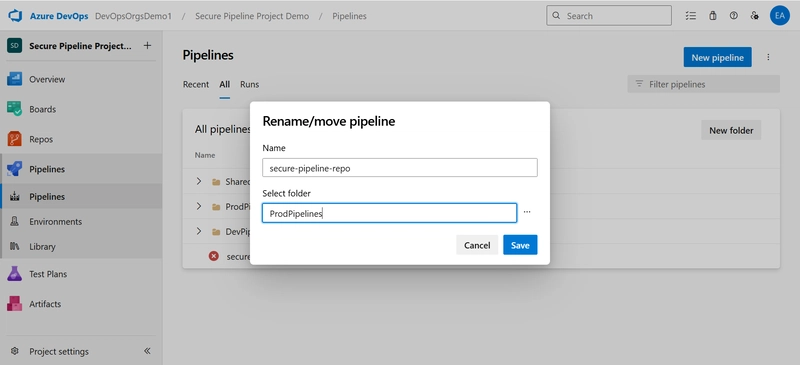
- Move Pipelines into Folders: In the Pipelines list, click the three dots (•••) beside a pipeline.Click Move/Rename. Select the appropriate folder (e.g., move production pipelines to
ProdPipelines).
Step 4: Use Secure Variable Management
Secure variable management involves storing sensitive information (like passwords, tokens, or API keys) in Azure DevOps as secret variables or through Azure Key Vault. These secrets are encrypted, hidden from logs, and only accessible during pipeline runtime to protect against unauthorized access or exposure.
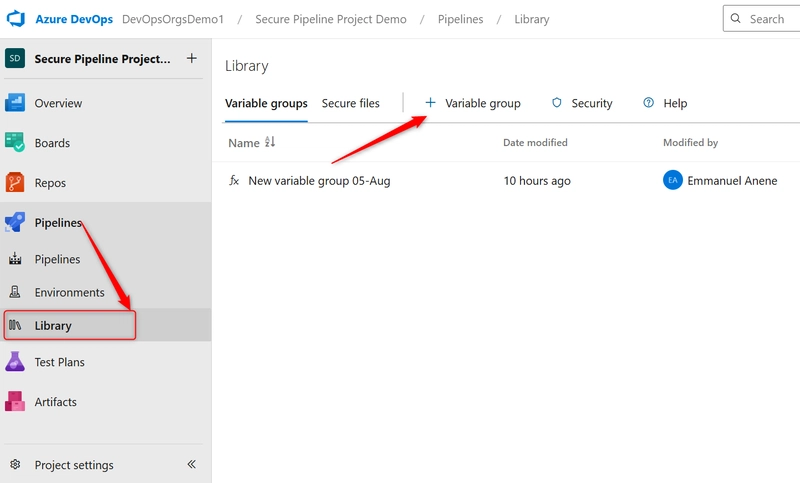
i. Go to ** Pipelines > Library >** and click + Variable Group to create a Variable Group.
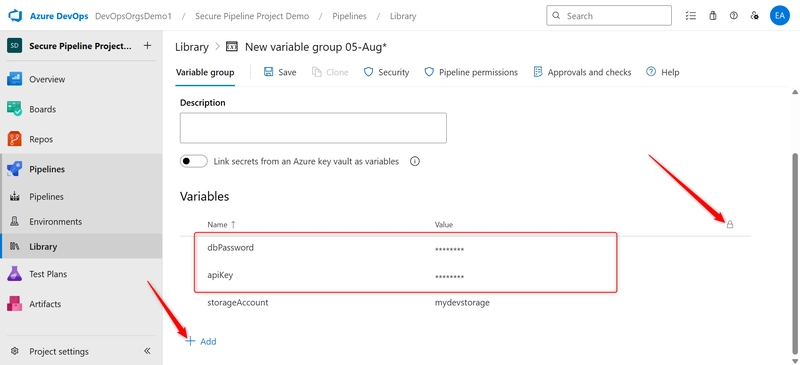
ii. Add variables like dbPassword, apiKey and mark them as secrets.
Conclusion – Part 1
In this first part of the series, we have laid the groundwork for building a secure Azure DevOps pipeline by focusing on:
-
Structuring projects and repositories for better isolation and governance
-
Implementing role-based identity and access management across projects, pipelines, and agents
-
Securing pipeline resources and environments to enforce deployment controls and approval workflows
These foundational steps are critical to reducing risks and aligning your DevOps processes with security best practices from the start.
Stay tuned for Part 2, where I will dive deeper into securing variable management, repository access, and modularizing pipelines with reusable templates!
AzureDevOps #DevSecOps #CloudSecurity #PipelineSecurity #MicrosoftLearn

