How to Use Appwrite in Android Jetpack Compose
Introduction
I love Appwrite. My first hackathon was actually from Appwrite (using Appwrite) 2 years ago, and I’ve been using it ever since.
It has basically every basic feature that you could want for a backend as a service and serves as a perfect base for almost any kind of app you could want to create.
It has a very generous free tier and therefore is really good for prototyping app ideas. And when you’re ready for production, you can easily upgrade!
However, I’ve only been using it for creating web applications. Recently I’ve started to take interest in mobile development, specifically using Jetpack Compose.
I thought Appwrite would be perfect to help me on my learning journey. I would have a ready backend and can just focus on learning the fundamentals of Jetpack Compose Android development.
That’s why I made this article.
Who Is This For?
Ultimately, this is for my future self and anyone else who might want a quick overview of how to integrate Appwrite into a Jetpack Compose Android application.
Note that I’m writing this as a beginner, but I will try to make sure all the info are objectively accurate.
At the end, I aim to have an article that I can look back to and get back a basic understanding fairly quickly when I’m rusty.
How This Is Going To Work
The tutorial is going to be heavily based on this quick start guide by Appwrite with a few adjustments.
For each new major Jetpack Compose/Android concept we encounter, I will explain it clearly within the current context without digressing too deep into other topics.
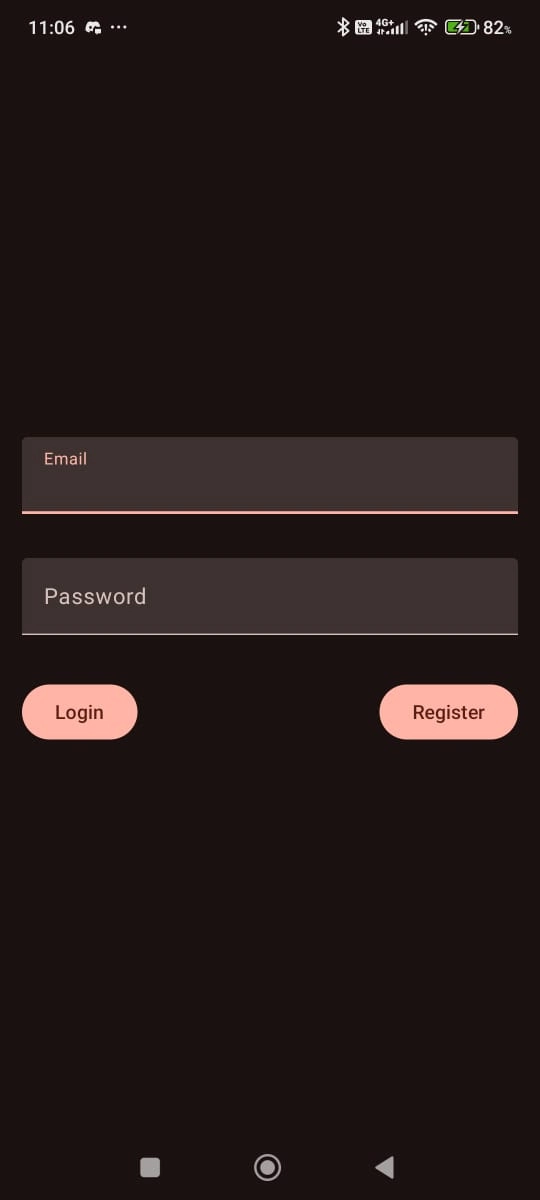
At the end, we will have the same result as the original article, which is a working Login Page that uses Appwrite. Spoiler:
Of course, I won’t just be regurgitating the same info as the original article: I will be explaining each concept clearly based on my objective understanding to add value to this article.
As a side note, it would definitely help if you came from a web background (like me), because I use a lot of analogies comparing this to web development, especially front end.
Prerequisites
- Android Studio
- Basic Programming Knowledge
- Appwrite Account
Integrating Appwrite
Let’s actually get into it.
Create Android Project
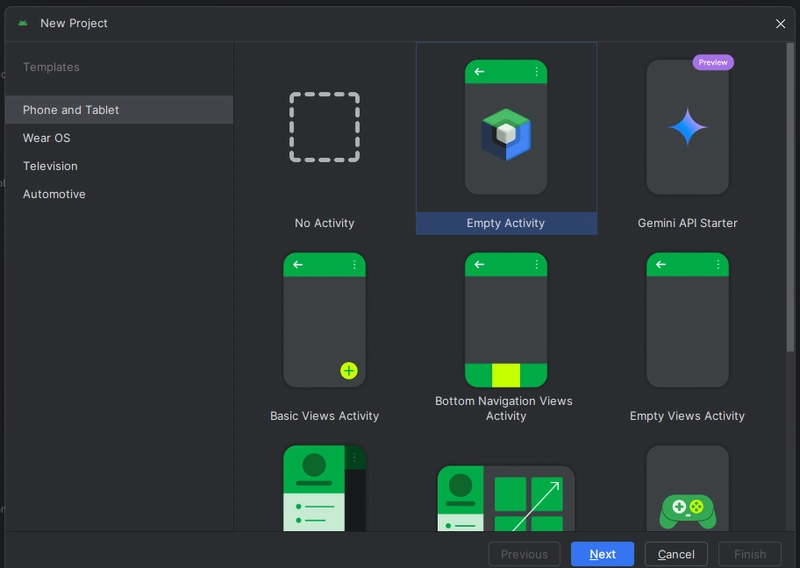
In Android Studio, create a new project. When given the prompt to choose a template, choose “Empty Activity”.
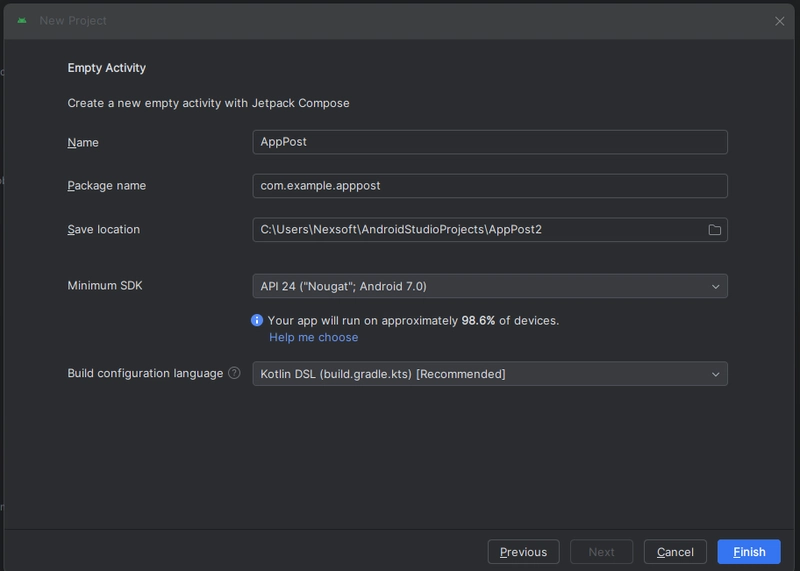
Name the application whatever you want, but pay attention to the “Package name”, as this will be used somewhere else later. Leave the other settings as the defaults:
Create Appwrite Project
Go to the Appwrite Console and create a new project.
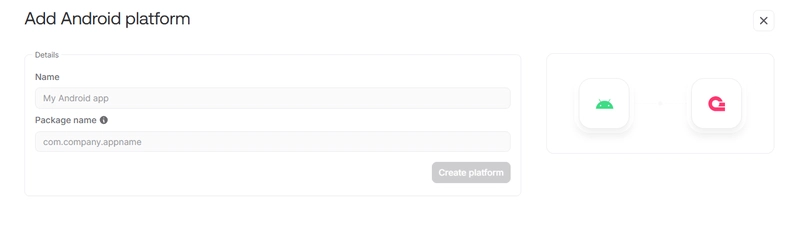
Create a New Android Platform
This is actually a very important step. Just like if you were creating a web app — where you’d need to create a web platform and add allowed domains, you need to add an Android platform and fill in the appropriate details from your actual Android app, namely the package name (I’ve found that the “Name” is irrelevant and that you can fill it with whatever you want).
Without this step (or by filling in the wrong package name), you’d get an invalid origin error.
Add Dependency
Just like you’d use NPM libraries inside your React projects, you can add existing libraries here in your Android project. Specifically, you can add the Appwrite SDK as part of your project so you can use existing code that the Appwrite team wrote to easily communicate with your project.
There are two build.gradle.kts files in your Android project, but you need to add the dependency to the one in the app level: <your project>/app/build.gradle.kts.
implementation("io.appwrite:sdk-for-android:8.1.0")
At time of writing, this is the latest version of the Appwrite SDK, but if you ever want to use the latest version, look it up in the respective library page where it is hosted in the Maven Repository.
Appwrite Singleton
In the same level as MainActivity.kt, create a new Kotlin file and call it… whatever you want. I’ll call mine Appwrite.kt. Fill it with the following:
package your.package.name

import android.content.Context
import io.appwrite.Client
import io.appwrite.ID
import io.appwrite.models.*
import io.appwrite.services.*

object Appwrite {
    lateinit var client: Client
    lateinit var account: Account

    fun init(context: Context) {
        client = Client(context)
            .setEndpoint("<YOUR_PROJECT_ENDPOINT>)
            .setProject("<YOUR_PROJECT_ID>")

        account = Account(client)
    }

    suspend fun onLogin(
        email: String,
        password: String,
    ): Session {
        return account.createEmailPasswordSession(
            email,
            password,
        )
    }

    suspend fun onRegister(
        email: String,
        password: String,
    ): User<Map<String, Any>> {
        return account.create(
            userId = ID.unique(),
            email,
            password,
        )
    }

    suspend fun onLogout() {
        account.deleteSession("current")
    }
}
In Kotlin, you create singletons using the object keyword. You create a singleton because you’d never need another instance of this object ever again.
Once it’s initialized, it will be available anywhere, and you’d never need to reinitialize it again.
Appwrite separates its APIs by services. Here, Client is the core or foundation that all services use. This makes sure the service actually communicates with the right project.
Account is one of Appwrite’s many services, used for handling authentication.
So, in summary:
- You create a singleton called
Appwrite - You give it two properties (
clientandaccount) - Those two properties have the
lateinitmodifier:
We use lateinit because we are defining the properties as “non nullable”. Meaning it has to have a value: instance of Client and Account respectively.
We could make it nullable by doing something like var client: Client? = null. But then we’d have to do null checks every time we want to use it: client?.doSomething().
So a compromise is lateinit: we are basically saying to the compiler: “Listen, I promise you it’s not going to be null when I use it. I’ll initialize it first. This won’t be null.” The error then goes away.
- Why can’t you just initialize it immediately in the singleton?
Because the Appwrite client requires Context, which you can’t get inside the singleton. It needs to be provided where context is available, like activities.
- We create suspended functions
onLogin,onRegister, andonLogout:
It’s suspended because the code inside it is asynchronous, i.e. registering a user. You need to add suspended because you call other other suspended functions.
This also allows you to await these functions and perform actions based on the timing of its execution:
try {
    onLogout()
    showSnackbar("Logged out successfully")
} catch (e: Exception) {
    showSnackbar("Failed to log out: ${e.message}")
}
This way you only show the snackbar ONCE you’ve actually logged out.
- Inside these defined functions, you call the account service’s built-in methods, provided by Appwrite.
Create Login Page
The template we choose earlier provided a MainActivity. As declared in the AndroidManifest.xml file, this will be the activity loaded when you build and run the app:
<activity
    android:name=".MainActivity"
    android:exported="true"
    android:label="@string/app_name"
    android:theme="@style/Theme.AppPost">
    <intent-filter>
        <action android:name="android.intent.action.MAIN" />

        <category android:name="android.intent.category.LAUNCHER"/>
    </intent-filter>
</activity>
We’ll replace the default activity with the following to create a login page:
package your.package.name

import android.os.Bundle
import android.widget.Toast
import androidx.activity.ComponentActivity
import androidx.activity.compose.setContent
import androidx.activity.enableEdgeToEdge
import androidx.compose.foundation.layout.Arrangement
import androidx.compose.foundation.layout.Column
import androidx.compose.foundation.layout.Row
import androidx.compose.foundation.layout.fillMaxSize
import androidx.compose.foundation.layout.fillMaxWidth
import androidx.compose.foundation.layout.padding
import androidx.compose.foundation.text.KeyboardOptions
import androidx.compose.material3.Button
import androidx.compose.material3.MaterialTheme
import androidx.compose.material3.Scaffold
import androidx.compose.material3.Surface
import androidx.compose.material3.Text
import androidx.compose.material3.TextField
import androidx.compose.runtime.Composable
import androidx.compose.runtime.LaunchedEffect
import androidx.compose.runtime.getValue
import androidx.compose.runtime.mutableStateOf
import androidx.compose.runtime.remember
import androidx.compose.runtime.rememberCoroutineScope
import androidx.compose.runtime.setValue
import androidx.compose.ui.Alignment
import androidx.compose.ui.Modifier
import androidx.compose.ui.platform.LocalContext
import androidx.compose.ui.text.input.KeyboardType
import androidx.compose.ui.text.input.PasswordVisualTransformation
import androidx.compose.ui.tooling.preview.Preview
import androidx.compose.ui.unit.dp
import your.package.name.ui.theme.AppPostTheme
import kotlinx.coroutines.launch

class MainActivity : ComponentActivity() {
    override fun onCreate(savedInstanceState: Bundle?) {
        super.onCreate(savedInstanceState)
        enableEdgeToEdge()

        Appwrite.init(applicationContext)

        setContent {
            AppPostTheme {
                Scaffold(modifier = Modifier.fillMaxSize()) { innerPadding ->
                    LoginPage(modifier = Modifier.padding(innerPadding))
                }
            }
        }
    }
}

@Composable
fun LoginPage(modifier: Modifier = Modifier) {
    Surface(
        modifier = modifier.fillMaxSize(),
        color = MaterialTheme.colorScheme.background
    ) {
        val context = LocalContext.current

        val coroutineScope = rememberCoroutineScope()

        var user by remember { mutableStateOf("") }
        var email by remember { mutableStateOf("") }
        var password by remember { mutableStateOf("") }

        LaunchedEffect(Unit) {
           coroutineScope.launch {
               try {
                    user = Appwrite.account.get().email
               } catch(e: Exception) {
                   Toast.makeText(context, e.message, Toast.LENGTH_SHORT).show()
               }
           }
        }

        if (user.isNotEmpty()) {
            Column(
                modifier = Modifier.fillMaxSize(),
                horizontalAlignment = Alignment.CenterHorizontally,
                verticalArrangement = Arrangement.Center
            ) {
                Text(text = "Logged in as $user")
                Button(onClick = {
                    coroutineScope.launch {
                        Appwrite.onLogout()
                        user = ""
                    }
                }) {
                    Text("Logout")
                }
            }
        }else {
            Column(
                modifier = Modifier.fillMaxSize(),
                horizontalAlignment = Alignment.CenterHorizontally,
                verticalArrangement = Arrangement.Center
            ) {
                TextField(
                    value = email,
                    onValueChange = { email = it },
                    label = { Text("Email") },
                    modifier = Modifier
                        .fillMaxWidth()
                        .padding(16.dp)
                )
                TextField(
                    value = password,
                    onValueChange = { password = it },
                    label = { Text("Password") },
                    modifier = Modifier
                        .fillMaxWidth()
                        .padding(16.dp),
                    visualTransformation = PasswordVisualTransformation(),
                    keyboardOptions = KeyboardOptions(keyboardType = KeyboardType.Password)
                )
                Row(
                    modifier = Modifier
                        .fillMaxWidth()
                        .padding(16.dp),
                    horizontalArrangement = Arrangement.SpaceBetween
                ) {
                    Button(onClick = {
                        coroutineScope.launch {
                            try {
                                Appwrite.onLogin(email, password)

                                user = email

                            } catch (e: Exception) {
                                Toast.makeText(context, e.message, Toast.LENGTH_SHORT).show()
                            }
                        }
                    }) {
                        Text("Login")
                    }
                    Button(onClick = {
                        coroutineScope.launch {
                            try {
                                Appwrite.onRegister(email, password)
                            } catch (e: Exception) {
                                e.printStackTrace()
                                Toast.makeText(context, e.message, Toast.LENGTH_SHORT).show()
                            }
                        }
                    }) {
                        Text("Register")
                    }
                }
            }
        }


    }
}
Like I said, I won’t digress too far into other topics and I’ll stick to what’s on the code. For example, I won’t go into other activity cycles like onDestroy, etc.
In summary:
- We override the
onCreatelifecycle method. It’s the first one called among the others, which makes it perfect for initializations (like our Appwrite singleton) - Since we override
onCreate, you want to call the originalonCreateto make sure everything works as intendedsuper.onCreate(savedInstanceState). - Then you initialize the Appwrite singleton with
Appwrite.init(applicationContext)
This is the perfect place for initializing our singleton because in modern Jetpack Compose apps, there usually only is one activity. And onCreate is the first lifecycle that’s called.
This means that, for this simple app, you likely won’t be calling the singleton’s methods before it’s initialized.
- You provide the
initmethod withapplicationContext:
applicationContextinherits fromContext, which provides app specific information. Appwrite likely needs this for usingSharedPreferences(similar to local storage in the web) for storing auth tokens.Contextallows Appwrite to find where this is located for your specific app.
Other things can have Context as well, but applicationContext is safe because it lasts the whole lifetime of the app, as opposed to an Activity’s Context which may be destroyed during the run of the app.
-
setContentis where you “draw” your page/activity. -
AppPostThemewraps around everything to provide the theme of the app, like primary color, background color, etc. This will be called different things depending on what you named your app. An app named “Super App” will haveSuperAppTheme. -
You create the
LoginPagecomposable
The @Composable annotation marks it as a composable. This means that the function will “describe your UI”. Composables are where you “write” your UI.
-
LoginPagefirst callsSurface, a built-in composable. You provide it withMaterialTheme.colorScheme.background, the value of which will be determined by your theme. -
You get the local context using
LocalContext.current. This will resolve to the current Activity’sContextas that’s where login page is called -
You create a coroutine scope:
val coroutineScope = rememberCoroutineScope()
Coroutines are where you write asynchronous code. In this specific case, inside the composable, you use rememberCoroutineScope.
This allows running asynchronous code to survive recompositions. That’s when the composable redraws itself after state change.
- You declare states
Ooh boy this took a while to fully understand.
var user by remember { mutableStateOf("") }
var email by remember { mutableStateOf("") }
var password by remember { mutableStateOf("") }
You use var because you want to reassign these at some point.
You use mutableStateOf so that it will trigger recomposition after change. (Making sure UI updates after state change).
You use remember to make sure the state change survives said recomposition (within the same composition).
You use by because without it mutableStateOf would’ve required you to use variable.value instead of just variable to access the state.
- You use
LaunchedEffectto check if you have an active session after the app is run
LaunchedEffect is a side-effect handler that gets executed every time its dependencies change.
In this case, there are no dependencies so you put Unit in it. So the code will only get executed once during the first composition.
You use it because a user might have an active session, so you get the current user and if they exist, you assign their email to email.
You also use coroutineScope.launch to make sure the fetching of the current user doesn’t get interrupted by recomposition, i.e. if, while fetching, the user updates the input values.
- Conditional UI rendering
You use an if else statement to render different UI based on whether or not a user is logged in (whether the email state is empty or not)
- Composables (
Column,Text,Button, etc.)
You arrange your UI by calling composable functions. Some composables like Column take in other composables and arrange them in certain ways.
Some composables directly render UI and add interactivity, like Button and Text.
Modifier is used to style a composable. Like the style property in HTML or React elements.
- Using
coroutineScopeto run suspended functions in the Appwrite singleton
Conclusion
If you were following along, after creating the template project with an empty activity, you should have done these things:
- Created the Appwrite singleton in
Appwrite.kt - Modified the
MainActivity.ktfile to create a login page.
And if you run the app, you should have something like this:

If you register an account and subsequently log in, the login form will disappear and be replaced with this (thanks to conditional rendering):