How to create a simple waitlist form in Next.js using Supabase to collect responses
Prerequisites
-
Initialize a Next.js project (Next.js 15 recommended) with Tailwind CSS.
-
(Optional) This guide uses Shadcn UI components. Install it from the official docs website: ui.shadcn.com
-
Setup Supabase credentials in
.env.local -
Setup supabase clients and middleware (optional)
Note: Replace the
<Input />,<Button>, and<Toast />components with your own components or default tags if you don’t want to install Shadcn UI
Here’s the notes on how to create a simple waitlist form in Next.js, collect responses from it, and store it on Supabase.
-
Create a table called “waitlist“ in the Supabase SQL Editor:
-- 1. Create the table for the waitlist CREATE TABLE public.waitlist ( id bigint GENERATED BY DEFAULT AS IDENTITY PRIMARY KEY, email text NOT NULL UNIQUE, created_at timestamptz DEFAULT now() ); -- 2. Enable Row Level Security (RLS) on the table ALTER TABLE public.waitlist ENABLE ROW LEVEL SECURITY; -- 3. Create a policy that allows public insertion into the table CREATE POLICY "Allow public insert" ON public.waitlist FOR INSERT WITH CHECK (true); -
Create the API for handling the form submission,
/api/waitlist:import { createClient } from '@/utils/supabase/server'; import { NextRequest, NextResponse } from 'next/server'; export async function POST(request: NextRequest) { const { email } = await request.json(); if (!email) { return NextResponse.json({ error: 'Email is required' }, { status: 400 }); } const supabase = await createClient(); const { error } = await supabase.from('waitlist').insert([{ email: email.trim().toLowerCase() }]); if (error) { if (error.code === '23505') { // unique_violation return NextResponse.json({ message: 'You are already on the waitlist.' }, { status: 200 }); } return NextResponse.json({ error: error.message || 'Something went wrong' }, { status: 500 }); } return NextResponse.json({ message: 'You have been added to the waitlist!', email: email.trim().toLowerCase() }); } -
Add this waitlist form code to your landing page or wherever you want it:
"use client"; import { Button } from "@/components/ui/button"; import { Input } from "@/components/ui/input"; import { useState } from "react"; import { toast } from "sonner"; import { Loader2, Check } from "lucide-react"; export default function Page() { const [email, setEmail] = useState(''); const [loading, setLoading] = useState(false); const [isSuccess, setIsSuccess] = useState(false); // Function to handle the submission const handleSubmit = async (e: React.FormEvent<HTMLFormElement>) => { e.preventDefault(); if (!email) { toast.error("Please enter your email."); return; } setLoading(true); try { const response = await fetch('/api/waitlist', { method: 'POST', headers: { 'Content-Type': 'application/json', }, body: JSON.stringify({ email: email.trim().toLowerCase() }), }); const data = await response.json(); if (response.ok) { toast.success(data.message); setEmail(''); setIsSuccess(true); } else { toast.error(data.error || "Something went wrong."); } } catch { toast.error("An unexpected error occurred."); } finally { setLoading(false); } }; return ( <> {/* Your JSX Code */} {/* Waitlist form Code: */} {isSuccess ? ( <Button disabled className="cursor-default bg-black text-white border disabled:opacity-100"> <Check className="h-4 w-4 text-green-500" /> you're on the list! </Button> ) : ( <form onSubmit={handleSubmit} className="flex gap-2"> <Input type="email" placeholder="e.g., naruto@gmail.com" value={email} onChange={(e) => setEmail(e.target.value)} disabled={loading} /> <Button type="submit" className="cursor-pointer" disabled={loading}> {loading ? <><Loader2 className="animate-spin mr-2" /> joining...</> : 'join waitlist'} </Button> </form> )} </> ); }Note: There is some
toastbased logic in the UI component. Replace the toast logic withconsole.log()statements if you’re not using or haven’t installed thesonnerpackage. -
Test, Deploy, and Launch!
Result
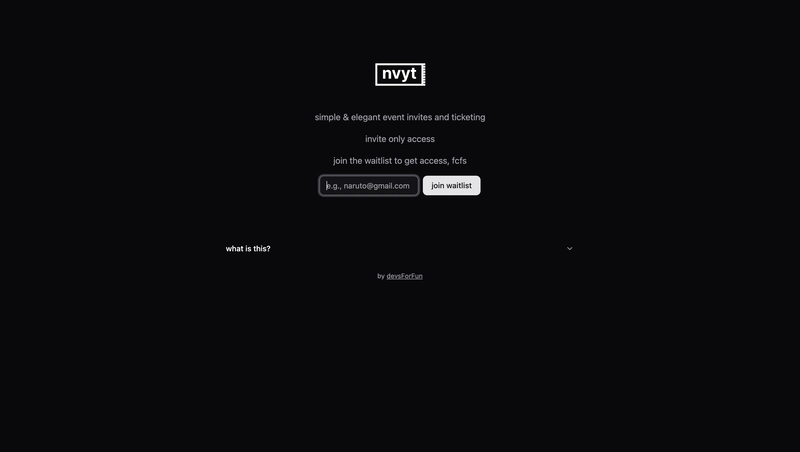
Here is an example site, called nvyt.xyz that is using the above code:
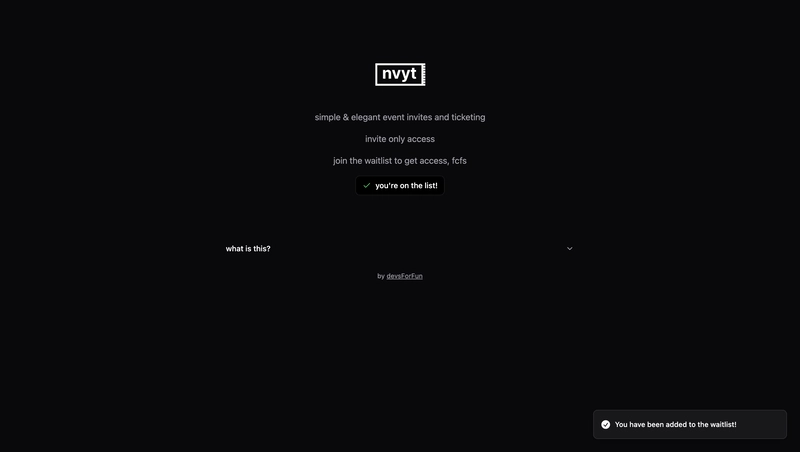
Here’s the result upon submitting the form:
Note:
If you’re using Shadcn UI components, you should see a similar result in the UI.
I’ve used the
<Toast />component in my root layout is how I got that toast, in the bottom right corner.
Here’s how to use this with AI tool(s) like Cursor
Write a prompt saying:
“Build a waitlist page using the instructions and the code, as is, in this blog post:“
And, paste this post’s link in an code editor like Cursor and let it handle the coding for you!
Bonus
You can refer to my other article about rate-limiting your Next.js APIs like the one we have here, to prevent brute-force attacks bombing your public waitlist form with random email address. It has the AI prompt too, if you just want to skip coding.
Here’s the link: How to rate limit your Next.js APIs using Upstash?
P.S.
And… that’s it! Hope this helps!
Do you need a website or an app for your business?
You can reach out to me at @CharanMNX on X/Twitter or email me at charan@devsforfun.com
Here are my other socials if you wanna talk:
-
Instagram: iam.charan.dev
-
X/Twitter: @CharanMNX
-
LinkedIn: Charan Manikanta Nalla
-
GitHub: CharanMN7
-
YouTube: Charan
-
Website: charan.dev
Happy Coding or Vibe Coding!