Google Agent Development Kit : Core Concept
Recently, Google announced their Agent Development Kit (ADK), which is an open-source Python (and Java recently) library to help developers build agents.
We’re entering a new phase where AI doesn’t just respond; it can act. These agents can search the web, write and execute code, read documents, call APIs, and perform many other tasks to get things done, often without needing step-by-step instructions.
Since May 20th 2025, the framework is officially stable in Python so I was immediately interested in diving in to understand all the possibilities it offers.
In this post, I’ll walk you through all the core concepts, what it is, and what it offers.

🔍 What is Google Agent Development Kit?
Agent Development Kit is a framework to build, run, and evaluate AI agents. These agents can be simple (answering a question with a tool) or more advanced (planning tasks, calling APIs, interacting with files, or even spawning sub-agents).
💡 Google says it uses the same underlying framework as its internal systems, like Agentspace or those powering Gemini experiences in tools like Gmail or Docs.
ADK is:
- Open-source, promoting community collaboration.
- Designed for both solo agents and multi-agent systems.
- Is able to work seamlessly with Google Cloud services like Vertex AI and Cloud Run, but is also capable of running locally or with other models.
ADK helps us to:
- Create agents that use LLMs to plan and reason
- Add tools that connect to APIs or run code
- Run workflows with multiple agents working together
- Deploy our agents locally or in the cloud
🧩 Core Concept and Architecture of ADK
So how does ADK actually work under the hood? It’s built around a few key building blocks.

ADK is built around several key building blocks that enable its powerful capabilities:
- 🧠 Agent: The fundamental unit designed to perform specific jobs. This includes LlmAgent (driven by LLMs) and various WorkflowAgent types (SequentialAgent, ParallelAgent, LoopAgent), and Custom Agents for maximum flexibility.
- 🛠️ Tools: Functions or capabilities that extend an agent’s abilities, allowing it to interact with external systems (e.g., searching, calculating, API calls, MCP).
- 📞 Callbacks: Custom code snippets that allow you to insert logic at specific points in an agent’s process, useful for logging, monitoring, or modifying behavior.
- 🧾 Events: Records of everything happening within a session (user messages, agent replies, tool calls), providing a clear historical trace for debugging and evaluation.
- 💾 State, Session, and Memory: A Session represents an ongoing interaction, managing its short-term State (current context), while Memory provides longer-term recall across sessions.
- 📁 Artifact Management: A mechanism for agents to manage and store files and data blobs (like generated CSVs or images) associated with a session.
- ⚙️ Code Execution: A powerful capability allowing agents to dynamically write and run code during their process to solve complex problems or automate tasks.
- 🧭 Planning: An advanced feature where agents can break down complex goals into a sequence of steps, determining the optimal approach using their tools and reasoning.
- 🧬 Models: The Large Language Models (LLMs) that LlmAgents rely on for reasoning. ADK is model-agnostic, supporting various providers while being optimized for Gemini and the Google ecosystem.
- 🏃 Runner: The orchestrator within ADK that manages the flow of events between the user, the agent, and its tools, ensuring everything executes in the correct order.
🚀 Let’s implement our first multi-agent system
For this hands-on part, our goal is to build a smart system that can organize a weekend trip to a city, planning an optimized itinerary to visit the most popular places efficiently.
1️⃣ Step 1: Defining our specialized agents
👤 The places_finder Agent
places_finder = LlmAgent(
    name="places_finder",
    model="gemini-2.0-flash",
    description="An agent to find popular places to visit in a city.",
    instruction=(
        "You are a helpful travel researcher. Your task is to find the top 5 most popular or highly-rated tourist attractions in the given city."
        "Use the Google Search tool for this. For each place, provide its exact name and, if possible, its full address or a clear identifier."
        "Return the list of places, clearly separated."
    ),
    tools=[
        google_search
    ]
)
The places_finder is an LlmAgent equipped with the Google Search tool, giving it the ability to browse the web for information.
👤 The geocode_finder Agent
Before we can plan a path, we need precise coordinates for our places of interest.
That’s where the geocode_finder comes in.
It takes a human-readable address or place name and converts it into a geocode (latitude and longitude) leveraging the MCPToolset for Google Maps to perform its core function.
geocode_finder = LlmAgent(
    name="geocode_finder",
    model="gemini-2.0-flash",
    description="Agent to geocode addresses and place names into coordinates.",
    instruction=(
        "You are a precise geocoding assistant. You will receive an address or a place name."
        "Your only task is to use the provided Google Maps MCP tool to get its exact geographic coordinates (latitude and longitude)."
        "Return ONLY the latitude and longitude, formatted as a string 'latitude,longitude' (e.g., '48.8584,2.2945')."
        "If you cannot find the geocode, return 'ERROR'."
    ),
    tools=[
        MCPToolset(
            connection_params=StdioServerParameters(
                command='npx',
                args=[
                    "-y",
                    "@modelcontextprotocol/server-google-maps",
                ],
                env={
                    "GOOGLE_MAPS_API_KEY": google_maps_api_key
                }
            ),
        )
    ]
)
👤 The path_planner Agent
path_planner = LlmAgent(
    name="path_planner",
    model="gemini-2.0-flash",
    description="An agent to optimize the visiting path for a list of geocoded locations.",
    instruction=(
        "You are an expert route optimization specialist. You will receive a list of geocodes (latitude,longitude strings) "
        "representing places to visit in a city. Your goal is to use the Google Maps MCP tool to find the most efficient travel path "
        "to visit all these locations, minimizing travel time and avoiding unnecessary backtracking."
        "Return the optimized list of geocodes in the recommended visiting order, each on a new line. "
        "Also, provide a brief, clear textual description of the optimized route."
    ),
    tools=[
        MCPToolset(
            connection_params=StdioServerParameters(
                command='npx',
                args=[
                    "-y",
                    "@modelcontextprotocol/server-google-maps",
                ],
                env={
                    "GOOGLE_MAPS_API_KEY": google_maps_api_key
                }
            ),
        )
    ]
)
The path_planner is an LlmAgent equipped with the MCPToolset for Google Maps, giving it the power to calculate routes.
This agent’s job is to figure out the best route. It’s smart enough to understand geographical points and use Google Maps to optimize a visiting path.
👤 The root_agent
This is the main agent the user will interact with. Its role is to orchestrate the entire planning process by calling upon the other specialized agents.
root_agent = Agent(
    name="city_trip_planner",
    model="gemini-2.0-flash",
    description="An agent to plan an optimized city visit itinerary.",
    instruction=(
        "You are an experienced travel agent specializing in city tours. "
        "When a user asks to plan a visit in a city, follow these steps meticulously:"
        "1. First, use the `places_finder` tool to get a list of the top popular places in that city."
        "2. For each place found, use the `geocode_agent` tool *one by one* to obtain its geographic coordinates. Handle any places that cannot be geocoded by noting them but continuing with the others."
        "3. Once you have geocodes for all successfully identified places, pass this *list of geocodes* to the `path_planner` tool to get the most optimized visiting route."
        "4. Finally, present the complete, optimized itinerary to the user in a clear and friendly manner. Include the order of places to visit and the route description provided by the path planner. Do not include internal tool outputs in the final user response."
        "If you encounter any issues (e.g., unable to find places or geocode them), inform the user about the problem."
    ),
    tools=[
        agent_tool.AgentTool(agent=path_planner),
        agent_tool.AgentTool(agent=geocode_finder),
        agent_tool.AgentTool(agent=places_finder),
    ]
)
The root_agent is also an LlmAgent acting as our “City Trip Planner” : first find places, then use geocode_agent to get their coordinates, and finally pass those coordinates to path_planner for routing.
Notice the tools list for root_agent: it uses agent_tool.AgentTool to include places_finder, path_planner and geocode_agent as its own tools.
This is an ADK feature, agents can directly call other agents as if they were simple functions, enabling multi-agent hierarchies.
2️⃣ Step 2: Running the agent
The Agent Development Kit can be easily installed following these instructions : https://github.com/google/adk-python
Then, to open the ADK developer interface, simply run the command:
adk web
Once the ADK UI is open, we can start a new conversation. Let’s ask our agent team to plan a weekend trip to Nantes.
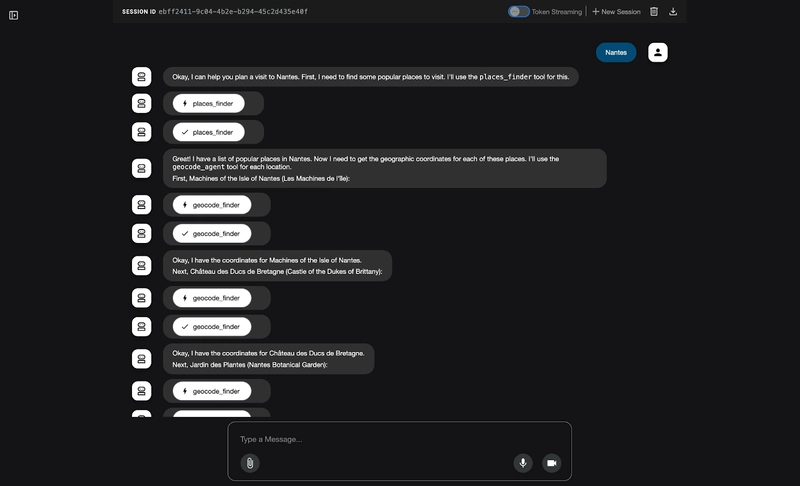
The ADK UI provides a powerful visual representation of our agents working behind the scenes.
The interaction graph is helpful to understand multi-agent systems.
We’ll see the root_agent delegating tasks, the places_finder researching attractions, the geocode_agent converting addresses to coordinates, and finally, the path_planner optimizing the route.

What’s Next?
I hope this first article has provided you with a clearer understanding of what Google ADK is and how you can begin creating your own agents to help with daily tasks. You’ve seen a concrete example of setting up a multi-agent system, and had an overview of the multitude of tools you can connect to these agents.
In the next article, we’ll try to use other tools provided by this framework, explore custom functions, deep dive into MCP, and look into deploying your agents to Google Cloud.