Deploy Dragonfly Replication
Introduction
In the fast-paced realm of modern data management, where speed, scalability, and reliability are non-negotiable, Dragonfly emerges as a compelling open-source alternative to traditional in-memory stores like Redis. Built for efficiency and compatibility, Dragonfly delivers exceptional performance while consuming fewer resources, making it an ideal choice for high-throughput applications. However, as your system grows, safeguarding against data loss and downtime requires more than just raw speed—it demands robust redundancy.
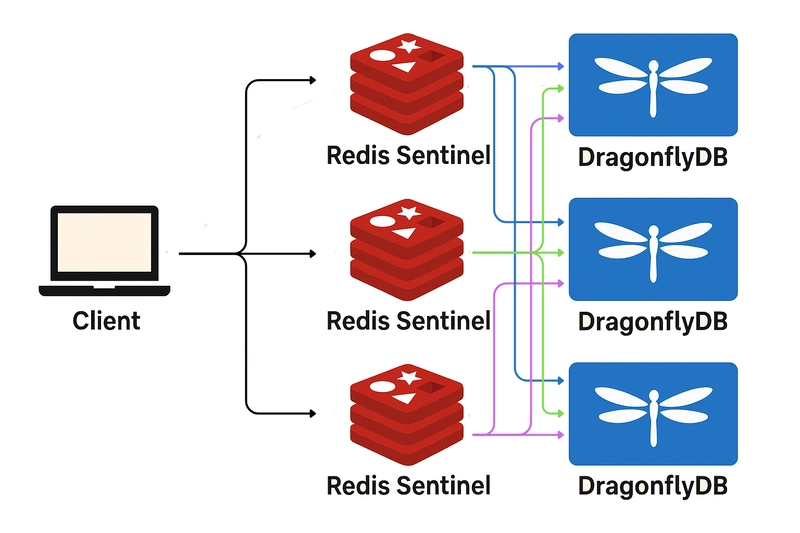
In this post, we will deploy Dragonfly in replication mode, utilizing Dragonfly itself and Redis Sentinel as the high-availability solution.
Prerequisites
For this scenario, we have 3 Linux machines with the following specifications:
| Instance | OS | IP | ROLE | Services |
|---|---|---|---|---|
| node-1 | Debian 12 | 192.168.1.10 | Master | Dragonfly,Sentinel |
| node-2 | Debian 12 | 192.168.1.11 | Slave | Dragonfly,Sentinel |
| node-3 | Debian 12 | 192.168.1.12 | Slave | Dragonfly,Sentinel |
Also, we have to open ports 6379 and 26379 on each of the instances.
We will need to install Dragonfly and Redis Sentinel on these instances.
Install Dragonfly
First things first, we need to install Dragonfly on all our instances.
Here we’ve used the binary method. For this purpose, visit the address Download Dragonfly and choose the version for your OS.

Here we choose Download Latest (AMD64 Debian).
Install the executable:
root@node-1:~# apt-get install ./dragonfly_amd64.deb
And now verify the installation.
node 1:
root@node-1:~# dragonfly --version

dragonfly v1.32.0-960ddf41c41ce27d5c038856957b4d740629f94b
build time: 2025-08-03 19:28:00
node 2:
root@node-2:~# dragonfly --version

dragonfly v1.32.0-960ddf41c41ce27d5c038856957b4d740629f94b
build time: 2025-08-03 19:28:00
node 3:
root@node-3:~# dragonfly --version

dragonfly v1.32.0-960ddf41c41ce27d5c038856957b4d740629f94b
build time: 2025-08-03 19:28:00
Dragonfly Configuration
The configurations are stored in /etc/dragonfly/dragonfly.conf. The service uses the options in this file as the running flags for the running instance. Edit or create the file dragonfly.conf.
root@node-1:~# vim /etc/dragonfly/dragonfly.conf
And insert the following options:
--pidfile=/var/run/dragonfly/dragonfly.pid
--log_dir=/var/log/dragonfly
--dir=/var/lib/dragonfly
--max_log_size=20
--version_check=true
--port=6379
--bind=192.168.1.10
--dbfilename=dump
--logtostdout=false
--maxmemory=2gb
--maxclients=50
--requirepass=A_STRONG_PASSWORD
--tcp_keepalive=300
--cache_mode=true
--snapshot_cron=*/30 * * * *
--keys_output_limit=16192
--masterauth=A_STRONG_PASSWORD
--proactor_threads=1
--conn_io_threads=2
NOTE: Dragonfly process runs as user dfly. Make sure that the Dragonfly files are owned by this user:
root@node-1:~# chown -R dfly:dfly /var/lib/dragonfly
root@node-1:~# chown -R dfly:dfly /var/log/dragonfly
Now restart the Service and verify its health:
root@node-1:~# systemctl restart dragonfly.service
root@node-1:~# systemctl status dragonfly.service

🟢 dragonfly.service - Modern and fast key-value store
     Loaded: loaded (/lib/systemd/system/dragonfly.service; enabled; preset: enabled)
     Active: active (running) since Wed 2025-08-13 17:04:30 +0330; 1s ago
   Main PID: 545394 (dragonfly)
      Tasks: 2 (limit: 2255)
     Memory: 55.5M
        CPU: 237ms
     CGroup: /system.slice/dragonfly.service
             └─545394 /usr/bin/dragonfly --flagfile=/etc/dragonfly/dragonfly.conf
NOTE: Do the above steps on all instances(in our case 3 nodes).
Dragonfly Options Explanation
- pidfile: The location of the service pid file.
- log_dir: Where to store the log files.
- dir: The directory to store the DB data.
- max_log_size: The maximum size in MB of each log file(i.e. ERROR, WARNING and INFO).
- version_check: Whether or not to check for the new version of the service.
- port: The port service listens on.
- bind: Which IP to bind to. The clients will have to use this IP address to connect to.
- dbfilename: The DB backup file to create and store data in. Dragonfly uses “.dfs” extension for its dump files(e.g., dump-0001.dfs).
- logtostdout: if true, logs to standard output.
- maxmemory: The maximum memory the Dragonfly database is allowed to consume in memory.
- maxclients: Maximum number of client connections that are allowed to be established.
- requirepass: The root Dragonfly password.
- tcp_keepalive: How many seconds to let an idle connection stay open.
- cache_mode: If true, the backend behaves like a cache, by evicting entries when getting close to the maxmemory limit
- snapshot_cron: Cron expression to save DB to the disk.
-
keys_output_limit: Maximum number of keys output by the
KEYScommand. - masterauth: The password to authenticate with master in replication mode.
- proactor_threads: The number of reserved io-threads in the pool. These threads consume io-threads when the service starts running. For example, if this value is set to 1 and there are 2 core CPUs in the machine, 50% of the IO capacity gets busy.
- conn_io_threads: The number of threads to handle server connections.
NOTE: In some Linux instances(usually with older Kernels), we must force Dragonfly to use epol mode. Otherwise, the service won’t start. For that, the following configs can be added to the config file:
--force_epoll
--epoll_file_threads=2
Create Replication
Now that the instances are running, we can configure the replication. For this scenario, we set node-1 as master and the other 2 nodes as slaves.
Connect to Dragonfly server on node-2:
root@node-2:~# redis-cli -h 192.168.1.11 -p 6379
192.168.1.11:6379> auth *****
And execute the following commands:
192.168.1.11:6379> REPLICAOF 192.168.1.10 6379
192.168.1.11:6379> ROLE
1) "slave"
2) "192.168.1.10"
3) "6379"
4) "online"
Also on node-3:
root@node-3:~# redis-cli -h 192.168.1.12 -p 6379
192.168.1.12:6379> auth *****
And execute the following commands:
192.168.1.12:6379> REPLICAOF 192.168.1.10 6379
192.168.1.12:6379> ROLE
1) "slave"
2) "192.168.1.10"
3) "6379"
4) "online"
At last, connect to node-1 and promote it to master:
root@node-1:~# redis-cli -h 192.168.1.10 -p 6379
192.168.1.10:6379> auth *****
192.168.1.10:6379> REPLICAOF NO ONE
192.168.1.10:6379> ROLE
1) "master"
2) 1) 1) "192.168.1.11"
      2) "6379"
      3) "online"
   2) 1) "192.168.1.12"
      2) "6379"
      3) "online"
Install Redis Sentinel
Redis Sentinel is used for high availability and automatic failover in Dragonfly deployments. It monitors instances, detects failures, and automatically promotes a replica to master if the master fails.
To install Redis Sentinel on Debian-based systems, use:
root@node-1:~# apt-get update && apt-get install redis-sentinel
Edit redis-sentinel config file located in /etc/redis/sentinel.conf:
root@node-1:~# vim /etc/redis/sentinel.conf
And check or add the following configs:
port 26379
sentinel monitor mymaster 127.0.0.1 6379 2
sentinel down-after-milliseconds mymaster 3000
sentinel failover-timeout mymaster 8000
sentinel parallel-syncs mymaster 1
sentinel auth-pass mymaster REDIS_ROOT_PASSWORD
NOTE: The REDIS_ROOT_PASSWORD is the password set in Dragonfly configuration by the requirepass flag.
Restart and verify the redis-sentinel service:
root@node-1:~# systemctl restart redis-sentinel.service
root@node-1:~# systemctl status redis-sentinel.service

🟢 redis-sentinel.service - Advanced key-value store
     Loaded: loaded (/lib/systemd/system/redis-sentinel.service; enabled; preset: enabled)
     Active: active (running) since Fri 2025-08-15 22:47:28 +0330; 5s ago
       Docs: http://redis.io/documentation,
             man:redis-sentinel(1)
   Main PID: 549960 (redis-sentinel)
     Status: "Ready to accept connections"
      Tasks: 5 (limit: 2255)
     Memory: 10.8M
        CPU: 114ms
     CGroup: /system.slice/redis-sentinel.service
             └─549960 "/usr/bin/redis-sentinel *:26379 [sentinel]"
NOTE: Do the above steps on all instances(3 nodes in our case).
Verify the sentinel’s status by running this command:
192.168.1.12:26379> INFO sentinel
# Sentinel
sentinel_masters:1
sentinel_tilt:0
sentinel_tilt_since_seconds:-1
sentinel_running_scripts:0
sentinel_scripts_queue_length:0
sentinel_simulate_failure_flags:0
master0:name=mymaster,status=ok,address=192.168.1.10:6379,slaves=2,sentinels=3
The Dragonfly Replica is now ready!
Now the applications can connect to the Sentinels, and they will handle the connections and send requests to the master node.
Summary
In this blog, we implemented replication for three Dragonfly instances with Redis-Sentinel. We walked through the configuration of Dragonfly for replication, integrated Redis Sentinel for failover, and optimized the configuration to get an acceptable performance.
To get more info about the services and their respective options, please visit the following sites:
Thank you for reading this article and please leave a comment if you have any suggestions or figured out an issue with this post.