Custom Middleware in ASP.NET Core
Middleware manages requests and responses in a modular, pipeline-based manner. It processes HTTP requests and can execute actions before forwarding the request to the next middleware or returning a response to the client.
How Middleware Works?
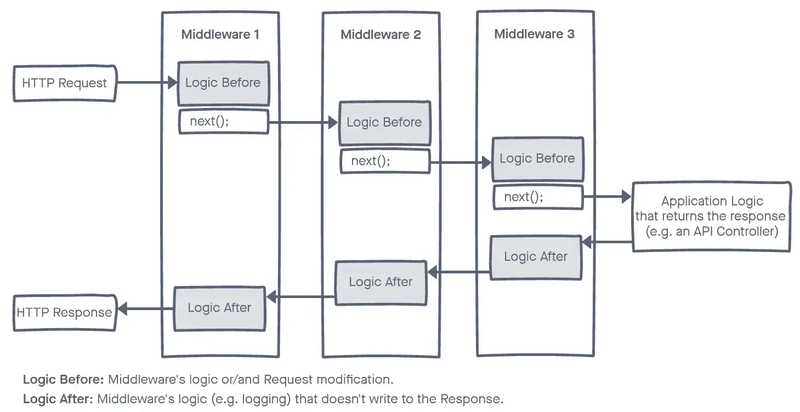
This diagram illustrates how middleware operates in an .NET Core application pipeline. Let’s break down each component:
-
HTTP Request: An incoming HTTP request enters the application and moves through each middleware in the pipeline’s defined order.
-
Middleware 1, Middleware 2, and Middleware 3: These are various middleware components, each executing specific logic as the request progresses through the pipeline.
Logic Before: Each middleware has a “Logic Before” section to perform actions or checks before passing the request further. Tasks may include logging, authentication, or request modification.
next(): After completing “Logic Before” actions, each middleware calls next() to forward the request to the next middleware.
Logic After: Once the response is generated and begins its return journey up the pipeline, each middleware can execute additional actions in the “Logic After” section, typically for logging or modifying the response before it exits the application. -
Application Logic (e.g., an API Controller): After traversing all middleware, the request reaches the application logic (such as a controller), which processes the request and generates a response.
-
HTTP Response: The generated response travels back up the pipeline, passing through each middleware again in reverse order, allowing the execution of each middleware’s “Logic After” section. Finally, the response exits the application and is sent to the client.
N
ow let’s create a custom middleware in ASP.NET Core that logs the request time for each HTTP request.
We create a middleware class called RequestLoggingMiddleware
RequestLoggingMiddleware.cs
public class RequestLoggingMiddleware
{
    private readonly RequestDelegate _next;
    private readonly ILogger<RequestLoggingMiddleware> _logger;

    public RequestLoggingMiddleware(RequestDelegate next, ILogger<RequestLoggingMiddleware> logger)
    {
        _next = next;
        _logger = logger;
    }

    // This InvokeAsync method handle the HttpContext
    public async Task InvokeAsync(HttpContext context)
    {
        // Log the incoming request
        _logger.LogInformation($"Handling Request. HttpMethod : {context.Request.Method} || Http Path: {context.Request.Path}");
        var stopwatch = Stopwatch.StartNew();

        // Call the next middleware in the pipeline
        await _next(context);

        stopwatch.Stop();
        _logger.LogInformation($"Finished Handling Request. Request Processing time : {stopwatch.ElapsedMilliseconds} ms");
    }
}
Constructor: Accepts a RequestDelegate for the next middleware in the pipeline and an ILogger to log messages.
InvokeAsync: This method handles the request. It logs the HTTP method and path at the beginning, then starts a stopwatch to track processing time. After calling the next middleware with _next(context), it stops the stopwatch and logs the elapsed time.
To make it easier to add our middleware to the pipeline, create an extension method.
Here is our RequestLoggingMiddlewareExtensions.cs class
public static class RequestLoggingMiddlewareExtensions
{
    public static IApplicationBuilder UseRequestLogging(this IApplicationBuilder builder)
    {
        return builder.UseMiddleware<RequestLoggingMiddleware>(); // Use our custom middleware name
    }
}
This static method extends IApplicationBuilder by adding a custom UseRequestLogging method.
It calls UseMiddleware<RequestLoggingMiddleware>(), which registers RequestLoggingMiddleware in the middleware pipeline.
This allows the middleware to be added in the Startup class with a simple call to app.UseRequestLogging().
And now for logging our information, we install SeriLog NuGet package. From NuGet package manager install this 3 packages
- Serilog
- Serilog.Extensions.Hosting
- Serilog.Sinks.File
After installing the necessary packages, now we can register our custom middleware in our Program class. Here is the code
Program.cs
public class Program
{
    public static void Main(string[] args)
    {
        var builder = WebApplication.CreateBuilder(args);

        // Configure Serilog for file logging
        builder.Host.UseSerilog((context, config) =>
        {
            config.WriteTo.File("Logs/log.txt", rollingInterval: RollingInterval.Day);
        });

        // Add services to the container.
        builder.Services.AddControllers();
        builder.Services.AddLogging();
        builder.Services.AddEndpointsApiExplorer();
        builder.Services.AddSwaggerGen();

        var app = builder.Build();
        app.UseRequestLogging();  // ***** Add Our Custom Middleware ****//

        // Configure the HTTP request pipeline.
        if (app.Environment.IsDevelopment())
        {
            app.UseSwagger();
            app.UseSwaggerUI();
        }

        app.UseHttpsRedirection();
        app.UseAuthorization();
        app.MapControllers();

        app.Run();
    }
}
In here by adding this code
// Configure Serilog for file logging
builder.Host.UseSerilog((context, config) =>
{
    config.WriteTo.File("Logs/log.txt", rollingInterval: RollingInterval.Day);
});
we configure our logging file. And for register our custom middleware we do like this app.UseRequestLogging();
Now if we run our Web API, we can see the logging of each request.
Now we also can create our custom middleware for specific API endpoints. Again we create a another custom middleware called EmployeeActivationleware for only employee routes. For simplicity in this middleware we just add some log information. There was no logic inside this middleware.
public class EmployeeActivationMiddleware
{
    private readonly RequestDelegate _next;
    private readonly ILogger<EmployeeActivationMiddleware> _logger;

    public EmployeeActivationMiddleware(RequestDelegate next, ILogger<EmployeeActivationMiddleware> logger)
    {
        _next = next;
        _logger = logger;
    }

    public async Task InvokeAsync(HttpContext context)
    {
        // Write the actual code logic here
        _logger.LogInformation($"Date & Time : {DateTime.Now.ToString()}: Employee Activation Middleware for specific Controller");
        await _next(context);
        // Write logic here [if any]
    }
}
Now we can directly register this middleware for any specific routes. Here we will use this middleware for /api/Employee routes. Then we can register it in our Program class like this
// Map Middleware for Specific Routes
app.UseWhen(context => context.Request.Path.StartsWithSegments("/api/Employee"), appBuilder =>
{
    appBuilder.UseMiddleware<EmployeeActivationMiddleware>();
});
this will works fine. But we can use extension method for this. If we want to do that again we will create another extension class called EmployeeActivationMiddlewareExtensions
public static class EmployeeActivationMiddlewareExtensions
{
    public static IApplicationBuilder UseEmployeeActivationForEmployeeRoutes(this IApplicationBuilder builder)
    {
        return builder.UseWhen(
            context => context.Request.Path.StartsWithSegments("/api/Employee"),
            appBuilder => appBuilder.UseMiddleware<EmployeeActivationMiddleware>()
        );
    }
}
Now we can just use this middleware like this
var app = builder.Build();
app.UseRequestLogging(); // This is for Request Logging
app.UseEmployeeActivationForEmployeeRoutes() // This is for Specific Routes
Now if we run our application, we can also see the log file with latest update
