Building an Intelligent Task Router for Multi-Model AI Systems with ML.NET
Introduction
In modern AI architectures, we often deploy multiple specialized models, each excelling at specific tasks. A critical challenge emerges:
How do we automatically route incoming requests to the most appropriate AI model?
This article demonstrates how to build an intelligent task classifier using ML.NET that can analyze natural language task descriptions and route them to the correct AI service. This pattern is essential for creating efficient multi-model AI systems where different models handle OCR, speech synthesis, transcription, summarization, and text generation.
The Problem: Multi-Model Orchestration
Today’s AI systems typically combine multiple specialized models:
- OCR models for text extraction from images
- Text-to-Speech (TTS) for audio generation
- Speech-to-Text (STT) for transcription
- Summarization models for content condensation
- Text generation models for creative writing
Without intelligent routing, developers must manually map each request to the appropriate model, leading to inefficient code and poor scalability. An ML-powered task classifier solves this by automatically determining which AI capability best matches each incoming request.
Building the Task Classifier with ML.NET
We’ll create a multi-class text classification model that categorizes task descriptions into five AI capabilities: OCR, TextToVoice, VoiceToText, Summarize, and TextGeneration.
Step 1: Define the Data Models
First, we define our data structures for training and prediction:
using Microsoft.ML.Data;

namespace MyPlaygroundApp.Model
{
    public class TaskData
    {
        [LoadColumn(0)]
        public string Description { get; set; }

        [LoadColumn(1)]
        public string Category { get; set; }
    }

    public class TaskPrediction
    {
        [ColumnName("PredictedLabel")]
        public string PredictedLabel { get; set; }

        [ColumnName("Score")]
        public float[] Score { get; set; }

        [ColumnName("Probability")]
        public float[] Probability { get; set; }
    }
}
Step 2: Prepare Training Data
Quality training data is crucial for accurate classification. Here’s a sample dataset with diverse examples for each category:
var trainingData = new List<TaskData>
{
    // OCR examples
    new TaskData { Description = "Extract text from scanned document", Category = "OCR" },
    new TaskData { Description = "Recognize text in an image", Category = "OCR" },
    new TaskData { Description = "Convert image to text", Category = "OCR" },
    new TaskData { Description = "Read text from photo", Category = "OCR" },

    // TextToVoice examples
    new TaskData { Description = "Convert meeting notes to audio", Category = "TextToVoice" },
    new TaskData { Description = "Read this text aloud", Category = "TextToVoice" },
    new TaskData { Description = "Generate speech from document", Category = "TextToVoice" },

    // VoiceToText examples
    new TaskData { Description = "Transcribe audio file to text", Category = "VoiceToText" },
    new TaskData { Description = "Convert speech to text", Category = "VoiceToText" },
    new TaskData { Description = "Create transcript from audio", Category = "VoiceToText" },

    // Summarize examples
    new TaskData { Description = "Summarize the user's email", Category = "Summarize" },
    new TaskData { Description = "Create executive summary", Category = "Summarize" },
    new TaskData { Description = "Extract main ideas from text", Category = "Summarize" },

    // TextGeneration examples
    new TaskData { Description = "Write a short story from a prompt", Category = "TextGeneration" },
    new TaskData { Description = "Generate marketing copy", Category = "TextGeneration" },
    new TaskData { Description = "Create blog post content", Category = "TextGeneration" }
};
Step 3: Build the ML Pipeline
The ML pipeline transforms text into features and trains a classification model:
using Microsoft.ML;
using Microsoft.ML.Transforms.Text;
using MyPlaygroundApp.Model;

public class Program
{
    public static void Main()
    {
        var mlContext = new MLContext(seed: 42);

        // Load data
        var dataView = mlContext.Data.LoadFromEnumerable(trainingData);

        // Split data: 80% training, 20% testing
        var trainTestSplit = mlContext.Data.TrainTestSplit(dataView, testFraction: 0.2, seed: 42);
        var trainData = trainTestSplit.TrainSet;
        var testData = trainTestSplit.TestSet;

        // Define the ML pipeline
        var pipeline = mlContext.Transforms.Text
            .FeaturizeText(
                outputColumnName: "Features",
                options: new TextFeaturizingEstimator.Options
                {
                    WordFeatureExtractor = new WordBagEstimator.Options
                    {
                        NgramLength = 2, // Use bigrams
                        UseAllLengths = true  // Include unigrams and bigrams
                    },
                    CharFeatureExtractor = new WordBagEstimator.Options
                    {
                        NgramLength = 3, // Character trigrams
                        UseAllLengths = false
                    },
                    Norm = TextFeaturizingEstimator.NormFunction.L2
                },
                inputColumnNames: new[] { nameof(TaskData.Description) })
            .Append(mlContext.Transforms.Conversion
                .MapValueToKey(
                    outputColumnName: "Label",
                    inputColumnName: nameof(TaskData.Category)))
            .AppendCacheCheckpoint(mlContext)
            .Append(mlContext.MulticlassClassification.Trainers
                .LbfgsMaximumEntropy(
                    labelColumnName: "Label",
                    featureColumnName: "Features",
                    l2Regularization: 0.1f,
                    l1Regularization: 0.01f,
                    optimizationTolerance: 1e-5f))
            .Append(mlContext.Transforms.Conversion
                .MapKeyToValue(
                    outputColumnName: "PredictedLabel",
                    inputColumnName: "PredictedLabel"));

        // Train the model
        var model = pipeline.Fit(trainData);
    }
}
Step 4: Evaluate Model Performance
After training, evaluate the model’s accuracy:
// Evaluate the model
var predictions = model.Transform(testData);
var metrics = mlContext.MulticlassClassification.Evaluate(predictions, labelColumnName: "Label");

Console.WriteLine($"MicroAccuracy: {metrics.MicroAccuracy:P2}");
Console.WriteLine($"MacroAccuracy: {metrics.MacroAccuracy:P2}");
Console.WriteLine($"LogLoss: {metrics.LogLoss:F4}");

// Display confusion matrix
Console.WriteLine(metrics.ConfusionMatrix.GetFormattedConfusionTable());
Step 5: Make Predictions
Use the trained model to classify new tasks:
var predictionEngine = mlContext.Model.CreatePredictionEngine<TaskData, TaskPrediction>(model);
var testExamples = new[]
{
"Convert the scanned receipt into digital text",
"Read this paragraph out loud",
"Transcribe this voice message",
"Give me a brief overview of this article",
"Write a story about a robot"
};
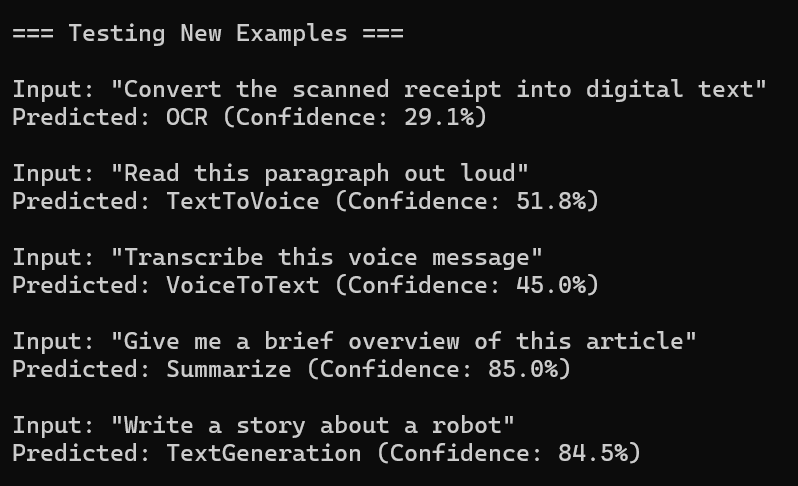
foreach (var example in testExamples)
{
var newTask = new TaskData { Description = example };
var prediction = predictionEngine.Predict(newTask);
var maxScore = prediction.Score.Max();
var confidence = maxScore / prediction.Score.Sum();
Console.WriteLine($"Input: "{example}"");
Console.WriteLine($"Predicted: {prediction.PredictedLabel} (Confidence: {confidence:P1})");
}
Result
How the Classification Works
The ML.NET pipeline performs several transformations:
1.Text Featurization: Converts raw text into numerical features using:
- N-grams: Captures word patterns (unigrams and bigrams)
- Character n-grams: Identifies character-level patterns
- TF-IDF weighting: Emphasizes important terms
2.Feature Engineering: The pipeline extracts meaningful signals from text:
- Keywords like “scan”, “image”, “photo” strongly indicate OCR tasks
- Terms like “audio”, “speech”, “voice” help distinguish between TTS and STT
- Action verbs like “summarize”, “condense”, “extract” point to summarization
3.L-BFGS Maximum Entropy Classifier: This algorithm:
- Learns probability distributions over categories
- Handles multi-class classification efficiently
- Provides calibrated confidence scores
4.Regularization: L1 and L2 regularization prevent overfitting, ensuring the model generalizes well to unseen data.
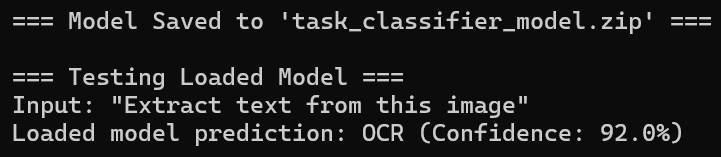
Persisting the Model
Save and load the trained model for production use:
// Save the model
mlContext.Model.Save(model, trainData.Schema, "task_classifier_model.zip");

// Load the model
var loadedModel = mlContext.Model.Load("task_classifier_model.zip", out var modelSchema);
var loadedPredictionEngine = mlContext.Model.CreatePredictionEngine<TaskData, TaskPrediction>(loadedModel);

// Use the loaded model
var newTask = new TaskData { Description = "Extract text from this image" };
var prediction = loadedPredictionEngine.Predict(newTask);
Best Practices and Optimization Tips
1.Data Quality
- Ensure balanced representation across all categories
- Include diverse vocabulary and phrasing for each category
- Add edge cases and ambiguous examples
2.Feature Engineering
- Experiment with different n-gram lengths
- Consider adding custom features (e.g., presence of specific keywords)
- Use cross-validation to validate feature choices
3.Model Selection
- Try different algorithms (SdcaMaximumEntropy, LightGbm)
- Tune hyperparameters using grid search
- Consider ensemble methods for improved accuracy
4.Performance Monitoring
- Track accuracy metrics in production
- Implement feedback loops to identify misclassifications
- Retrain periodically with new data
Real-World Applications
This task classification pattern enables several practical applications:
- API Gateway Intelligence: Route requests to appropriate microservices
- Cost Optimization: Direct simple tasks to lighter models
- Load Balancing: Distribute workload across specialized services
- User Experience: Provide instant feedback about task processing
Next Steps
To extend this solution:
- Add More Categories: Include Translation, ImageGeneration, CodeGeneration
- Implement Confidence Thresholds: Route low-confidence predictions for human review
- Build a REST API: Expose the classifier as a web service
- Add Multi-label Support: Handle tasks requiring multiple AI capabilities
Conclusion
Building an intelligent task router with ML.NET provides a robust solution for orchestrating multi-model AI systems. This approach automates the complex decision-making process of selecting the right AI model for each task, improving both system efficiency and developer productivity.
The classifier acts as an intelligent dispatcher, analyzing natural language requests and routing them to specialized AI services. As AI systems grow more complex, such routing mechanisms become essential infrastructure components, enabling scalable and maintainable AI architectures.
References
Love C# & AI!