📷Building a Face Recognition Attendance System with Next.js, TypeScript, face-api.js, and Supabase
Hi, Devs! 👋
In this article, I want to share my experience building a modern attendance system that leverages face recognition technology on the web. This project was developed using Next.js (a React framework), TypeScript, face-api.js for face detection, and Supabase for backend and data storage.
I designed this system to be easily integrated into various digital attendance needs whether for offices, schools, or communities with a modern user experience and seamless verification process.
🔍 Background
Manual attendance especially with signatures or conventional fingerprint scanners can be slow and even lead to proxy attendance issues. I saw an opportunity for face recognition to solve these problems, providing a faster, more accurate, and contactless attendance experience.
⚙️ Tech Stack & Workflow
This project is powered by several key technologies:
- Next.js: For building fast, scalable, SEO-friendly web apps.
- TypeScript: For structured development and fewer bugs.
- face-api.js: A lightweight JavaScript library for in-browser face detection and recognition.
- Supabase: Backend as a Service supporting auth, database, and storage no need to build your own backend from scratch.
How It Works (Overview):
-
User face registration
Users simply face their device camera. The system captures their face and stores the face descriptor in Supabase. -
Attendance with face recognition
For check-in, users only need to open the attendance page. The system automatically detects the face, matches it against saved data, and logs attendance if there’s a match. -
Data storage & querying
Attendance records and user info are stored neatly in Supabase (PostgreSQL + Storage), making it easy to access for both internal dashboards and further analytics.
✨ Key Features
- Live Face Recognition: Check-in with your face, no need for manual logins.
- Real-time Feedback: The system instantly notifies whether the face is recognized.
- Lightweight Dashboard: Admins can view attendance history and user data through a simple web dashboard.
- Data Security: Raw face photos are never stored only encrypted face descriptors.
- Cross-Device: Works from desktop or mobile browsers.
🚀 Why face-api.js & Supabase?
-
face-api.js
This library is battle-tested, delivers solid performance for attendance use cases, and runs entirely client-side (in the browser), so there’s no need for a dedicated inference server and user privacy is enhanced. -
Supabase
Offers a complete stack for authentication, data, and storage, all ready-to-use. Integration is smooth, documentation is developer-friendly, and features like row-level security keep user data private.
🛠️ Quick Glimpse at the Implementation
The app is modular by design. Here’s an overview of the main architecture and flow:
-
Frontend:
Built with Next.js and face-api.js, users can scan their face directly in the browser. -
Auth & Data:
User authentication and attendance data management are handled via Supabase Auth and tables. -
Face Recognition Integration:
face-api.js performs live face detection and compares the captured descriptor with those in Supabase. If there’s a match, attendance is automatically recorded. -
Dashboard:
Admins can view and download attendance records or manage users through a simple UI.
💡 Challenges & Solutions
-
Face Detection Accuracy:
The main challenge is optimizing lighting and face positioning for accurate detection. The app provides real-time guidance and tips during the scan. -
Data Privacy:
Only face descriptors are stored (never raw photos), ensuring stronger privacy for users. -
Cross-Platform Compatibility:
In-browser face recognition can be tricky across devices. By using face-api.js, I was able to optimize performance and provide fallback options for unsupported devices.
🎯 Who Is This Project For?
- Developers interested in face recognition integration in modern web apps.
- Startups/Companies needing fast, efficient, contactless attendance solutions.
- Communities/Organizations wanting a plug-and-play attendance system just a browser and webcam needed.
🧑💻 Example Code Snippets
1. Initializing face-api.js in a Next.js Component
import { useEffect } from 'react';
import * as faceapi from 'face-api.js';

export default function FaceScanner() {
  useEffect(() => {
    const loadModels = async () => {
      await faceapi.nets.tinyFaceDetector.loadFromUri('/models');
      await faceapi.nets.faceRecognitionNet.loadFromUri('/models');
      await faceapi.nets.faceLandmark68Net.loadFromUri('/models');
    };
    loadModels();
  }, []);

  return (
    <div>
      {/* ... Camera & UI elements here */}
    </div>
  );
}
2. Capturing and Generating a Face Descriptor
async function handleCapture() {
  const video = document.getElementById('videoElement') as HTMLVideoElement;
  const detection = await faceapi
    .detectSingleFace(video, new faceapi.TinyFaceDetectorOptions())
    .withFaceLandmarks()
    .withFaceDescriptor();

  if (detection) {
    // The descriptor is saved to Supabase
    const { descriptor } = detection;
    await saveFaceDescriptor(descriptor);
  } else {
    alert('Face not detected, please try again.');
  }
}
3. Saving a Face Descriptor to Supabase
import { createClient } from '@supabase/supabase-js';

const supabase = createClient(
  process.env.NEXT_PUBLIC_SUPABASE_URL!,
  process.env.NEXT_PUBLIC_SUPABASE_KEY!
);

async function saveFaceDescriptor(descriptor: Float32Array) {
  const { data, error } = await supabase
    .from('users')
    .update({ face_descriptor: Array.from(descriptor) })
    .eq('id', userId);

  if (error) throw error;
  return data;
}
4. Attendance Check: Face Matching Logic
function isMatch(inputDescriptor: Float32Array, storedDescriptor: number[]): boolean {
  // face-api.js has a helper for euclideanDistance
  const distance = faceapi.euclideanDistance(inputDescriptor, new Float32Array(storedDescriptor));
  // Threshold can be adjusted (e.g., 0.5)
  return distance < 0.5;
}
5. Querying Attendance Data from Supabase
async function fetchAttendanceHistory(userId: string) {
  const { data, error } = await supabase
    .from('attendance')
    .select('*')
    .eq('user_id', userId)
    .order('created_at', { ascending: false });

  if (error) throw error;
  return data;
}
🔗 Demo & Preview Video
Want to see it in action?
Check out my short preview video showcasing the app’s features and workflow:
Short Preview Video Showcasing
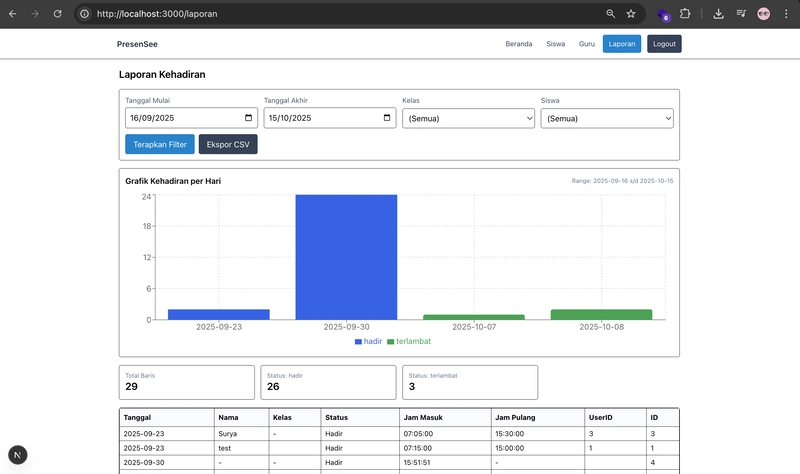
Preview Reports
Thanks for reading!
If you have questions or feedback, feel free to drop a comment below.
Happy coding & stay creative! 🚀
Note:
Full source code, installation guide, and sample configs are available upon request via DM or in the comments.