How to Create an IoT App in Kotlin Multiplatform
In this article, you’ll build a small multiplatform app for Android and iOS that blinks an LED on an IoT device. You’ll use Kotlin Multiplatform (KMP) for shared logic, Compose Multiplatform for the UI, and the Kable library for Bluetooth communication.
Kotlin Multiplatform provides the foundation for sharing application logic. Compose Multiplatform lets you create a fluid, native UI for both Android and iOS from a single codebase. For connectivity, you’ll use Kable, a modern, coroutine-based library that simplifies Bluetooth Low Energy (BLE) communication. This stack helps you build high-performance, native IoT controller apps, reuse the most code, and improve your development workflow.
Introduction
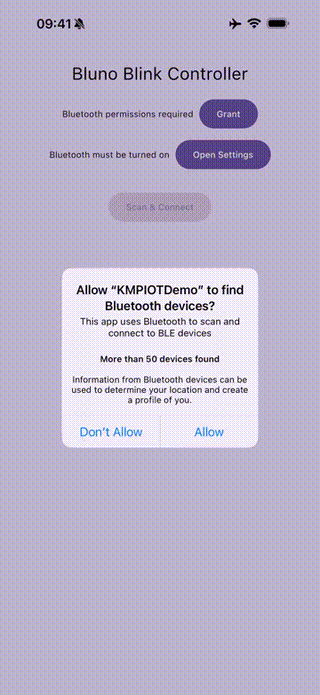
In this tutorial, you’ll create a simple IoT controller app for Android and iOS called “Bluno Blink Controller.” The app will connect to a Bluno BLE device, let you select a number on a slider, and send it to the device. The Bluno will then blink its onboard LED the corresponding number of times. This project shows how to interact with hardware from a shared codebase.
The video below shows the final app controlling the Bluno device.
Bluno blink controller in action
And here’s a video showing Bluno devices in action, blinking in response to commands from the app.
Bluno device blinking
The main reason to choose Kotlin Multiplatform for an IoT project is code sharing. IoT apps often have identical logic across platforms for managing connection states, defining communication protocols, and processing data. KMP lets you write this core logic once in a shared module, which reduces duplication and errors. This approach gives you a single source of truth for your app’s logic while delivering a native experience on both Android and iOS.
While KMP is great for shared logic, you still need to handle platform-specific tasks like runtime permissions and enabling the Bluetooth adapter or location services. You do this in the native Android and iOS source sets. Once you complete the platform-specific setup, a library like Kable can manage BLE communication. Kable provides a unified, cross-platform abstraction for scanning, connecting, and exchanging data with BLE devices, which you’ll use in the shared code.
The atack at a glance
You’ll build the project on a stack where each layer has a clear role, from the user interface down to the hardware. The diagram below shows how these components fit together, with a shared core running on both Android and iOS.
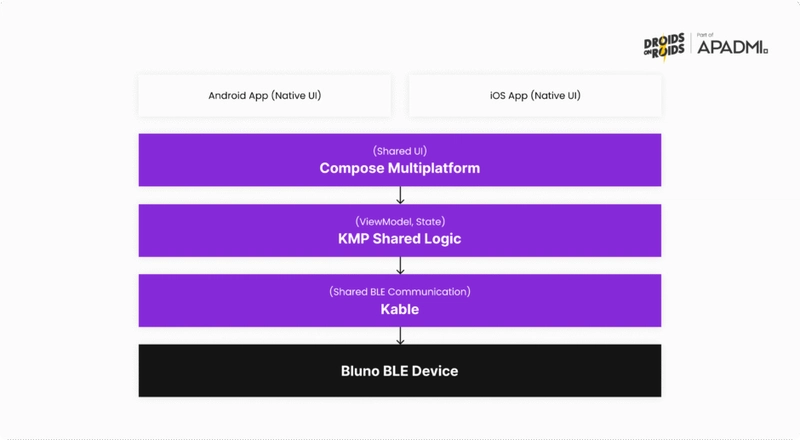
Architecture diagram
Here’s a closer look at each component’s role:
-
Kotlin Multiplatform: This is the core of your project. It lets you share the application’s business logic between Android and iOS. You’ll write all logic for managing connection state, handling BLE events, and preparing data for the Bluno device once in the commonMain source set.
-
Compose Multiplatform: You’ll use Compose Multiplatform to build the entire UI from a single, shared codebase. The screen contains a connection button, status indicators, and a blink-count slider. You only need to define it once with composable functions that render natively on both Android and iOS.
-
Kable: This coroutine-based library is your tool for Bluetooth Low Energy communication. It provides a clean, modern API for scanning peripherals, establishing connections, and reading or writing data to device characteristics. Kable abstracts many platform-specific BLE complexities, letting you write the communication logic once in shared Kotlin code.
-
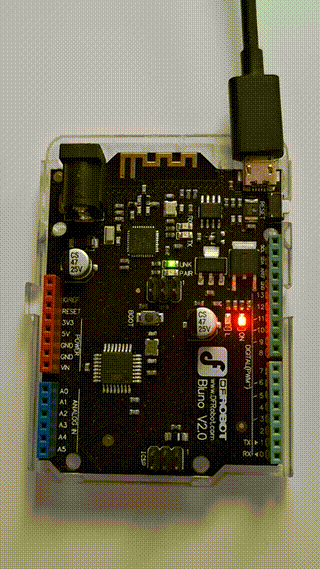
Bluno BLE Device: Your IoT app targets a Bluno device, an Arduino-compatible board with a BLE module.
Meet the hardware: The Bluno BLE device
Before diving into the code, it helps to understand the hardware you’ll control. The Bluno is a microcontroller board based on the Arduino platform. An Arduino is a tiny, programmable computer that interacts with the physical world through sensors, motors, and LEDs. Hobbyists and professionals use it to build interactive electronic projects.
The Bluno is special because it has a built-in Bluetooth Low Energy (BLE) module. This lets it communicate wirelessly with devices like smartphones, making it a great choice for simple IoT apps. The logic on the Bluno runs a C++-based language, and you develop it using an environment like the Arduino IDE. For this project, the device runs a simple script (in arduino/BlunoBlinkController.ino) that listens for a number sent over BLE and blinks an LED accordingly.
This development model is different from mobile app development. Instead of an event-driven UI, Arduino programs run a continuous loop() function that contains the device’s main logic. You also work with significant constraints. A microcontroller has a fraction of the memory and processing power of a modern smartphone, so the code must be efficient. Communication happens through a Serial interface. On a standard Arduino, this would be a USB cable. On the Bluno, the firmware bridges this Serial communication over its BLE connection, letting your mobile app send and receive data like a wired terminal.
For your KMP app to communicate with the Bluno, it needs the device’s specific BLE “address.” This isn’t a physical address but a set of unique identifiers (UUIDs) for the services and characteristics the device exposes. A “service” is a collection of related functions, and a “characteristic” is a piece of data within that service. In our case, the Bluno exposes a serial port service that we can write to.
Here is the specific characteristic our app will target, defined in the shared Kotlin code:
// file: composeApp/src/commonMain/kotlin/pl/droidsonroids/kmpiotdemo/data/Constants.kt
internal val blunoSerialPortCharacteristic = characteristicOf(
    service = "0000dfb0-0000-1000-8000-00805f9b34fb",
    characteristic = "0000dfb1-0000-1000-8000-00805f9b34fb"
)
When you send the blink count from the app, you write to this exact characteristic. The Bluno’s firmware listens for this write event, reads the number, and runs the blinking sequence.
Project setup
The project uses a standard Kotlin Multiplatform structure. The core logic and UI are in the composeApp module. The composeApp/build.gradle.kts file configures key dependencies, including Compose Multiplatform for the UI and Kable for BLE communication.
The most KMP-specific part of the configuration is the kotlin block, where you declare compilation targets. This project targets Android and multiple iOS architectures to support physical devices and simulators.
// file: composeApp/build.gradle.kts
kotlin {
    androidTarget()
    listOf(
        iosX64(),
        iosArm64(),
        iosSimulatorArm64()
    ).forEach { iosTarget ->
        iosTarget.binaries.framework {
            baseName = "ComposeApp"
            isStatic = true
        }
    }
    //...
}
This configuration tells Kotlin to build a native Android app and an iOS framework from the same shared codebase.
Two important settings here are baseName and isStatic.
- baseName = “ComposeApp”: This sets the name of the compiled framework. The iOS app will use this name in its Swift code (import ComposeApp) to access the shared Kotlin code.
- isStatic = true: This configures the framework as a static library. The compiled Kotlin code is linked directly into the final app executable at build time. This is a common way to integrate KMP into an iOS project.
BLE basics & the Kable Mental Model
At its core, BLE communication uses a client-server model. The peripheral device (your Bluno) is the server, which advertises its presence and data. The central device (your phone) is the client, which scans for and consumes that data. The peripheral exposes its features through a standard structure.
- Peripheral: The IoT device itself (the Bluno).
- Service: A collection of related functions. Our Bluno has a “Serial Port” service.
- Characteristic: A specific piece of data within a service. A characteristic isn’t just a value; it has properties that define how you can interact with it. You can write to it (send data), read from it (request its current value), or subscribe to notifications to have the peripheral push updates to you automatically when the value changes.
Kable provides a developer-friendly abstraction over this structure. It simplifies low-level platform details into a clean, coroutine-based API centered on the Peripheral object. This object represents the device you want to interact with.
The typical workflow for connecting and sending data looks like this:
- Scan: Use a Scanner to find nearby devices. Kable lets you filter by advertising data, such as services, name, or manufacturer-specific data.
- Connect: Once you find the target device’s advertisement, you create a Peripheral instance from it and call connect().
- Interact (Read/Write/Observe): After connecting, you can interact with the device’s characteristics. Kable handles service discovery, so you can start making calls right away. You can write() to send data, read() for a one-time data request, or use observe() to listen for a stream of notifications.
In the project, BleRepository encapsulates this logic. The scanAndConnect function creates a Scanner that filters for Bluno’s unique service UUID.
// file: composeApp/src/commonMain/kotlin/pl/droidsonroids/kmpiotdemo/data/BleRepository.kt
val scanner = Scanner {
    filters {
        match {
            services = listOf(blunoSerialPortCharacteristic.serviceUuid)
        }
    }
}
val advertisement = scanner.advertisements.first() // Find the first matching device
For this tutorial, you connect to the first device that matches the service filter. In a production app, you would probably scan for a few seconds, show a list of found devices, and let the user choose one.
Once the app finds the device, it creates a Peripheral and connects to it.
// file: composeApp/src/commonMain/kotlin/pl/droidsonroids/kmpiotdemo/data/BleRepository.kt
private suspend fun connectToAdvertisement(advertisement: Advertisement) {
    peripheral = Peripheral(advertisement)
    peripheral.connect().launch {
        _connectionStatus.value = ConnectionStatus.Connected
        _isReadyToSend.value = true
    }
}
The peripheral.connect() call returns a CoroutineScope that remains active for the connection’s duration. If the device disconnects, this scope cancels automatically, giving you a structured way to manage connection-specific tasks. The UI observes the connection status, which is updated in a StateFlow.
The BleRepository uses two StateFlows to communicate its state to the UI:
- connectionStatus: This flow tells the UI if the app is Idle, InProgress, or Connected. The UI uses this to change the button text (e.g., from “Scan & Connect” to “Disconnect”), show a progress indicator, and display controls only when connected.
- isReadyToSend: This boolean flow controls the UI’s interactivity. It enables the slider and “Send” button when the device is ready and disables them while a command is in flight. This prevents the user from sending multiple commands at once.
The BleViewModel exposes these flows, and the App composable collects them. This creates a reactive link between the back-end BLE logic and the front-end UI state.
Implementing the “Blink Count” feature
With the connection established, you can now implement the main feature: sending the blink count to Bluno. This process involves capturing user input, encoding it for BLE, writing it to the device, and waiting for a confirmation.
1. UI and state management
The BlinkControls composable provides a Slider to select a number and a “Send” button. The screenshot below shows the app’s main screen when connected.
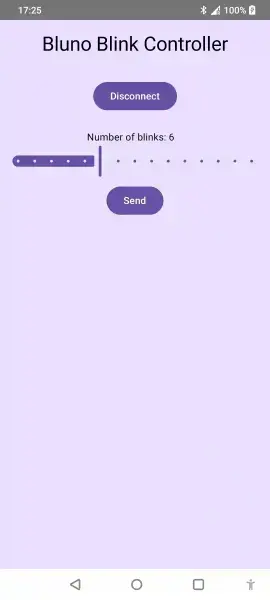
Blink Controller UI
When the user presses “Send,” it triggers the onSend callback, passing the integer value to the BleViewModel. The ViewModel then calls the corresponding function in the BleRepository.
// file: composeApp/src/commonMain/kotlin/pl/droidsonroids/kmpiotdemo/BleViewModel.kt
fun sendBlinkCount(count: Int) {
    bleRepository.sendBlinkCount(count)
}
2. Sending data and awaiting confirmation
The BleRepository handles the logic for sending data and managing UI state. When sendBlinkCount is called, it sets isReadyToSend to false. This disables the “Send” button to prevent the user from sending a new command while the first one is running.
// file: composeApp/src/commonMain/kotlin/pl/droidsonroids/kmpiotdemo/data/BleRepository.kt
fun sendBlinkCount(count: Int) {
    _isReadyToSend.value = false
    peripheral.scope.launch {
        awaitBlinkConfirmation()
        _isReadyToSend.value = true
    }
    peripheral.scope.launch {
        writeData(count)
    }
}
You launch two independent coroutines in the peripheral’s connection scope. The first one listens for the device’s confirmation signal. The second one sends the data. This separation is important because writing the command and listening for the response are distinct, asynchronous operations.
3. Writing to the characteristic
The writeData function is where the app communicates with Bluno. It takes the integer, converts it to a ByteArray, and uses Kable’s write function to send it.
// file: composeApp/src/commonMain/kotlin/pl/droidsonroids/kmpiotdemo/data/BleRepository.kt
private suspend fun writeData(value: Int) {
    peripheral.write(
        characteristic = blunoSerialPortCharacteristic,
        data = value.toString().encodeToByteArray(),
        writeType = WriteType.WithoutResponse
    )
}
Here, you use WriteType.WithoutResponse, a “fire-and-forget” write. The app sends the data but doesn’t wait for a low-level acknowledgment from the BLE stack. This is fine for our use case because we implement our own application-level confirmation by listening for the “C” character.
4. Handling the device response
After the Bluno receives the number, it blinks its LED and sends a confirmation character (“C”) back to the app to signal it is finished. The awaitBlinkConfirmation function catches this response.
// file: composeApp/src/commonMain/kotlin/pl/droidsonroids/kmpiotdemo/data/BleRepository.kt
private suspend fun awaitBlinkConfirmation() {
    try {
        peripheral.observe(blunoSerialPortCharacteristic).awaitConfirmation()
    } catch (_: IOException) {
        createPollingFlow().awaitConfirmation()
    }
}
private suspend fun Flow<ByteArray>.awaitConfirmation() = map(ByteArray::decodeToString)
    .first { it.contains(BLINK_DONE_TOKEN) }
It first tries to observe() the characteristic, which sets up a notification listener. It then waits for a ByteArray that contains the “C” token when decoded. Once it receives this confirmation, the coroutine completes, isReadyToSend becomes true, and the UI becomes interactive again.
The try-catch block handles a common hardware quirk. For BLE notifications to work, a characteristic must include a Client Characteristic Configuration Descriptor (CCCD) that the client app writes to. The Bluno firmware, however, doesn’t expose this descriptor correctly. This is a known issue, especially on iOS, where the Core Bluetooth framework strictly follows the BLE specification and refuses to subscribe to a characteristic without a valid CCCD. This causes Kable’s observe() call to fail.
To work around this hardware limitation, the code falls back to a manual polling flow. If the observe() call throws an IOException, the catch block repeatedly reads the characteristic’s value until it receives the confirmation token. While less efficient than notifications, this polling strategy reliably gets the completion signal from this device. You can read more about this long-standing issue in this ble-serial GitHub thread.
Handling platform specifics
While most of your code is in commonMain, you still need to write some platform-specific code in the native Android and iOS source sets. Here, you handle system-level features like permissions and services before the shared code takes over.
Android
On Android, you must handle permissions, the Bluetooth adapter, and location services.
Android permissions
First, you declare the necessary permissions in composeApp/src/androidMain/AndroidManifest.xml. For an app targeting SDK 31 (Android 12) or newer, you need:
- BLUETOOTH_SCAN
- BLUETOOTH_CONNECT
- ACCESS_FINE_LOCATION
- ACCESS_COARSE_LOCATION
You might wonder why location permissions are needed. On Android, discovering nearby BLE devices can infer the user’s location. For this privacy reason, Google requires apps to have location permission to perform BLE scans. You cannot add the neverForLocation attribute to the scan permission for the same reason.
Android runtime checks
In MainActivity.kt, you implement the runtime logic to ensure all requirements are met before the user can connect. The code does the following:
- Requests permissions: It uses ActivityResultContracts to launch the standard runtime permission dialogs.
- Enables Bluetooth: If the Bluetooth adapter is off, it launches an intent with BluetoothAdapter.ACTION_REQUEST_ENABLE to prompt the user to turn it on.
- Enables location: It checks if Location Services are enabled and directs the user to system settings if they are not.
The official Android documentation notes that intents for Bluetooth, location, and application settings may not always resolve. A device manufacturer might block or fail to implement them. The sample project handles this by falling back to the generic settings screen.
To keep the UI state synchronized, the app rechecks all permissions and service statuses in the onResume lifecycle method. This ensures that if a user enables Bluetooth in system settings and returns to the app, the UI correctly reflects the new state. Additionally, a BroadcastReceiver listens for ACTION_STATE_CHANGED (for Bluetooth) and PROVIDERS_CHANGED_ACTION (for location). This allows the app to react to these service changes in real-time.
iOS
On iOS, the platform handles more of the setup flow automatically, so you write less boilerplate code.
iOS permissions
For permissions, you only need to provide a usage description string in the iosApp/iosApp/Info.plist file.
<!-- file: iosApp/iosApp/Info.plist -->
<key>NSBluetoothAlwaysUsageDescription</key>
<string>This app uses Bluetooth to scan and connect to BLE devices</string>
The first time Kable attempts a BLE scan, iOS automatically detects the required permission, finds this string, and displays a standard system dialog.
iOS Bluetooth service
The flow for enabling Bluetooth is also system-managed. If a user tries to use the app with Bluetooth off, the Core Bluetooth framework automatically displays a system alert prompting them to enable it. This differs from Android, where you must manually create and launch an intent for a similar prompt.
Wrap-up
Real-world IoT is rarely as clean as this sample app. Platform-specific quirks, where devices don’t conform to standards, are just one part of the challenge. You will encounter issues that can affect reliability and user experience. Remember that Bluetooth can be unreliable: connections drop, devices lose power, or users might turn off their devices or Bluetooth.
The current app’s most critical flaw is its inability to handle unexpected disconnects. If the Bluno device loses power or goes out of range while the app waits for the blink confirmation, the UI will get stuck with a spinning progress indicator. Another issue is that the app will wait forever for a device during the initial scan. You can fix both problems by adding timeouts. After a reasonable period, such as 10 seconds, you can abort the scan or connection attempt and reset the UI to its Idle state, letting the user try again. For a better user experience, you could add a dedicated Error state to display a helpful message like “Device not found” instead of just returning to the idle screen.
You should now have a solid understanding of how to build a simple IoT app with Kotlin Multiplatform. The worlds of IoT and Kotlin Multiplatform are evolving quickly, so stay updated with the latest library versions and best practices.