CI/CD on Jenkins of Java web App and deployment to ECS with DevSecOps best Practices
In this post, I will give you a step by step guide on how to deploy a CI/CD pipeline on Jenkins with deployment to ECS. This project will teach you how to use jenkins to deploy pipelines, scan code and docker image with trivy, sonarcloud and OWASP vulnerability scanners. The Results will be emailed to the configured email address and the build status is sent to slack.
Architecture
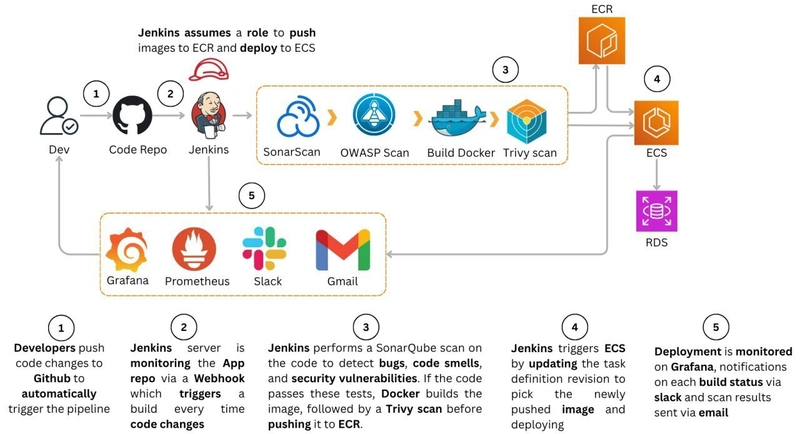
Once the developer pushes code to Github, the pipeline is triggered through Jenkins webhooks. Jenkins scans the code with Sonarqube scanner in sonarcloud, once the quality gates are passed, the code is equally scanned for OWASP top 10 known vulnerabilities and dependencies, next the docker container is build and scanned with Trivy image scan. Once the code and image security are satisfying, the image is pushed to ECR. Jenkins downloads the Task definition and updates it with the new image tag, and causes ECS to deploy the new task definition revision. Once the code is deployed, the team is notified via slack and email with the results of the scan.
Prerequisites
- AWS account
- Gmail account
- Slack account
- GitHub account
- DockerHub account
Project Setup
1. Spin Jenkins Server
Go to the AWS console and spin the instance with the following specs:
- Name: Jenkins server
- AMI: Ubuntu
- Instance type: t3.medium
- Keypair: Create a new keypair and store locally
- Security group: Create new which allows traffic from everywhere
- Storage 20GiB
- Under advance details, post the following for the user data
#!/bin/bash
sudo apt update

sudo apt install openjdk-21-jdk -y

sudo wget -O /usr/share/keyrings/jenkins-keyring.asc
https://pkg.jenkins.io/debian-stable/jenkins.io-2023.key

echo "deb [signed-by=/usr/share/keyrings/jenkins-keyring.asc]"
https://pkg.jenkins.io/debian-stable binary/ | sudo tee
/etc/apt/sources.list.d/jenkins.list > /dev/null

sudo apt-get update

sudo apt-get install jenkins -y

# install docker
# Add Docker's official GPG key:
sudo apt-get update
sudo apt-get install ca-certificates curl
sudo install -m 0755 -d /etc/apt/keyrings
sudo curl -fsSL https://download.docker.com/linux/ubuntu/gpg -o /etc/apt/keyrings/docker.asc
sudo chmod a+r /etc/apt/keyrings/docker.asc -y

# Add the repository to Apt sources:
echo
  "deb [arch=$(dpkg --print-architecture) signed-by=/etc/apt/keyrings/docker.asc] https://download.docker.com/linux/ubuntu
  $(. /etc/os-release && echo "${UBUNTU_CODENAME:-$VERSION_CODENAME}") stable" |
  sudo tee /etc/apt/sources.list.d/docker.list > /dev/null
sudo apt-get update

sudo apt-get install docker-ce docker-ce-cli containerd.io docker-buildx-plugin docker-compose-plugin -y

sudo usermod -aG docker ubuntu
sudo usermod -aG docker jenkins

sudo newgrp docker

sleep 30

sudo systemctl restart jenkins

sudo apt-get install wget apt-transport-https gnupg lsb-release
wget -qO - https://aquasecurity.github.io/trivy-repo/deb/public.key | sudo apt-key add -
echo deb https://aquasecurity.github.io/trivy-repo/deb $(lsb_release -sc) main | sudo tee -a /etc/apt/sources.list.d/trivy.list
sudo apt-get update
sudo apt-get install trivy -y

sudo apt-get update && sudo apt-get install -y unzip
apt install curl nano -y
sudo curl "https://awscli.amazonaws.com/awscli-exe-linux-x86_64.zip" -o "awscliv2.zip"
sudo unzip awscliv2.zip
sudo ./aws/install  -y
rm -rf awscliv2.zip
This user data will install the following:
- Docker
- Trivy
- awscli
- Jenkins
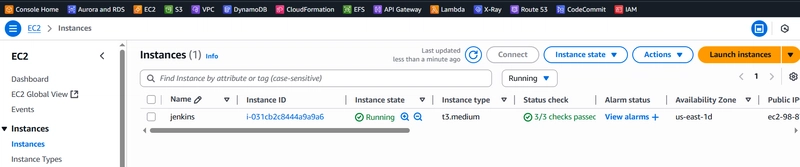
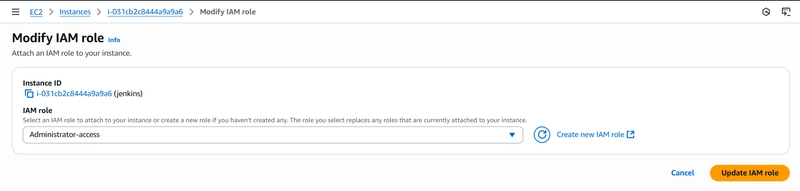
Give this instance an administrator role
- Actions -> Security -> Modify IAM role -> Choose Administrator Access
Wait for the instance to run all the checks, copy the public IP, on a new tab, paste it and add port 8080(jenkins listens to this port) to it, eg http://98.87.166.219:8080. This will open jenkins welcome page.
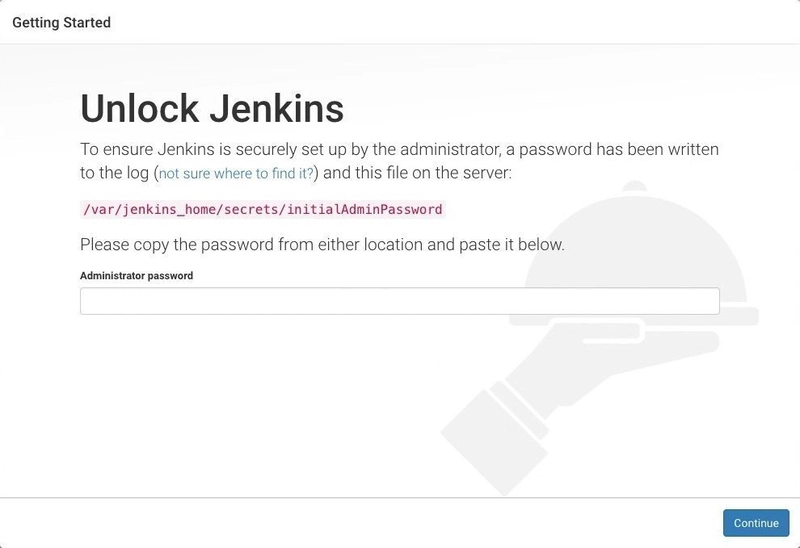
This will open the welcome page of the jenkins UI, now connect to jenkins server by going to the console -> instances -> select jenkins-server -> connect EC2 instance connect -> Connect. On the web cli that opens, run the command to get jenkins password:
sudo cat /var/jenkins_home/secrets/initialAdminPassword
Copy the password and return to jenkins tab and paste it. click on Intall suggested plugins.
2. Install Custom Plugins
On Jenkins, navigate to manage jenkins -> Plugins -> available and install the following plugins:
- maven integration
- github integration
- sonarqube scanner
- slack notifications
- Pipeline: stage view
Install these without a restart.
3. Configure Tools
Create a sonarcloud organization
- Click on the account icon on the top right of the screen
- My Organizations and click create organization
- create one manually
- Give it the name “jenkins-cicd”
- select the free plan
-
-> Create Organization
-
Copy the organization name as it will be needed shortly
Analyse new project
- Display name, give it “jenkins-cicd-project”
- Project visibility: public
- Next
- The new code for this project will be based on: Previous version
- choose your analysis methode: With Github Actions
- Copy the SONAR_TOKEN as will be needed in a safe location
Navigate to manage jenkins -> tools
JDK installations
- name: JDK21
- java home: /usr/lib/jvm/java-1.21.0-openjdk-amd64
SonarQube Scanner installations
- name: sonarscanner
- check install automatically
- version: Sonarqube Scanner 4.7
Maven installation - name: MAVEN3.9.9
- check install automatically
- version: 3.9.9
Apply changes and save to close the tab.
Navigate to Manage jenkins -> System and configure the following:
Sonarqube installations
- name: sonarscanner
- server url: https://sonarcloud.io
- Server authentication token: + add -> jenkins -> kind: secret text -> secret: paste the copied SONAR_TOKEN from previous steps -> name: sonartoken -> add
- Server authentication token then select sonartoken
Gmail
Open your gmail account and click on your profile picture -> manage account -> Security and on the search bar, type App passwords, enter your gmail password(make sure activate 2FA authenticator is activated for your account) and create an App by entering the name jenkins-cicd, you will be prompted with the app password, copy as is and store it in a safe location.
Now return to jenkins webpage -> manage jenkins -> system, search for Extended E-mail Notification fill the following:
- SMTP server: smtp.gmail.com
- SMTP Port: 587
- Advanced: + Add -> Jenkins
- Kind: username with password
- Username: gmail address
- Password: app password generated earlier
- ID: apppassword -> add
- click on credentials and select apppassword
- check “use TLS”
- Default user e-mail suffix: @gmail.com
- default email receipients: the email of the receipients and the same for reply to list, leave the rest as defaults
Scroll down to E-mail Notification and fill the following:
- SMTP server: smtp.gmail.com
- Default user e-mail suffix: @gmail.com
- Advanced: check use SMTP authentication
- User Name: Enter your gmail address
- Password: enter the app password
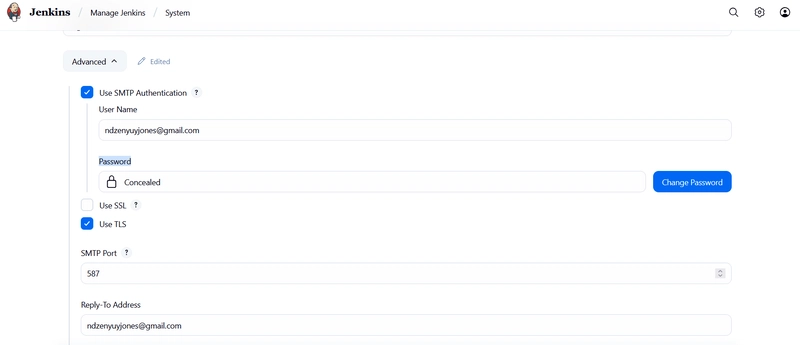
- check: use TLS
- SMTP Port: 587
- check: Test configuration by sending test e-mail
- Test e-mail recipient: enter your email -> click test configuration

Test email successfully sent
b. Slack
Login to slack and Go to https://api.slack.com, click “Your apps”. Create a Slack App -> from scratch:
- App name: jenkins-cicd
- Workspace: pick a workspace -> create
Once the app is created, we click on OAuth and permissions and add go to the bot token scopes.
We add the chat: write, files:write, chat:write.customize, reactions:write, users:read, users:read.email scopes.
Once done adding the scopes, we click install workspace which adds Jenkins to the slack workspace.
In the workspace you what the pipeline to post build results, in our case our app is jenkins-cicd so type:
/invite @jenkins-cicd
to invite the app into our workspace.
Go to the Jenkins Dashboard and click on manage Jenkins + credentials. Click on the global domains where we add your Slack credentials.
Choose the secret text option, the scope option should be global.
The value of the secret is the OAuth token created in Slack. The ID and description can be anything we wish to add.
Check Custom slack app bot user and click test connection:
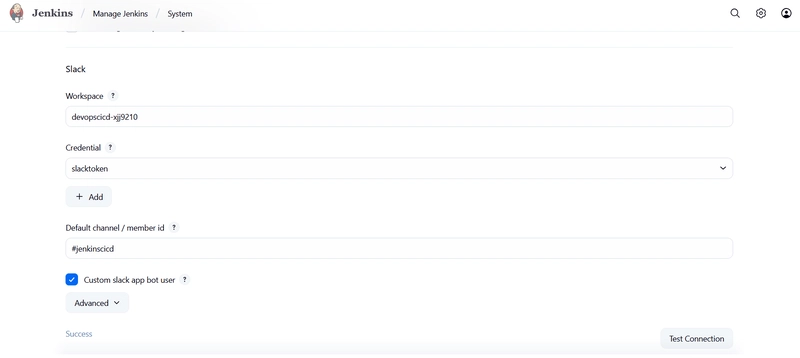
Succesful connection message is shown below
4. Clone the repository and push to github
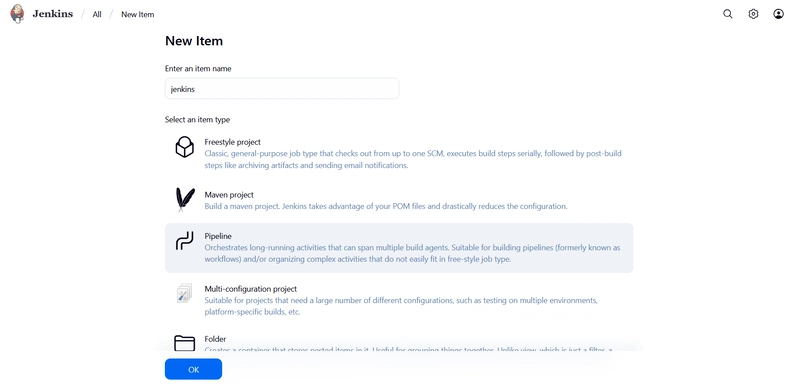
5. Create a Jenkins pipeline Job
Go to the Jenkins tab and create a new job
- Enter an item name: jenkins-cicd
- Select pipeline -> OK
Under the configuration tab that will open
- Triggers: GitHub hook trigger for GITScm polling
- Pipeline -> Definition: Pipeline script for SCM
- SCM: GIT
- Repository URL: Enter ur repo url
- Branch Specifier: */main
- Script Path: Jenkinsfile
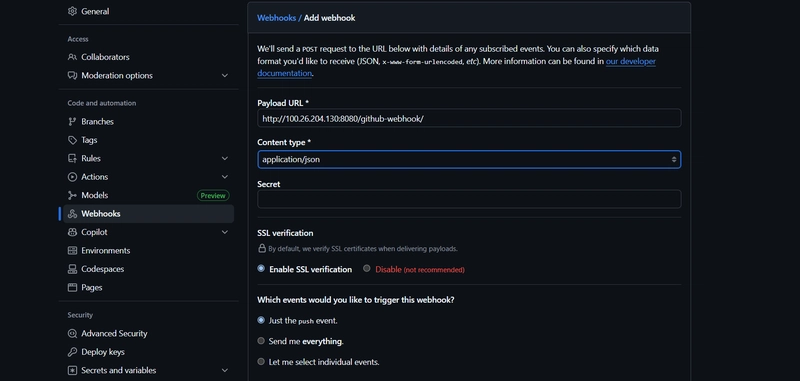
Go to your Github repository and configure webhooks for jenkins pipeline to be triggered every time there is a push. So go to your repository -> Settings -> Webhooks -> Add webhook
- Payload url: http://:8080/github-webhook/ (e.g. http://100.26.204.130:8080/github-webhook/)
- Content type: application/json -> Add webhook
6. Configure DockerHub credentials in Jenkins
Go to Manage Jenkins -> Credentials -> System -> Global credentials (unrestricted) -> Add credentials:
- kind: username and password
- user name:
- Password:
- ID: DOCKER_LOGIN
- Create
7. Create ECS Cluster and run app
Create the task definition
Navigate to ECS service on the console and select task definitions. Create task definition for the service-container that we will be deploying.
- Task definition family: jenkins-task
- Infrastructure requirements: AWS Fargate
- container name: jenkins
- Image URI: copy and paste the image URI from ECR
- container port: 8080
- use log collection = true
- create
- Copy the task definition arn
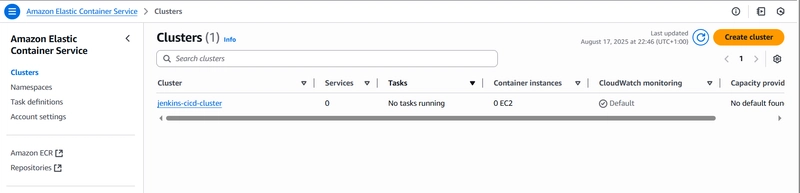
Create ECS cluster
Navigate to the console and create a cluster under ECS service with the following parameters:
Cluster name: ecs-cluster
Leave the rest as defaults and create cluster.
Create ECS service
We have to now create a service for the tasks. Go to create services and configure with the following:
- Task definition family: jenkins-task
- revision: choose the latest
- service name: jenkins-task-service
- Compute options: Launch type
- Desired tasks: 1
Leave the rest as defaults and create
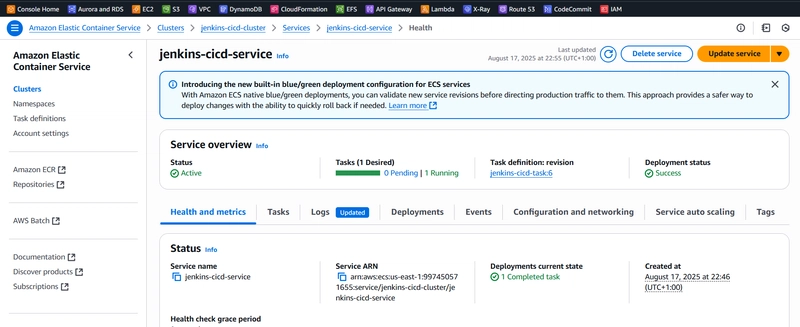
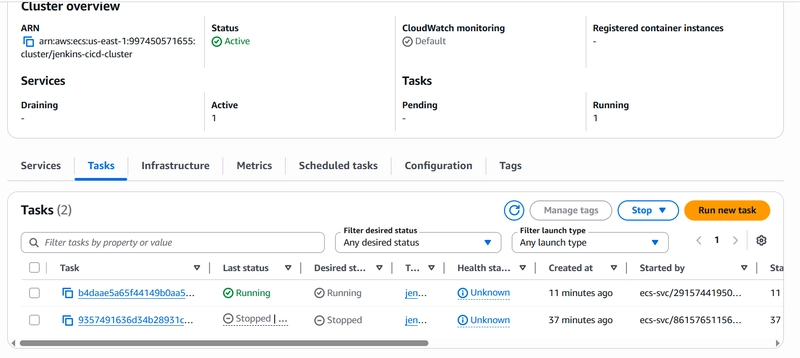
Now click on the Tasks tab, select the running task, copy it’s public IP and run it on a new tab with the container port 8080 (eg. http://52.203.182.243:8080). We should see the app up and running:

Now copy these properties of ECS cluster:
- ECS cluster name
- arn of the task definition
- service name
Update the environment values of the Jenkinsfile in the cloned repository to match those of your running ECS cluster
pipeline {
    agent any
    tools {
        maven "MAVEN3.9.9"
        jdk "JDK21"
    }

    environment {
        SONARSERVER = 'sonarserver'
        SONARSCANNER = 'sonarscanner'
        IMAGE_NAME = '<your-dockerhub-name>/ecommerce-app'
        IMAGE_TAG  = 'latest'
        TASK_DEF_ARN = 'arn:aws:ecs:us-east-1:XXXXXXXXXX:task-definition/jenkins-cicd-task'
        SONAR_PROJECTKEY= 'jenkins-cicd1_project'
        SONAR_PROJECTNAME= 'project'
        SONAR_ORG= 'jenkins-cicd1'
        ECS_CLUSTER = 'jenkins-cicd-cluster'
        ECS_SERVICE = 'jenkins-cicd-service'
    }


    stages {
        stage('Build'){
            steps {
                sh 'mvn clean install -DskipTests'
            }
            post {
                success {
                    echo "Now Archiving."
                    archiveArtifacts artifacts: '**/*.war'
                }
            }
        }

        stage('Test'){
            steps {
                sh 'mvn test'
            }

        }

        stage('Checkstyle Analysis'){
            steps {
                sh 'mvn checkstyle:checkstyle'
            }
        }

        stage('Sonar Analysis') {
            environment {
                scannerHome = tool "${SONARSCANNER}"
            }
            steps {
               withSonarQubeEnv("${SONARSERVER}") {
                   sh '''${scannerHome}/bin/sonar-scanner -Dsonar.projectKey="$SONAR_PROJECTKEY"
                   -Dsonar.projectName="$SONAR_PROJECTNAME"
                   -Dsonar.projectVersion=1.0
                   -Dsonar.organization="$SONAR_ORG"
                   -Dsonar.sources=src/
                   -Dsonar.java.binaries=target/test-classes/com/visualpathit/account/controllerTest/
                   -Dsonar.junit.reportsPath=target/surefire-reports/
                   -Dsonar.jacoco.reportsPath=target/jacoco.exec
                   -Dsonar.java.checkstyle.reportPaths=target/checkstyle-result.xml'''
              }
            }
        }
        stage('OWASP Dependency Check') {
            steps {
                sh '''
                echo "Installing unzip..."
                sudo apt-get update && sudo apt-get install -y unzip

                echo "Downloading OWASP Dependency-Check CLI..."
                curl -L -o dependency-check.zip https://github.com/jeremylong/DependencyCheck/releases/download/v8.4.0/dependency-check-8.4.0-release.zip

                echo "Unzipping..."
                unzip -o -q dependency-check.zip -d dependency-check-dir

                echo "Listing dependency-check-dir contents:"
                ls -l dependency-check-dir/dependency-check/bin/

                echo "Setting executable permission..."
                chmod +x dependency-check-dir/dependency-check/bin/dependency-check.sh

                echo "Running OWASP Dependency-Check..."
                ./dependency-check-dir/dependency-check/bin/dependency-check.sh --version || echo "Failed to run dependency-check.sh"

                ./dependency-check-dir/dependency-check/bin/dependency-check.sh
                    --project "MyProject"
                    --scan .
                    --format HTML
                    --out owasp-report
                    --failOnCVSS 7 || true

                echo "OWASP scan complete, reports in owasp-report/"
                '''
            }
        }

        stage('Building image') {
            steps{
              script {
                sh 'docker build -t $IMAGE_NAME:$BUILD_NUMBER .'
                sh 'docker tag $IMAGE_NAME:$BUILD_NUMBER $IMAGE_NAME:$IMAGE_TAG'
              }
            }
        }

        stage('Trivy Scan') {
                steps {
                    script {
                        sh 'trivy image --severity HIGH,CRITICAL --format table $IMAGE_NAME:$BUILD_NUMBER' // Scan for high/critical vulnerabilities
                        // You can also output to a file:
                         sh 'trivy image $IMAGE_NAME:$BUILD_NUMBER > trivy-report.txt'
                    }
                }
         }
        stage('Push to Dockerhub') {
            steps {
                withCredentials([usernamePassword(
                    credentialsId: 'DOCKER_LOGIN',  // ID from Jenkins credentials
                    usernameVariable: 'DOCKER_USER',
                    passwordVariable: 'DOCKER_PASS'
                )]){
                    sh'''
                      echo "$DOCKER_PASS" | docker login -u "$DOCKER_USER" --password-stdin
                      docker push $IMAGE_NAME:$BUILD_NUMBER
                      docker push $IMAGE_NAME:$IMAGE_TAG
                      docker logout
                    '''
                }

            }
        }
        stage('Remove Images')   {
            steps {
                script {
                    sh 'docker rmi  $IMAGE_NAME:$BUILD_NUMBER'
                    sh 'docker rmi  $IMAGE_NAME:$IMAGE_TAG'
                }
            }
        }

        stage('Update ECS Task Definition') {
            steps {
                script {
                    sh '''aws ecs describe-task-definition --task-definition "$TASK_DEF_ARN" --query 'taskDefinition.{family: family, taskRoleArn: taskRoleArn, executionRoleArn: executionRoleArn, networkMode: networkMode, containerDefinitions: containerDefinitions, volumes: volumes, placementConstraints: placementConstraints, requiresCompatibilities: requiresCompatibilities, cpu: cpu, memory: memory}' --output json > task-def.json'''

                    def taskDefinition = readFile('task-def.json')
                    def newTaskDefinition = taskDefinition.replaceAll(/"image":\s*".*?"/, '"image": "' + IMAGE_NAME + ':' + IMAGE_TAG + '"')

                    writeFile file: 'new-task-definition.json', text: newTaskDefinition

                    sh 'aws ecs register-task-definition --cli-input-json file://new-task-definition.json'
                }
            }
        }

        stage('Deploy to ECS') {
            steps {
                script {
                    sh 'aws ecs update-service --cluster "$ECS_CLUSTER" --service "$ECS_SERVICE" --force-new-deployment'
                }
            }
        }
    }

    post {
        always {
            slackSend(
                channel: '#jenkinscicd',
                color: currentBuild.currentResult == 'SUCCESS' ? 'good' : 'danger',
                message: "The recently built Pipeline *${env.JOB_NAME}* #${env.BUILD_NUMBER} finished with status: *${currentBuild.currentResult}*n${env.BUILD_URL}"
            )
        }

        success {
            emailext(
                to: 'your-email@gmail.com',
                subject: "SUCCESS: Job '${env.JOB_NAME} [${env.BUILD_NUMBER}]'",
                body: """<p>Job '${env.JOB_NAME} [${env.BUILD_NUMBER}]' succeeded.</p>
                        <p>Check console output at <a href='${env.BUILD_URL}'>${env.BUILD_URL}</a></p>""",
                mimeType: 'text/html'
            )
        }

        failure {
            emailext(
                to: 'ndzenyuyjones@gmail.com',
                subject: "FAILURE: Job '${env.JOB_NAME} [${env.BUILD_NUMBER}]'",
                body: """<p>Job '${env.JOB_NAME} [${env.BUILD_NUMBER}]' failed.</p>
                        <p>Check console output at <a href='${env.BUILD_URL}'>${env.BUILD_URL}</a></p>""",
                mimeType: 'text/html'

            )
        }
    }
}
After updating the jenkinsfile on your local machine, push it to your github repository, this push will trigger the pipeline automatically.
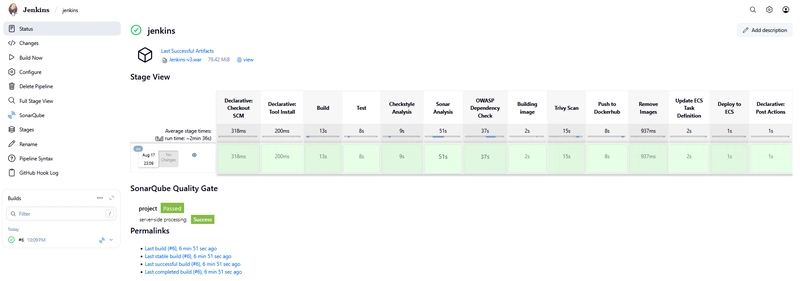
It will build a new container, push it to dockerhub and update ECS to deploy this new container. It will send an email to notify the status of the build, a slack notification.
-
Slack notification

-
Email notification

- Jenkins pipeline stopped the former task and updated it with the new container