Trackable Flask API using EventSource
Setup
APIs are connections between computers to exchange information or data. For a website, we expect them to return a visual change, something as simple as a now different text or a floating message in the corner of the screen.
However, what if the API we are waiting for is taking too long to respond to us? Are we supposed to stare at the screen now? Is there anything else we can do on the website at the moment? Such frustration and panic would ruin the experience of any patient user. And to us developers, the general solution is an API that would return its progress periodically.
In this tutorial, I’m going to introduce an answer to the above issue, by using EventSource class along with a Flask API server. The complete demo is available here for reference
Below are the prerequisites for the demo as mentioned in its README, please make sure they are installed properly before you continue:
- An IDE for a comfortable coding experience, either Visual Studio Code or PyCharm.
- Pyenv, a simple Python version manager. For Windows users, you should use the recommended pyenv-win.
- Python, the programming language used in Flask. This tutorial is meant for version 3 or later.
The Flask server
Virtual environment
Flask is a lightweight Python web application framework that can be used to easily and quickly set up an API server. To set it up, we would need to make a Python virtual environment. This is crucial to prevent potential conflicts with other Python projects in your machine.
If you have properly installed Pyenv, you should be able to run the following command in a desired location:
In Mac OS and Linux: <pyenv> /versions/3.11.11/bin/python -m venv .venv
In Windows: <pyenv> /pyenv-win/versions/3.11.11/bin/python -m venv .venv
Whereas <pyenv> stands for where you have installed the tool in your machine.
Once the command is done, there should be a hidden folder .venv in your chosen location. Any Python 3 version should be fine for this tutorial, so you can replace 3.11.11 in the above command with any desirable version.
The next step is to activate the installed environment, by using this command:
- In Mac OS and Linux:
source <location>/.venv/bin/activate - In Windows:
source <location>/.venv/Scripts/activate
Whereas <location> is where you install the environment. The successful activated environment would be indicated by the prefix (.venv) in your IDE’s terminal.
In case you activate the wrong environment, you can leave it by a simpler command: deactivate. Otherwise, you should continue with installing Flask: pip install flask
The session APIs
We only need 3 APIs for the demo:
- GET /generate: generate strings from 2 arguments: amount and length. It is meant to be trackable.
- POST /session: set up session values.
- GET /: Render a simple web page from the templates folder, as well as setting default session values.
Here is the API to return the index page and getting sessions:

The index page from the server is rendered in your browser similar to any HTML file, except that it has been put through Jinja2, Flask’s default template engine, to assemble it with session values before returning to the browser:

Sessions are values that persist in system memory as long as the server can run, which can be used between APIs. In this tutorial, they determine which set of characters should be used in the string generation API.
Here is the API to set session values, received from the client and return an HTTP response:
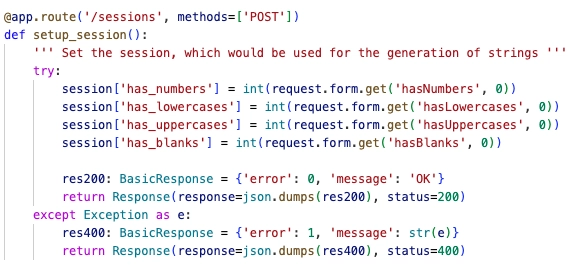
The values are chosen to be numerical for better communication between the client side (Javascript) and the server side (Python), since numbers are the same between 2 languages.
The Javascript/JQuery client
The rendered index page consists of 3 noticeable parts: the checkboxes that determine session values, the form to generate strings and the box for displaying the generated result.
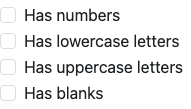

The checkboxes above are used to set and unset Flask server’s session values. They are controlled by the JQuery’s onChange event listener, which would use AJAX to call API:
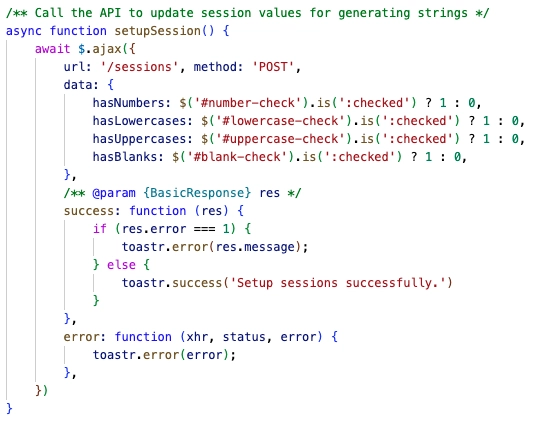
(The function to call the API to send new values for the sessions. Returns a toast message)
The form and the progress bar
In addition to session values, the API to generate strings would require 2 arguments: the amount of string to generate and the string length. The values for them come from 2 number inputs:

Upon submitting the form, strings would be generated and the progress bar in the result box would be updated while the API is running.

The trackable API
Server-side
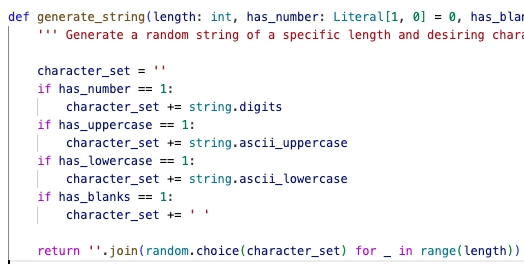
The trackable string generation API would emit a data message after every running instance. These messages are used for handling on the client side by updating the progress bar and display generated string. Here is an example of said message:
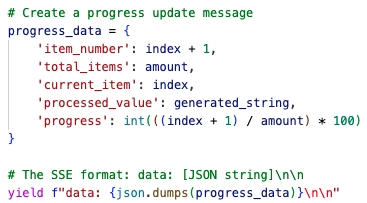
In that message, generated_string is the generated by looping through a set of characters (from the provided session values) and randomly picking one by one until it has the desirable length.
Once the loop is finished, the API should also emit a custom event for the browser to display a toast message.
In order to use session values, the for loop must become written as a function, then wrapped in a stream_with_context. Finally the API should return an HTTP response with a special mimetype text/event-stream.
Client-side
As mentioned, submitting the form would call the trackable API as an instance of the EventSource class. This kind of trackable API, however, is limited to the GET method and cannot accept any payload body, which is why URL arguments have to be used, like in this image:

Every yield from the API corresponds to a JSON-like data being sent to the browser and can be extracted for updating the progress bar and result box:
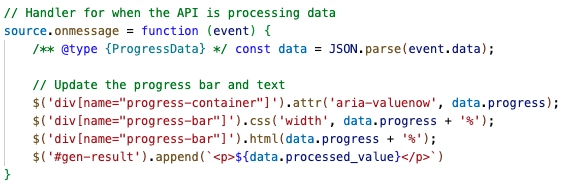
Once the API is done, the EventSource instance should be closed with a toast message, whether successful or not:

Future plan
There are other ways to develop a trackable API, such as WebSocket. This method is more superior due to:
- Allowing other HTTP methods, aside from GET.
- Allowing sending custom payload bodies.
- Allowing intercommunication between client and server.
Perhaps, that can be a tutorial for another day.
I hope you enjoy this tutorial. Let me know if you have any questions by: Github or Email.
Thank you for your time.