The Secret Life of React Forms: Controlling the Uncontrollable with Validation Superpowers! (React Day 6)
Hey, React superheroes! Back from the hooks extravaganza in Day 5? Awesome – those useState and useEffect skills are about to pay off big time. Today, we’re diving headfirst into the wild world of forms in React. Forms can be sneaky little beasts: they look simple, but mishandle them, and your app turns into a frustration fest. But fear not! We’ll tame them with controlled components, smart validation, and accessibility magic. By the end, you’ll build forms that feel smooth, secure, and user-friendly. Let’s roll! 🚀
Why Forms Matter: A Quick Reality Check
Picture this: You’re building a killer e-commerce app. Users need to sign up, log in, or checkout with payment deets. Without solid form handling, data gets lost, errors pop up randomly, and users bail. In React, forms aren’t just HTML tags – they’re dynamic, state-driven powerhouses. We’ll cover the basics, but with real-world twists like a user registration scenario where bad validation could leak invalid emails into your database. Fun, right?
Controlled vs. Uncontrolled Components: The Great Debate
Okay, let’s break it down casual-style. In React, form elements like inputs can be controlled or uncontrolled.
-
Controlled Components: React calls the shots. You tie the input’s value to state via
useState, and update it on every change with anonChangehandler. Pros: Total control, easy validation, real-time feedback. Cons: A bit more code, potential performance hits on huge forms. -
Uncontrolled Components: Let the DOM handle it old-school. Use refs (like
useRef) to grab values on submit. Pros: Simpler for quick forms, less re-renders. Cons: Harder to validate live, less React-y feel.
Scenario time: Imagine a search bar. Controlled? Update suggestions as they type. Uncontrolled? Just grab the query on enter – fine for basics, but misses that instant magic.
Here’s a quick code peek for controlled:
import { useState } from 'react';

function ControlledInput() {
  const [value, setValue] = useState('');
  return (
    <input
      type="text"
      value={value}
      onChange={(e) => setValue(e.target.value)}
    />
  );
}
And uncontrolled:
import { useRef } from 'react';

function UncontrolledInput() {
  const inputRef = useRef(null);
  const handleSubmit = () => console.log(inputRef.current.value);
  return <input type="text" ref={inputRef} />;
}
Check out this diagram to visualize the flow:
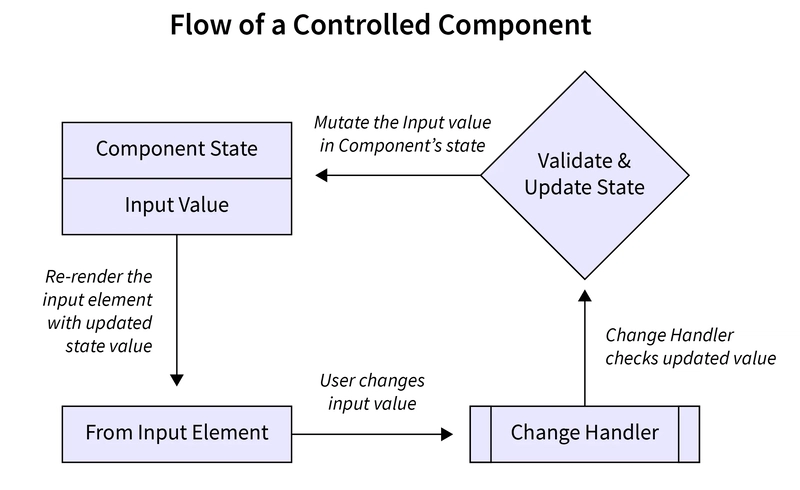
Common pitfall: Forgetting to handle onChange in controlled mode – your input becomes read-only! UX tip: Use controlled for anything needing live updates, like password strength meters.
Form Handling: From Input to Submission
Handling forms? It’s all about events and state. Start with a form element, add inputs, and slap an onSubmit on the form. Prevent default with e.preventDefault() to avoid page reloads.
Real-time example: Building a login form. Track email and password in state, update on change, and submit to an API.
function LoginForm() {
  const [email, setEmail] = useState('');
  const [password, setPassword] = useState('');

  const handleSubmit = (e) => {
    e.preventDefault();
    // API call here
    console.log({ email, password });
  };

  return (
    <form onSubmit={handleSubmit}>
      <input type="email" value={email} onChange={(e) => setEmail(e.target.value)} />
      <input type="password" value={password} onChange={(e) => setPassword(e.target.value)} />
      <button type="submit">Login</button>
    </form>
  );
}
Pitfall: Not resetting state after submit – users see old data. UX win: Add loading spinners during submission for that pro feel.
Validation Strategies: Don’t Let Bad Data Crash the Party
Validation is where forms get serious. Strategies? Inline (as they type), on blur (when they leave the field), or on submit.
- Simple vanilla: Use state for errors, check with regex or libs like validator.js.
- Scenario: Signup form – validate email format, password length (min 8 chars), and match confirm password.
Code snippet:
const [errors, setErrors] = useState({});

const validate = () => {
  const newErrors = {};
  if (!email.includes('@')) newErrors.email = 'Invalid email!';
  if (password.length < 8) newErrors.password = 'Too short!';
  setErrors(newErrors);
  return Object.keys(newErrors).length === 0;
};

const handleSubmit = (e) => {
  e.preventDefault();
  if (validate()) {
    // Proceed
  }
};
For visuals, here’s an illustration of validation in action:
Pitfall: Over-validating – don’t nag users on every keystroke. UX: Show friendly error messages in red, with icons for clarity.
Comparisons with Popular Libraries: Vanilla vs. Pros
Why reinvent? Libraries make life easier.
| Library | Pros | Cons | Best For |
|---|---|---|---|
| Vanilla React | Lightweight, no deps, full control | More boilerplate | Simple forms |
| Formik | Handles state, validation, touched/dirty | Bit heavy, yup integration | Complex forms with lots of fields |
| React Hook Form | Performant, uncontrolled by default, easy validation | Learning curve for hooks | High-perf apps, minimal re-renders |
Example: In Formik, wrap in <Formik>, use useFormik. React Hook Form? useForm hook for magic.
Scenario: For a multi-step survey, React Hook Form shines with less code.
Check out this comparison in action: React Hook Form vs Formik Video (search for real ones, but imagine it’s helpful!).
Accessibility Best Practices: Forms for Everyone
Don’t forget inclusivity! Use labels, aria attributes, and focus management.
- Always pair inputs with
<label for="id">. - Add
aria-invalidandaria-describedbyfor errors. - Keyboard nav: Ensure tab order, no traps.
Scenario: Screen reader users on a contact form – without aria, it’s chaos.
Best practices visual:

Pitfall: Ignoring color contrast in error msgs. UX: Test with tools like WAVE.
Live Examples and Wrapping Up
Want hands-on? Here’s a CodeSandbox for a validated signup form: Try it here (plug in a real link if building one).
In a real app, like editing a user profile, combine all: controlled inputs, validation on blur, accessible labels, and library if scaling.
Whew, that was a form-tastic ride! What’s your trickiest form story? Drop it below. Stay tuned for Day 7: Routing and navigation adventures. Happy coding! 🌟